Flower topiary. Meister-classy. Do-it-yourself topiary: instructions for preparing instant decoration (115 photos) Kula on a stick in a potter
Topiaries are gaining more and more popularity. They are used for the appearance of interior decorations in booths, apartments, salons, boutiques, cafes, offices, etc.
It’s very easy to create a topiary on your own. For this purpose, you can use different materials, depending on the internet, for any purpose. This can be all natural materials (ghouls, turtles, cavo grains, pea shells, beans and much more).
I’ll tell you how I made the bottom and get enough from simple and inexpensive piece kits. What about you?<<раскошелитесь>> on a chic design that is definitely natural, then your topiary will be simply gorgeous!
Besides the quizzes themselves, you still need:
Kulya, on how you label them:
Gilka - stovbur topiary;
glue Moment Crystal;
plaster of Paris, or alabaster;
flowerpot;
acrylic fabric;
sisal, stitches and other decorative embellishments.
We carefully open the hole and insert a pin. We have obtained the basis of our upcoming European tree, as they also call topiaries. To make the process of gluing colors easier, the paper can be wrapped in paper paper and secured with thread.
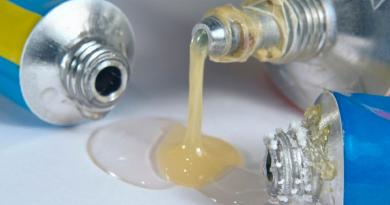
Mix alabaster with water and bring to the consistency of thick sour cream. We put all the details in the flower pots. Before speaking, I just picked up a cap from a can of cava from this episode. I decorated it with stitches, lace, and made a bow. I'm selling my little ones for a lot of money. So axes like these, man-made pots, make a larger drink, lower store ones. It’s funny because they seem to be 100% hand-made.
It’s easy for plaster to catch up, so we immediately put our tree in it. You have to touch a decimal place with your hand until the plaster wants to crumble together. It's almost enough to make you completely dry.
Let's start decorating the cooler. The flower heads are separated into flowers and leaves. We glue the stem of the flower, although it may be chaotic, leaving little space between them. Then we fill the gaps with leaves. You can also vikorize the lines, actually. - Use all your imagination.
Stovbur is covered with acrylic tarpaulin, decorated with tassel and a bow. At the pots we glue sisal in a similar color.
That's all! Small material expenditure, more patience and maximum relish and fantasy - a ready-made topiary!
Topiary with paper servers
I’ll show you how to make an original topiary practically from nothing. It is enough to show a little imagination.
To create such a topiary, I needed:
paper servers;
plastic bag;
tree leaf;
plastic container;
plaster and alabaster;
Titan glue;
knives;
stapler;
paper's vizerunok cola;
satin stitches, nylon of different width;
tasma-merezhivo;
tasma z namistin;
decorative elements (heart);
floral papier.
To prepare paper quilts, I fold the servette in four, using a stapler in the middle. I place the stake template in the center of the serving plate and cut it with scissors. I squeeze the leather ball of the servette to the center, then straighten it out. Leave the little box. For topiary, I’ll add 15-17 of these colors at a time, and during the process I’ll add more if needed.
I make a hole in the center of the hole and insert a nail - the base of the topiary is ready. I wrap the sack with a red servet and fasten it with thread - the squirrels are easier than gluing on a sieve, and the blue sachet will not be visible in the finished product.
I’ll stick some stickers on it. The space that was lost between the cards, I will fill it with all sorts of bows for the stitch, the heart, the measure.
To plant a tree, I dilute the gypsum: I dilute the gypsum with water in a plastic bottle. I don’t adjust the singing proportions, the difference is due to the thickness of the sour cream. I immediately put the items in the flower pots, because... gypsum has the power to overtake a storm. I put the tree in a flowerpot, apply the first 10-15 quills until the plaster leaves the little bits. Before the plaster hangs completely, go through it as quickly as possible.
I wrapped the Stovbur tree with a stitch and braid from Namistin. Like a vikoryst plastic pot. She wrapped it in floral corrugated paper and tied it with living ribbon. I also covered the bottom of the flowerpot (dence) with a piece of paper from that paper. At the bottom of the tree I glued the same flowers from serverets, and added bead stitches between them. The final touch was tying a bow from satin stitch on a tree tree. Everything is a topiary of ready-made servers.
Look, everything is so simple, accessible, cheap, and the result is obvious! Try it and you will have an exclusive experience for all types of life. Among your friends, relatives and acquaintances, there are many lovers and lovers of manual robots, they will be happy for the gift that you gave with your soul and love!
Topiary from handmade robots
The other day I’ll be busy with floristry, and in the meantime I’ll be busy preparing cava trees. I’m planning on holding a master class so that everyone can make a tree like this to decorate their kitchen and work table.
Prepare the following materials:
cavo grains;
plastic ball;
a hole in the tree or what else would it be<<стволом>> cava tree;
alabaster and plaster;
It is possible to install a tree in the yak;
shade of dark brown color;
penzlik;
glue Moment Crystal;
Ornate decor to decorate the walls and flowerpots of wood.
Open the ball and place the ball on the neck - the base of the tree is ready! I buy the ball at a children's toy store (kits for filling a dry pool). In order to avoid sticking the cavo grains into two balls, I use a trick: I wrap the cauldron in a paper cutter and fill it with a dark brown color.
While the farb is hanging, prepare the splitter and place the tree in it. To do this, add alabaster to the prepared container and add water. The mixture should be approximately the consistency of sour cream. So when this problem comes to a head, immediately install the tree. For the first 5-10 weeks, you will have to touch the wood with your hand until the plaster catches a little. Leave the rot until completely dry, until about 100% enough.
And now the most important task is to stick the cava grains. If you are a coffee lover, and you know how to do everything, then you will feel a sea of satisfaction! Believe it or not, I’m glued and enjoying myself!! For my pleasure, I would like to recommend the use of Jardin kava grains, among those available at the best price. I recommend gluing chaotically, but as tightly as possible, so that there are no leaks. I want all the grains to be glued with the round side down, but not too sticky.
Let the pasted grains dry, and you can start decorating the container. In this version I used felt. I pasted over the potter. I added the same felt decorative elements, stitches, and grains. The potter glued sisal. I didn’t glue the cava grains, I just put them in a flowerpot. This is a kind of flavoring agent that can be used to enhance the smell of grains. I colored the stovbur tree with color and tied a bow from satin stitches. So she cut the tree down to New Rock and put a snake, a symbol of rock, in a flowerpot.


Topiary takes its origins from ancient times of the Roman nobility. This word is similar to the Latin “topia”, which means “decorative place”. The Romans had a love for aesthetics; they were famous for being masters of landscape design, “masters of topos,” as they were then called.
Today, topiary is an original composition that is an imitation of a neatly trimmed tree. Vishukana decorative piece will fit perfectly into any interior of the booth, or awkward topiary with paper or richly textured compositions from feathers, coins, rhinestones.
Secrets of the tree of happiness
The floristic tree bears a very respectful sense. This is a symbol of family, wealth and health. Unique decoration pleasantly flows into the energy of the home, and even topiary not only adds success, but also vibrates the intense energy of happiness.
Please! How to interior your booth in classic colors gray gami, you can decorate it with a topiary with a line of cool colors (blue, black). In “warm climates” where there are a lot of dormouse species, choose dark colors for the tree.
An original topiary made with your own hands will become a wonderful gift on a sacred occasion. Such wonders can be created with paper, pieced papers, fabric, grains, feathers, turtles, pine cones, coins, beads - anything you can find in a craft booth. Topiary will be appropriate in any situation:
- New River Ideal gift or decoration element before the winter holiday. A topiary made of sisal, decorated with pine cones, small yaline paws and glittering coulis will look especially original. And if you add sparkles, lurex, tinsel and golden embellishments, the snow tree of happiness can become a miraculous replacement for the new-born yalinka.
Please! Silver and gold go perfectly with contrasting shades (blue, green, red gold). Shiny elements are optimally matched with light, pastel tones..
- Romance of Saint Valentine. A twisted tree or a topiary heart, decorated in black and white and decorated with satin or paper trojans, valentines, fluffy feathers, will become a perfect romantic gift.
- Holy from a colleague. Give your colleague topiary with cavy. Decorated in the color of cavo grapes, decorated with fragrant grains, this tree will wonderfully decorate the office and fill it with a sensitive aroma.
- Mystical Halloween. For the Celtic saint's costumes, go with topiary, watermelon-like designs. Decorate it with canvas, plant an animal figurine with witches, and the spirit of the hidden purity will be instilled in your donkey.
- Gift for a friend. Before your close friend's birthday, you can make a lower topiary from the Trojans. To prepare cakes, take stitches, cutlets, fabric or corrugated paper. There are also small-sized piece flowers available.
Please! It is best to plant a flower tree in a container of white, light, pastel tones. Figured glass vases would be ideal. There you can write a memorial to the memory.
- We're happy. Romantic cheerful topiary will become a popular birthplace among gifts for young people. Decorated with satin, hemlock, pearl beads, sisal, topiary with flowers, we remember the miracle day for a long time.
- Novoseliv. Our ancestors, when they laid the first log for the life of a new house, put a grain crop under it, so that the house would be in good health. The greatest gift in the New Year is this current topiary made from grains. You can take any large grains (dormouse, watermelon, kvass, peas). For decoration, use fabric, twine, and cords.
Topiary in the interior
It is not without reason that topiary is called the “Tree of Happiness.” It is obvious that the interior of the booth is being rebuilt, this viconic fruit brings with it magical strength and brings good luck:
- Kitchen. The owner of the main place in the booth is a cotton topiary with decorative elements made from natural materials (straw, linen, twine). A topiary made from serverets would fit perfectly into the kitchen.
- Childish. Create trees for your little ones using a variety of funny souvenirs. For girls, create a cassava topiary from corrugated paper, and for boys, design a tree in the shape of a soccer ball.
- Bedroom. Preserve the love and loyalty of a friendly couple with the help of topiary with organza, porcelain in pastel colors and decorations with live stitches, stitches and beads.
- Vitalnya. Create an original style with a vibrant, bright, elegant topiary from satin stitches, woven patterns in a secluded style.
The deepest infusion is created by the interior trees, created with clumsy hands. This science is simple, we would like to tell you how to make a topiary.
How to make homemade topiary with your own hands
For the cob, it’s better to try to create a clumsy topiary for the cobs.
Orange tree. For the juiced orange tree you will need at least 3-4 years. What is needed:
- Sintepon.
- Brown threads.
- Gel pen trim.
- A small potter for the foundation.
- Orange tins for decoration.
- Corrugated paper in green color.
- Great yalinka bag made of plastic (whatever).
- Wooden sticks with sharpened ends.
The tools required are a glue gun, scissors, and a stationery knife. Preparation steps:
Krok 1. Stovbur. Let's take one stick and tie two knots of thread to it (on both sides). As a matter of fact, we tie another stick. We continue to knit them until the end, removing the long tails of the threads. We have a deck similar to a wooden kilimka. In the middle, apply a small amount of glue on it and wrap the sticks around the tube. The entire structure is wrapped with thread tails and secured with a knot. For reliability, they can be glued together.
Croc 2 Stovbur, scho vyshov, with the sharp edges of the stick, carefully insert it into the hole on the ring, and press it onto the glue. You can put the grain in the middle of the bag first, so that the tree becomes “unbreakable.”
Croc 3 I will prepare it and glue it to the bottom of the pot.
Krok 4. Beautiful wooden wood in brown color. It would be better to coat the bag itself with green, so as to create an additional layer of leaves.
Krok 7. Spruce it up. Small oranges are shy with orange ones. We plant them in sufficient order on the crown of the tree (securely with glue). Namistins can be used to decorate even the top of our topiary.
The orange tree is ready!
New Cossack. A new topiary in a red-gold style will become a stylish color for your home and create a Cossack mood for the New River.
What is needed:
- Miner.
- Toothpicks.
- Satin stitching.
- Chervona seam fabric.
- Tovsta gilka or cardboard tube.
- Small plastic bags of gold and red coins.
- Kulya base (you can choose polystyrene foam or a floral oasis).
- Decorate for decoration (pine cones, yalinka toys, tinsel, tinsel or sisal).
The tools we need are a glue gun, knives and double-sided tape. Etapi roboti:
Krok 1. Miner. We decorate the pot with red cloth, which is secured with additional tape. A floral oasis and polystyrene are placed in the middle.
Croc 2 Stovbur. The trunk of a mighty tree is secured in the center of the potter. Behind the hole, you can insert a cardboard tube, wrapped in front with yellow satin stitch. The place where the stovbur is assembled is decorated with sisal and tinsel.
Croc 3 Place the upper part of the stovbur on a polystyrene foam or floral oasis (first give it the shape of a stake). The place of fastening is tied with satin stitch.
Krok 4. Glue toothpicks to the cores and place them on the base of the core.
Krok 5. Decor. In a free place between the bags, with the help of toothpicks, we insert pine cones, small strawberry decorations, toys, tinsel, and tinsel. To be sure, we glue them together one by one.
The new enchanting tree is ready! Make a wish on New Year's Eve for a bazaar and a topiary that is bound to come together.
At first, topiary was simply called a garden that had short-trimmed ornamental trees with garden sculptures around it. The current rose under the topiary has an original small tree. If you want to quickly get a small tree of the ideal shape, you can grow it yourself.
At a minimum, these are the elements required for this virus. Such a small list is just a base, without which such a cute globe would not be available.

Required elements:
- Miner/stand;
- Stovbur;
- The basis;
- Crown.
The main virob is called kulya. People are always afraid to go to the last detail, and strict geometry brings them closer to each other every now and then. In the photo you can also see other forms of topiaries, such as a heart.
Today, the basis is taken from a polystyrene plastic blank. In order not to make a spool himself, the master buys a spool at once from handicraft stores, and, therefore, asks the robot to do it.

For a stovbur, you need to take a thick drit, you need to wrap it with a skein (a skein is most often used), or with decorative braid or stitching.

Kvitkova ball for topiary (video)
Making topiaries with your own hands: the basics, step by step
The next stage of the work, where great possibilities are revealed, is the preparation of the crown. Papier is often used, from corrugation to multi-ball servers. The creation of such a crown will require care.

Works made from fabric are also similar, in the photo you can see all the nuances of this work. The popular nini felt is already used in created topiaries, vikoryst and bavovna, as well as satin stitches.
The crown and fabric are complemented with nasties, beads, and gudziki. Why not cut the crown - fruits can be harvested from pistachios. European trees (that’s what these sprouts are called) look even natural. It’s true that you really need pistachios because you didn’t want to grow a tree.

Around the pistachio, kava grains are actively fermented. This technique is used in such a way that you can kill two birds with one stone. The bonsai tree will not be too garnished, so that a special aroma comes out.
DIY thread topiary
Okrema history is a topiary made from different weights of thread. Call up the threads that are the basis of the future crown. To prepare such a tree, you need to wrap a wrapped bag with threads, and carefully, so that the threads sit on the glue. Then the ball swells (just pierce it with a pin) and loses the round porous figure from the thread. Such a thread globe. Just wait for the glue to dry up!

Other threads can be twisted in order to decorate the wood of the tree. It’s not good to take the same threads that the globe is afraid of. Such thread constructions are used in the creation of topiaries. Often it’s easy to put a light on a lamp like this.
Do-it-yourself topiary base (video)
Topiary made from kavi grains: fragrant decor
The seed itself is a wonderful decorative material. For its color and texture, the stench does not compromise the decor of glass beads, Namistin, and its incredible aroma admixes with the quality of cava.

Another such fashionable look of cava topiary with cavy as a cava gentleman. Which tree has handles, a panicle or a whole tailcoat and a cylinder on the head-crown.
Cave topiary is characterized by:
- Selection of grains - large and beautiful ones go to the upper ball of the crown, and small and small ones to the lower one;
- Instead of a potter or flowerpot, you can garnish a cup of cava;
- This topiary can be complemented with chocolate tsukkerki.
The grain can be sprayed with an additional spray or coated with varnish.
Kavove tree (photo by Meister Klass)
The main stage of preparing the basis for the crown you already know. The crown can be buti vikonan not obov'yazkovo in the form of a cool. Once the topiary “heart” is planned, the basis is to use another cardboard template covered with crumpled paper or cotton wool.


Topiary from servers: lower branches
Today's serverets with paper are more of a decorative purpose, less of a casual one. The structure of the servettes and the little ones that live on a wide range of servettes. This includes prepared topiaries.

In this way you can vikoristovuvat serverets:
- Make little flowers, buds, triplets from fragments of the server, and then make compositions from them;
- Glue the top ball of the serverette onto a smooth base for the crown (decoupage principle), covering the ball with varnish;
- Creation of numerous miniature breasts from serverets and gluing these breasts onto the base from the molding of a textured crown.
Servettes are a garnish material for decorating a wood burr or a potter. And here you will need different techniques of decoupage technique. Particularly stunning are the new topiaries with servet flowers and the appearance of textured yawls.
Do-it-yourself topiary made from serverets (video)
Topiary from pine cones: new decoration and guesses about autumn
Such a topiary will become a wonderful winter decoration, and it will bring pine cones to the autumn decor in such a way. Most often, the cones themselves lend themselves to decorative treatments. So, for topiary they are often filled with golden spray (or silver). And with the help of a simple extractor, the original cones without any preparation can actually be turned into white.

Cone topiary is most often a tree with a round crown covered with cones. Sometimes the crown can shape the heart. A new topiary can be created with the appearance of snowflakes and cones. In this case, you should cover the snowflake with piece snow. This can be primarily sea salt, fixed with PVA glue.
As an autumn plant, this topiary also includes chestnuts, acorns, peas and leaves.
Cone decor: Schastya tree (photo by Master Klass)
Let's take a look at the report on the process of preparing a tree of happiness from pine cones in the autumn theme. As the basis will be a polystyrene foam bag, so you can replace it with a bag made with your own hands from any material.


Virib from satin stitches: a tree of happiness with your own hands
Satin stitches are an inexpensive and accessible material that can be used at various stages of topiary production. Most often, the stitches are used as additional decor. They tie the pots, trunks, bows with satin stitches to fill the crown.
Ale is popular and this type of topiary is like a souvenir tree with flowers with satin stitches.

The principle of creating such a tree is simple:
- A bud is formed from satin stitches of different colors, the folds of which are sewn with hidden seams;
- It is necessary to prepare a number of flower buds, which are fixed with hot glue on the base;
- The Stovbur tree is tied with a satin stitch or their threads;
- The gorshchik can also be tied with a thin stitch.

The master class video will show the process of preparing a tree and a stitch in more detail.
Topiary made of satin stitches (video MK)
Autumn topiary: riddles about the golden age
An autumn tree, a souvenir topiary, like nothing else, decorates the little house, as if one would like to add accents of the lyrics of autumn. The most commonly used materials are natural materials, which can be found literally under your feet.
Cones, chestnuts, acorns, dried flowers, berries, peas and, of course, the leaves are actively growing.

This popular type of topiary is a tree with a crown of trojans, made from leaves. So that the leaves do not wilt, they can be soaked with glycerin. True, the process is not so simple, I would like two or three times the amount of glycerin to be absorbed into the leaf through a cut hole. And then three more thick leaves will dry.
Do-it-yourself topiary "School tree" (video)
Sea topiary: souvenir made from turtles

You can create a topiary like this:
- Cover the crown with beautiful dolls, decorating such a doll in one place with decorative sea mirror;
- Wrap Stovbur with satin black or turquoise stitch;
- A gorschnik can become a souvenir kuhol, purchased for repairs, and if there is some kind of symbolic inscription on it - even better;
- At the potter you can throw smooth stones or sea sand.
The replacement of a round crown can be a crown that looks like a heart. And then, in your own drawing, there might be a photo frame, with a canvas of turtles framing a photograph of a seascape.
Topiary in nautical style (photo master class)
MK with baby photos will show you how to create a topiary with turtles in details.


Paper-corrugated topiary
Corrugated paper is cheap, and the number of handicraft items you can use is great. The preparation of topiaries could not be done without the addition of corrugated paper (or crepe paper).

Having prepared the necessary number of colors with corrugated paper, the stinks are glued to the base ball with a heat gun, sealing the crown.
The corrugated paper has a miraculous power - it is plastic, stretches well, which is why the pellets look incredibly believable.
Master class: topiary made from corrugated paper (video)
Topiary "Penny Tree": how to achieve financial well-being
The topiary itself is often called the penny tree itself, although its head is considered a tree of happiness. You can also create such a lucky souvenir with a penny symbol - for which coins or banknotes (souvenirs, coins) are used.

Coins can become a wonderful crown decoration. Only brothers demand ten-ruble coins that are worth gold. They do not require additional painting, varnishing or other procedures. Coins are glued behind the principle of affection, one coin at a time, two more on top of it, so that the first one is in the middle. And after these three coins, other coins are stuck.
The penny tree of their banknotes still looks wonderful, the axis of only the banknote needs to be finely seen. Buds, rolls, birds, etc. are formed from them. Such a penny tree is a wonderful option for a gift for a young family, as their family budget may still be in place.
Penny tree: topiary made of coins (photo by master class Pokrokovo)


New topiary: decorate the booth to the fullest
New souvenir trees are special topiaries that can be made from different materials. Most often, topiaries have the appearance of a yalinka, so that the initially round crown is replaced by the shape of a yalinka.

Cones are used as materials for new topiary:
- Cones– just like the natural look, so is the decoration;
- Tulle or organza For those who can earn the so-called pounds;
- Felt- in itself, its texture, which is a wonderful decor;
- Sequins, For those who can create “Yalinkova Luska”;
- Textile;
- Yalinkova tinsel ta tsukerki;
- Chocolate tsukkerki and beautiful burns.

New topiary is a special decor. A vortex of rhinestones, nastin, glass beads, gudziks, and so many satin stitches just float around. Like a potter, you can make cups that are decorated with cotton wool, servettes on a new theme, tinsel, etc.
Meister class: new tree of happiness (video)
Other options: how you can make a topiary
Anything that is practical can become a wonderful decorative base for topiary. You can combine materials, create eclectic trees, etc.

Examples of topiaries:
- Topiary with Gudziki. Gums of different sizes and colors can become a crown for a tree. The stench is easy to stick to, it’s easy to work with them, and it’s not at all difficult to pick up the gudzhiki.
- Topiary from Paper's Trojans. Paper's books from old sheets of music (the rich people had collections lying around on the mezzanine) look really beautiful - this is vintage, which is so relevant at the same time.
- Topiary with pistachios. Pistachio scallop, whether decorated or natural, can decorate the crown of a tree.
- Topiary made from pasta. Macaroni is a wonderful material for decoration. They are easy to prepare, varnish, and glue together. There was no longer any choice of pasta in the required shape.
Some non-original materials complement traditional topiaries.

Unique topiary design
European trees are a wonderful beauty of the little house. For the kitchen, for the living room, and for other rooms, such trees will become a natural decor. I e Since it is difficult to create today with the material of any kind of topiary (even though it is possible), then it is definitely possible to impress with the form.

Topiary ideas:
- Bonsai from gorobini. Autumn style, sophisticated, natural, simple from the Viconn. The pea has a beautiful texture and color, which can later be supplemented with other autumn foliage. To experience this beauty yourself, watch the master class video. A red pea tree is an ideal autumn indoor gift.
- Heart. The topiaries with burlap linen look great and look like a heart. Often such topiaries are used as an accessory for thematic photo shoots.
- Bonsai made from printed fabric. And this tree will become a decoration for such natural resources as fun. You can make a lot of mini-topiaries, which don’t take much time to create.
- Tree-lamp. Quiet decoration for the home - both for the kitchen and for the bedroom - a nice option.
- Topiary before National Day. ZToday's popular topiaries are not with a crown, but with numbers that indicate the number of fates that have occurred. You can see two stovburi-stems, with a number “sit” on the skin. For example - 30. This could be the same topiary with cavo grains, with crowns-numbers. Well, the potter, no matter how tall the tree, decorates himself on the occasion of National Day.
- Poppy flower with cabbage and burlap. Garny topiary comes from cavoy grains and fabrics that together can fold a poppy seed, and the grain is the core, and the fabric is pellets. Instead of fabric, you can use crepe papier.

With your own hands, you can create a mini-garden from such trees at home. You can use images from the Internet, video instructions, and kitchen decor catalogs as a basis.
Express topiary: master class for cobs (video)
Do-it-yourself topiary (photo)


The secrets of preparing 20 types of topiary are revealed with step-by-step instructions and video lessons.
The history of the origin of the mystique of topiary stretches back to ancient times and was a curly haircut of green shoots. Vivid stands of trees could be found in the gardens of the Roman nobility, whose original form was given by court slave gardeners.
The current topiary is a miniature copy of the tree and bushes, and it is up to the imagination of a kind florist to lay down the shape of the crown of the tree. Topiary is a tree of happiness, which has regained its popularity in current European floristry.
Do-it-yourself topiary for fun
You can make topiary for fun with your own hands. To get started, get acquainted with ideas for the shapes of cheerful topiaries in our gallery. 

Is it not so, the ideas are simply charming? Can you see yourself as a young person if you give them a “merry tree of happiness” as a gift? Or perhaps a celebration is coming up in your homeland, and you can independently prepare wonderful decorations for a cheerful table, inspired by not only an original idea, but also your own craftsmanship.
Axis, for example, we present to you a cool, cheerful decor that looks like a topiary, on which you will not have to spend a lot of money and energy. Please prepare the following materials:
- Original potter for flowerpot
- Hole for stovbur
- Termokliv
- stapler
- Beads
- Namistini
- Cotton pads
- Crepe papier green color
Alright, let's get started.
- Our cheerful tree is made up of three pieces, which we prepare with you from the basic cotton pads from the division of one disk - one three piece
- We fold both sides of the disk to the center in such a way that we have a wide edge on one side, and a sharp edge on the other side, and in the center with a stapler.
- Now carefully ignite the wide edge of the name, and in your hands the first bud of a white trojan will be born
- So you can use other disks yourself - there will be a lot of trojans to store, so wide will be your disk


- Let's start preparing the crown for the joyful tree of happiness. For this purpose, you can use polystyrene foam, pick up newspapers from the bag
- Golovne, so that the material for the base is not important. Wrap the paper around the top of the pipe and secure it with glue until the prepared hole, which will be the trunk of your pipe
- Glue the core to the base of the drill with hot glue
- The offensive attack is the sticking of the Trojans. You need to glue them tightly, press them firmly one by one, so that the base is not visible


- At this stage of the work, you need to take a crepe paper and cut out small squares from it, which will serve as small leaves. Glue them with PVA glue

- It’s okay to plant it on a bouquet in a chaotic order with the help of hot glue.
- The time has come to formalize the miner
- For this purpose, a small, hot container or a jar of yogurt will work wonderfully.
- Place dry plaster in a container and fill it with water until it reaches the consistency of thick sour cream.
- Carefully, in the center, insert the tree of happiness and let it dry well. Ideally, you need to leave it overnight


- The next day, it’s time to decorate the tree trunk. A white namist is pulled onto the thread and the namist is secured under the crown of the tree. We wrap the spiral around the trunk and secure it to the base of the tree with glue. Sizzle with a ball of granular beads
- Regardless of which kind of potter you have chosen for the tree, you can come up with a new decoration for a fun one, and white organza is ideal.
- Tie it with a bow and your cheerful topiary is ready

Topiary for Keliha Meister Klas
If we want to give you a surprise before the fun, then let’s do it in its entirety - give another gift for the betrothed and the betrothed before the beautiful, cheerful topiary. Ale kelikhs will not be forgiven, but rather tsikavim.
You can also make topiary on kelikhs with your own hands. And this means that you will see in them your whole soul and love, hoping for a lot of happy and cheerful fates in your local life.
Video: Master class do-it-yourself cheerful kelikha
Topiary on 8 Bereznya
- Holy 8 Bereznya is respected by women. In this case, everyone is in a joyful mood, regardless of their status or age. Holy, in itself there is no joy and in order to strengthen it, it is customary to give such gifts
- All the time, men gave wives flowers - beautifully decorated bouquets or flowers in pots. And if you want to make your wife happy, you can quickly use the idea of topiary
- There are more options for holy topiaries without faces, and you can always choose the one that suits your family’s heart


Topiary from servers of Troyand Pokrov's instructions
Alright, let’s get down to business – creating Trojandi.
- In order to create this miraculous beauty, we prepare serverets of a singing color.
- It’s almost time to transform them into the buds of Trojans. The skin of the servet is cut into 4 parts
- We take one part of the server and fold it as shown in the photo. It didn’t come in full, by one third
- We can do the same with other parts. For a bud of Trojans you need 2 serverets. And let me tell you, you can regulate the size of the buds yourself


- Nina forms a bud with a twisting method. The skin pellet is shaped with your fingers, giving the bud a round shape. This is what you may get as a result.


- The buds of the troyands from the servers are ready, firmly glued to the root.


- For topiary, until the day of death, you can decorate the servers with white and red colors for the Trojans, and decorate the design with hearts and the arrow of Cupid
- For example, you can take note of this option for preparing trojans


- On Women's Day 8 Bereznya the buds will come in any color. Golovna, create it from the soul and with love, and decorate the topiary itself with decorative elements, which is similar to the saint
 Topiary on New River
The topiary on the New River may symbolize the purity of the area. We have already talked about what is topiary and what are the basic principles of its preparation.
What is this topiary on the New River? You’ve already guessed it – it’s customary to make a birthday cake near the New River. If you decide to make a new tree of happiness with your own hands, then you will be able to reliably secure your tree with durable glue.

 First of all, before cooking, you need to pay attention to its shape. The new topiary can have a traditional round shape, or it can be given a curly shape, such as a yoke shape.
Let us look at a variant of topiary with yalinka bags. You will need to prepare:
- Yalinka coulis in silver or golden color (you can add color coulis)
- Polyfoam for the base
- stick
- Miner
- Foam plastic for coolies
- New design elements - pine cones, decorative berries and fruits
- If you chose a gornik for a new theme, you can lose it in such a way as it is at once. Otherwise, the core must be decorated with satin fabric and secured to the base of the pot with double-sided tape.
- In the middle of the pot, immediately place polystyrene foam, which will be a reliable support for your topiary. In the middle of the oasis, fasten the stovbur - this can be a primary club, burnt with a satin stitch or a cardboard base covered with grub foil or spittle
- At this stage, to the upper part of the wood drill, fasten the polystyrene foam, first forming the shape of the coulee. The axis is the moment when we shape the crown of the tree with our own hands. Our version has the price of new toys-coolies. Place the skin around the culm on toothpicks and glue them onto the base. Carefully insert the toothpicks from the bags into the crown ball.
- If you are going to use large baskets, then the gaps between them can be filled with small baskets and decorated with tinsel and tinsel
- To ensure that your structure is properly trimmed, we recommend, for example, gluing the pieces together

 Don’t be afraid to use your imagination, add or change elements to your own discretion. The firebrand is a rule, so that the stinks join each other behind the color!
DIY topiary
Every day after the holy day of the New Rock, the Holy Rezdva begins. Naturally, your New Year’s topiary can be celebrated at Christmas. Ale! Everyone miraculously knows that once again is associated with the red, white and green colors. If you want to prepare another topiary, then create the decorations for the same ones.
Topiary with fresh and juicy half-bottoms in the appearance of a redwood tree. You can enjoy this delicious midnight decor not only at Rizdvo, but at the holy buffet or jar.
To prepare the Christmas tree of happiness with the appearance of a yalinka, you will need to prepare:
- Cone made of polystyrene foam
- Kharchov's spittle and foil
- The stand looks like a vase or a bowl
- Fresh mint leaves, basil or salad
- Chocolate
- Half - 2 kg
- Tsukrovu powder
- Cannon,
- Toothpicks
- Bows for decoration
Alright, let’s get down to the final process.
- First, carefully press the cone from polystyrene foam to the base using hot glue. Immediately wrap the cone-trunk of a new fruit tart with grub or foil
- Carefully sort through the half and select only healthy flesh from burnt ends, approximately the same size
Lay out on the table all the necessary elements for the work:
- Toothpicks
- Chocolate
- Ozhini berries
- Half-face without green leaves
- Floral pins
- Start the work from the bottom, carefully along the stake. In this case, it is necessary to twist not the cone, but the base. During the day, soak the chocolate in the middle of the heat, place it on a toothpick and attach it to the cone.
- Cover the gaps between the half-parts with minted leaves and basil with the help of floral pins. Try to attach the leaves to a distance of 7-8 cm one way at a time
- You can also insert orange berries in the space between the half-bottoms, which will give your tree an even more original look.
- Decorate the top of the split topiary with carom or decorate the split star with mango or pineapple. If you don’t have one or the other, you can also decorate the top with an original bow
- Before serving, dust half of the face with cinnamon powder to give your tree a more Christmassy look with the effect of snow.

Topiary made from penny bills
There were a lot of hoardings and welcoming emotions in honor of the birthday boy’s gift, which looked like a topiary made from penny bills – a real penny tree!
To prepare such a wonderful gift, you need:
- Hot melt glue, PVA glue
- Newspapers and threads
- Wooden skewers
- Servetka
- Leg-split
- Paper bills
- Coins
- Mishkovina
- Acrylic farb gold color
- Golden lace
- We'll formalize the miner from now on
- You can take the container from the sour cream, or especially for this season, buy an original form of pot for kvitivs
- Fill the top part of the pot with golden acrylic farb and place it aside so that the farb dries thoroughly.
- If you don’t need it, you can apply another ball of farbi
- Coat the top of the potter with PVA glue and wrap it tightly with twine, securing the end with hot glue.
How to earn money for topiary from newspapers
- Place newspapers in a bag approximately 10 cm in diameter
- Wrap the yogo with sewing thread
- Immediately tear the color server and coat the sack with a thin ball of glue
- Stick 1-2 balls of servettes to the core so that the threads are not visible
- Let the glue dry thoroughly
- With the help of a knife, make a hole at the cooler for the future stovbur
- Take 10-15 skewers and tie them together with threads from two ends. Pour a little glue into the hole and insert the skewers with sharp ends. Coat the drill with glue and wrap it tightly with twine. Secure the end of the twine with glue
- Dilute gypsum with water until thick and pour into a pot. Insert the prepared barrel from the spool into the center and hold it in this position for about an hour so that the plaster accumulates well. In another situation, your trunk may become askew
- After 30 minutes you can re-decorate the crown of the penny tree.
- While the plaster dries, prepare the blanks. Why do you need souvenir bills and golden stitches?
- Fold the bill like an accordion, tie it in the middle with gold thread, and glue the edges like a disk. For your cooler you will need approximately 18-20 disks
- Stick the discs onto the bag, starting from the bottom. Your bag is ready
- The infection can be earned from banknotes of various types: svyala, suv, flyers, etc. Glue them in places where it suits you best - so that your tree turns out to be fruitful and fruitful
- It was too late to decorate the stand. For this you can use green moss and sisal. Place a small burlap bag under the tree, put coins in it and tie the animal with a golden thread.
- Your penny tree is a topiary of penny bills, ready. Enjoy its beauty and vistas


Pearl topiary
A topiary made of pearls will become a wonderful decoration for the interior of your room or a cheerful table. There are literally no options for its preparation and all the smells, as you can choose, are simply amazing. Check with someone yourself.

Topiary from tsukerki
Remember that we recently looked at the option of preparing topiary for Christmas. For whom we vikorized our fresh half-face. And now there’s a new proposal - to prepare a topiary from zucchini.
Such an unusual attribute is miraculously approaching some level of purity, but it is holy for us to make it unique and original. You can please not only with your decoration, but also with your interior design.


Video: Master class Bouquet of tsukerki
Video: Topiary from tsukerki until Valentine's Day
Fruit topiary
For fruit lovers, it is not important to prepare topiary for their taste. You can’t just decorate the interior of your home, but you can still remember the beautiful and warm summer. I will show you how to make a colorful decorative topiary from fruits. Before speaking, with this technique you can grow a fruit tree.
Now, let's start preparing the topiary from fruits.
We need:
- Flowerpots
- Droti
- Kulya with polystyrene foam
- Decorative leaves and apple
- Acrylic farb brown color
- Hot glue
- Stitch or Lanzyuzhok
- Wooden skewers – 4 pcs.
- Any element of decor - a snowstorm, a bird or something.
It is worth noting that from a thick shot a steel drill and a fruit tree Gilk are formed. We creak them for the help of a thin dart.


The plaster is filled with water until the consistency of thick sour cream is achieved. We pour sumish at the pot and place it in the center of the stovbur of our future tree.


Topiary made from threads for knitting
If you are engaged in knitting, then, doubtfully, after your work on your skin, you will lose your sewing threads. Express your creative side, thereby inspiring your loved ones with new hobbies - knitting thread topiary.
The technology for producing topiary in this case becomes immutable, but the current appearance has a lot to do with it. To create an original topiary, you can knit different colored balls of thread or knit original flowers from them, which will decorate the top of your tree of happiness.


 And the axis is butt, which knits you can tie yourself. Naturally, it’s not easy to get used to the butt, because, as you are a handicraft, you can come up with a new creation on your own. These can include flowers, pine cones, fruits, vegetables and various figurines of snowstorms, birds, etc.


Topiary with photographs in the middle
Of course, the gift from the tree of happiness with a photograph in the middle will not go unnoticed and will bring a lot of positive emotions to the saint.
It’s not important to create it, you just need to choose the right photo and come up with the shape of the tree crown. This topiary looks original until the day of death.
You can choose the shape of the heart and put your photo in the middle. Intrigued? Zvichaino. Then there is nothing you can do to prepare such an original proposition with your own hands.

 Topiary from available tools
Such a popular decoration for the interior as topiary, it turns out, can be prepared from the basic materials at hand. For decoration, you can use kale grains, pasta and the usual colored papier. Before speaking, the remaining version is ideal for those mothers who want to accustom their child to the point of mastery. Your child will undertake this preparation with great satisfaction.
For this preparation you will need the following materials:
- Color paper
- Wood stick
- A jar of baby puree
- Masking tape
- PVA glue
- Figured cutout with the appearance of a card
If you don’t have such a baby in your house, then before the process of winning the tickets you can get your baby.
So, let’s crumple up the newspaper and wrap it with masking tape. The end of the wooden stick is coated with PVA glue or immediately inserted into the hole, having first made a hole in the hole with scissors. 
 For the help of a flower paper, you can see from a paper of different colors the flowers - you will need about 100 pieces, depending on the size of the sample and the colors themselves.
  Let's decorate our topiary with a garnish bow.
Topiary with felt, photo
Such material, like felt, looks very beautiful on the tree of happiness - topiary. It’s not just an unusual tree that comes out, but it’s more appetizing. You see, you can tell a lot about the great Chupa Chups, which is so loved by affectionate children.
Before this process you can get children, the scraps from this material can be easily processed. Then, as a result, miracles can be created. A little bit of childish fantasy and a gift for the birthday of classmates, ready.


Topiary for cobs with satin stitches
Who among us in childhood did not try to work with the Trojans with satin stitches? Probably, leather. But none of us could realize that a number of such trojans would help create the wondrous beauty of topiaries.
Well, satin stitches, a little bit of designer tricks and topiary can really decorate any place, becoming a wonderful gift before the birthday or on the day of death, serve as decoration on the merry table. Are you suffocated? So let's get started.
Of course, to create a topiary with satin stitches, first of all you need to stock up on satin stitches - choose their colors according to your taste, according to the character of the saint. 
- Just don’t forget to secure the skin underneath with hot glue. Now let's start preparing the topiary. As a rule, we need a miner, a club, and a stick
- We do the same as in the front attacks. We select the design from the stub of a maybut tree and begin to carefully and firmly place the prepared trand on the stub, fixing them with a drop of hot glue.
- The kula is ready, I just need to add a few designer touches and... This is the result. Beautiful, isn't it? With such a gift you can immediately reach your beloved daughter

Flying topiary
And for dessert, we invite you to prepare a little of the unusual topiary - flying. It sounds over-the-top, but it looks bad. I don’t doubt that you are simply hooked on this idea and hurry to find out how you can make such an original topiary with your own hands.
What is the figure like in bad weather? You already have plenty of food - I’m in love with it. Well, you can really earn money on your own, and don’t hesitate.

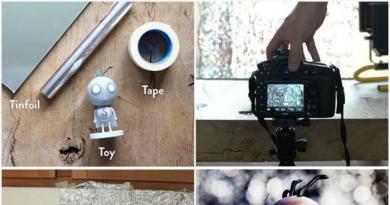
 To prepare “Parks with Kavoy” you will need to prepare:
- Pliers,
- Glue gun
- Cup,
- Saucer,
- Kava Arabica,
- Aluminum fork.
You might be worried about a warehouse material called an aluminum fork. Aluminum because it is easier to bend - we need to bend it with the letter “Zu”, so that the shape of the future waterfall will form.


- Oh dear, the video has been bent. Now we need to firmly glue it with hot glue, one side to the saucer, and the other to the cup. To be sure, secure the animal with tape
- Now we need polyethylene foam, which can be found in the packaging for dishes. Verified according to the width of the waterfall and glued to the fork
- We select large kava grains and begin to paste them onto the stitch on both sides. Quilt so that there is no empty space left. Kawi grains can be glued into balls


- Let the glue dry thoroughly and you can start decorating. Kavo grains can be coated with a ball of varnish. Ale in this vipadku kava is not visible to its aroma. So believe me. Decorate the cup with a garnish bow, place cinnamon sticks on the saucer - in a word, let your imagination run wild
- You already have the basis, and the decoration is in your hands. You have already learned how to make topiary garnishes with your own hands
Master, demonstrate your ideas and delight people close to you with new creations of your creativity.
Video: Topiary with a stitch
Topiaries in individual colors highlight elegance and versatility, and you can create a composition that suits you at any time. Of course, in order to get a truly realistic picture, you have to do a good job of looking at Joden Meister - class! However, the final result may erase from memory all the difficulties of the working process, which will result in the final result.
Such theories are a very modern idea that has only recently acquired its relevance. If you were a human being, you could enter into the food service and become an amateur at the food service, hand made. Golovne – clearly adhere to the proportion and basic principle of work.
The tree itself can be shaped according to the following meaning:
- Become a wonderful gift, both for adults and for their children.
- Act as decor for photo shoots.
- Create a live internet.
Before speech, topiary from grass is better to work in height, even more, with a lower traditional flower composition. It is explained by this that in larger sizes, such a composition looks much more complex and, for the sake of it, we can guess the same tree! However, to replace its living equivalent, topiaries will not have the opportunity to be watered or conditioned with good water.
Unusual ideas for making topiary from kava grains:
The shape of the composition does not change: everything is the same as the rounded tree of the potter. Of course, to glue the crown, it takes a lot of time, and even gluing small fragments of piece grass for an hour can be very tasty and monotonous! You need to be patient! The final result, no matter how hard it is, really comes out of the effort.
Do-it-yourself topiary from piece kits for cobs
Topiary from detailed piece colors begins with the preparation of the “tree” and the selection of the right potter for the new one. The “grow” itself is formed using a winter paper, lashed onto a wooden stick - everything is very simple and laconic. It’s much easier to embellish the vibe in the future. One of the most important factors is the choice and decor of the pot, which plays an important role in this tandem.

Harmony can always be achieved using the materials at hand:
- Stitches, indeed, that decorative mesh.
- The embroidery is planted on the canvas.
- Textile.
- Hand painted acrylic fabric.
- Leg-split.
- Burlap with added decorative elements.
The so-called shabby-chic style, which is highlighted by the flashy simplicity of the line and a certain unbalance, is gaining particular popularity. The potter must be coated with a single-color farba, specially removing wear and tear and under-preparing. If you can’t achieve anything during the process, you can quickly use an emery paper, which will solve all the problems.
When installing a tree in a potter, you need to make sure that it is reliably strengthened. This can be achieved by pouring concrete into the container and leaving the structure dry until it reaches the desired level. Now there is no doubt: the topiary is firmly in place and looks like a must-have for the new decor.
How to make topiary from piece kits with your own hands: cinnamon leaves
Be any master - the class with the preparation of topiary will make this process accessible to everyone: fathers, children, teachers, students. Golovne – it’s important to concentrate your respect and, finally, get rid of the right result.

What is needed for:
- Piece flowers and herbs.
- Plaster.
- Glue.
- Potter for kvitivs.
- Decor of elements.
- Kavo grains.
- Newspapers or thin paper.
In this case, all the elements that are selected can be changed in order according to the wishes of the confectioner. Golovne, so that you can get out of them without getting out of line with the ensemble.
When preparing piece knits for work, it is necessary to remove the stems from the roots, sanding them with an emery paper. In this way, it is possible to ensure greater adhesion of the material to the base. To make the composition look more realistic, the crown of the tree can be wrapped with artificial grass, which gives it a natural look. As “rodzinkas” of the composition, small birds can act, quietly hid in the green foliage.
Topiar will be the same as your master! And this is where the main advantage of such work lies!
Master class topiary from piece kits: what is important
To begin with, the next thing to remember is the following Talmud:
- Meister - class - is just a sketch that can be completely polished.
- There are no favors here, so you can buy everything you can get.
- Once confirmed, the fahivists may have mercy.
Topiary from kvitiv: master class (video)
In order to create a beautiful topiary, you don't need much more. Artificial grass, flowers or decorative elements are, however, welcome to be found in the hands of the best. Especially since the composition is meant to be a gift to a good or close person.
Variants of topiary from piece kits (photo)