How to make a wooden board with your own hands. See the typeboards and those made with your own hands. Templates for the typeboards
There is not a lot of kitchen stuff. Special boards are especially valuable, as they can easily go out of order. To save money on purchasing an item, you can purchase it yourself. Since working with wood is not for everyone, plywood is an ideal option for modeling. The wooden board made from plywood is made quickly with your own hands, the material is cheap, it is environmentally friendly.
Functionality of plywood in everyday life
The complete boards can be divided into decorative and household ones. The decorative option is used to decorate the interior of the kitchen, so the type of material is important. Craftsmen vikorist the most important yak wood species.
Dishkas for everyday needs are less feasible. One mind is the environmental friendliness of the material. Looking at the possibilities of making plywood, it is a universal option that will please any gentleman.
The functionality of plywood in everyday minds is determined by the following points:
- It does not deform under the influence of temperature changes.
- Mitsna is on top.
- Not much masa.
- Plywood can be used for cutting, beating meat, and serve as a stand under hot water.
- It is important to vignet chi polamati.
The wooden board is made of plywood, made with your own hands, you can replace expensive wood, ceramic, non-ecological plastic and broken glass for kitchen accessories with this functionality.
Peculiarities of the Vikonian work from preparation
Housewives want their home not only to perform direct functions, but also to decorate the spaces. When preparing the fabric from plywood, it is necessary to heat it so that the surface of the material cannot be decorated with details. Varto choose other types of decoration.

An aesthetic look is achieved through the use of unique lines, contours and decorative dots that are applied to the surface of the board. To make sure the little girl turns out beautiful and original, give special consideration to the shape.
There are two ways to make boards from plywood: solid and glued. The leather version has advantages equal to those of others. A solid board is easier to prepare, and a glued one is more functional. When starting work, be sure to adequately assess your ability and ability.
Tools for robots
To make a board from plywood quickly and easily, you need to select the appropriate parts for this tool. If the robot is preparing a product for the kitchen first, the power supply for the tools may run out.
To prepare a simple board, you need the following tools:
- If you are wondering how to cut plywood, then the ideal option would be a manual or electric jigsaw.
- To shape the openings, you will need to drill with a set of wood drills.
- Set of sandpaper with different levels of grit.
- Sanding machine.
- Milling machine.
- Rasp.
The set of tools for decorative decoration depends on how and what you decorate the vibrator with.
Layouts of building boards
It is very easy to create wooden boards with visconati plywood, all you need to do is select a paper of the required format, a ruler and a simple sheet of paper. The chair is created according to the following requirements:
- It is necessary to take into account the shape of the future virus.
- Check the dimensions of the finished board.
- Create a sketch on the paper.
- Using a ruler and other chair tools, a layout is created.

On the chair there are marks corresponding to the dimensions and other features of the upcoming virus.
How to make custom plywood boards yourself
A complete board made of plywood is made with your own hands, including material that has a thickness of at least 10 millimeters. Otherwise, the vibration will appear harsh. Then the vinyatkovo-mechanical actions are made using wooden material.
Algorithm for preparing a kitchen board from plywood:
- The sketch of the future virobu is transferred to the plywood board. During the process of moving the chair, you can change the ruler. You can draw the little ones and describe them on plywood.
- Virize the current vibration behind the contour. Straight lines are formed using a circular saw, folding shapes are formed using a jigsaw.
- The edges of the contour cuts are sanded using an emery paper, a grinding machine or a file. The tool is selected according to the shape of the cut.
- The hole in the handle is drilled and the working surface is sanded.
- Decorative additions are subordinated to further functionality.
- The virus must be infiltrated in a dry warehouse in order to maintain the term of operation.

Preparing a board using the gluing method involves a very different algorithm: carve out the details, polish the skin edge of the part, trim the elements, combine them into a single composition.
Optimal forms for manual vikoristan
Handiness and functionality are demonstrated by the shapes of the chalkboards. The best option is rectangular, oval and round shapes. These are standard solutions for such viruses.
The wooden board made of plywood, made by hand, is not only beautiful, but also handmade. Current design solutions for kitchen appliances ensure all functional features of the product.

Current models are available. The board is taking off, the pallet is slipping. Vegetable waste can be removed from the container so that the stench does not interfere with the slicing process. An analogue is boards with a compartment for exits. Technologically, it looks like a hanging screen in a desk. The shape of such viruses is rectilinear.
Kutova doshka is being prepared for kitchens where there is very little space. Due to its unique design, the board can be installed perpendicularly to the surfaces to protect the work area.
A board on legs is a unique option that can easily replace a folding board with a separate mechanism or a vibrator with an exit compartment. A plate is installed to serve as a container for collecting waste.
Improved boards
Garni made of plywood boards are the result of decorative finishing. Due to the peculiarities of the material, such an option as cutting with plywood is excluded. In this case, there are no sufficient decorative options to enhance the aesthetics of the room.

The functional option is to remove the baby from scorching the surface of the pot. A little girl with such technology can be used for purposes or even have a decorative character.
You can paint a wooden canvas. A child like this would be absolutely beautiful. Vikonannya of elementary zagliblennyh bridle edges can be effectively painted on the top of the board.
In order to prevent the spread of moisture and ensure a uniform color, the board is coated with mineral oils. The stench is absolutely not harmful to health and is good to leach onto a wooden base.
Those who are hungry for the Lord cannot do without a meal - the discussion is not allowed. Only one axis of the large assortment of high-quality products is not the size and geometry, another is the new design, the third is still in place. The repercussions of such “claims” can be continued ad infinitum.
It’s also possible to solve the simple problem of the optimal option for a home-made dough – to make it with your own hands from wood. Knowing certain features of technology means forgiving this robot.
First of all, what kind of food do home masters ask for, who are looking for sufficient satisfaction from a robot with wood - which breed is more beautiful than the vikorist one?
First of all, it is necessary to clarify for what purposes it is being prepared. Many times, gospodarok always carry not one, but at least two sticks under your hand, for various products. Moreover, stinks differ both in the thickness of the tree and in size (and, therefore, in the ease of placement on the table). Therefore, you first need to be aware of the specifics of the further design of the board - it is intended as a universal attribute or for a specific purpose. For example, for working with meat, there is hardly any sense of working with its massive size, since processing by chopping and curing the patty, for the purpose of removing meat with brushes, is not carried out.

In addition, the children’s deeds have not been victorious for direct reasons. They are prepared with a special hand for embellishment of the vest. This stench is only part of the decoration for the beautiful interior of the booth (country and a number of others). Well, first of all, there is such a criterion as the artistry of the design of the finished board, and whether it is valuable or durable. For this type, you can get by with multi-ball plywood, and not rely on the type of wood. The cheapest variety with all the same parameters is . Due to the presence of adhesive carcinogens, the leaves themselves are recommended for internal use.
In another way, it is also significant to the extent that the detailed structure is intensely vikoristic. Since he is prepared “for all kinds of situations,” such a demonstrator, like value, is not obliged to go to another plane. It is intended for the purpose of highlighting the significance of the vantage, with the assurance that the cutting of the same brushes will be created on it.
Thirdly, the kitchen, regardless of its type, is located not only with a supernatural environment. There are significant temperature changes from time to time. There is enough to understand - no matter how wood is suitable for a sample board.
When choosing a wood species for a sample board, it is necessary to respect the following criteria:
- Minimal moisture content, otherwise the kitchen will be slightly swollen. The result is deformation of the working surface of the worktop. This is a support for which it is unlikely to be required in case of a strong change in geometry;
- sufficient value. Otherwise, with point impacts (it is important during the cutting process), the board will gradually become covered with deep dents. Well, stay away from the search for direct reasons - under the great nutrition. There is no doubt about the possibility of distributing the material. Plywood, which is probably the most expensive type (for example, FB), is definitely not suitable for processing meat.

Reinventing exotic breeds is a no-brainer - they are only used for sample boards by professionals (Hevea, too), who prepare original specimens for processing, and the masters don’t need them. Tim, who intends to build such a board for his household needs, I bet cut into birch, acacia, pine, oak, beech, pear, cherry. This kind of wood is pliable in cutting, has great value and is also inexpensive.
Dimensions of a sample board
What kind of food should you choose for many home masters - what linear parameters should you focus on? There is no standard for the production of boards, just like the generally accepted norms. Making them from wood with your own hands, all dimensions are calculated quite well.

What to consider when choosing the size of your dog:
Handling of the robot
First of all, you can tell what skin area is optimal for processing these and other products. Therefore, it is necessary to adhere to the principle of sufficiency before the size. Since the plate is made mainly for meat, then its dimensions are chosen to be much larger, and the axis for shaking the sheep, for example, is to be very small. Otherwise, in any case, products are collected at one time. Aje sіm'ya z 3 osіb or 5 – 6 – not the same. Thirdly, it’s important, where and how the work place, gentlemen, is treated basically. Would it be possible to place a big baby there?

Availability of inventory conservation
I say again, that’s what the gentleman means. A man’s task is to make it with his own hands, and the final product (dimensions, shape, etc.) is a woman’s decision. Some people prefer to save such accessories from the kitchen cabinet, while others prefer to hang them in the kitchen – there are plenty of options. The smut, so that in everyday life the child does not fall into disrepair, does not respect him, and is always under his hand.

The procedure for preparing a sample board
There are no fragments of anything foldable in this robot, it is enough just to overthink the main technological operations:
- Layout of the wooden blank behind the folded chairs. To make the board more handy, it is necessary to transfer the handle. The caveat is that the latent axis of the virus is responsible for growing. Otherwise, the center of your head will shift, and it will become difficult to get involved with this kitchen attribute.
- Reveal the tree. The material is fairly lightweight; it is enough to quickly cut it with a jigsaw or a knife (for metal, with fine teeth). This is to ensure the most accurate results. It is especially important that you prepare with your own hands not just a detailed board, but a folding form (figurative).
- Cutting edges. Every ruler will always have at hand some kind of abrasive (“skin”, or sharpening stone) or an additional tool (file, grinding machine). All the corners and edges of the finished board that came out must be sharpened in order to gain the loose hair that was lost after sawing the microscopic cod and so on. There is a double problem here. First of all, after scrubbing the board, you won’t have to take the rolling pin out of your hands. Otherwise, other fractions of the tree, which were lost after opening, can be lost in products that will be formed.
- I'll open the door. It may be in your hands, although it’s not overwhelming. If you work on it in advance, then next year, when you need to, I’ll make sure to hang the board here in your hand, there won’t be any problems.


- Since the door is kept in a visible place, one side should be left for work, and the gate should be decorated artistically. Options depend on your imagination - paint and varnish, glue, laminate with decorative melting, etc.
- Daily life is most often formed in the singing style, fortunately, the choice of materials is sufficient. Therefore, it is important to choose the appropriate shape of the standard board, and not be limited by the traditional rectangular or square.

- Wood is suitable for low parameters in the preparation of such a kitchen attribute. There are also some shortcomings that require care. For example, birch is good for general wood, but the structure of the board is porous, so this lumber is subject to increased hygroscopicity. It’s difficult to make a choice - first choose a specific type of wood, you need to consider the whole selection and save this kitchen attribute. The same oak, although it is soft, water-resistant, and the flooring is thick, so that the wood is small and has a significant value. And that’s just down to the ease of operation.
The axis, in principle, is all. And when I decide to make a board with my own hands from wood - the size, shape, external design - it’s up to you, shady reader.
What boy in childhood didn’t pick something out of a tree?! This newbie may come in handy if you decided to make the board with your own hands. It’s crazy, in the store you can buy a ready-made doshka for your mother, friend or girlfriend. Apart from the greater stench of the spared soul, that is, the unique aura that one brings from the river with one’s own hands. And since it is also decorated with the same laser engravings - yes, the same thing that you can buy from the famous Drevoshop - then there is no doubt: such a souvenir would be worth appreciating no matter how much of a woman you are!

Technology for preparing sample dough at home
In every case you can find pieces of some kind of board, plywood is suitable, or better yet, to prepare a complete board, vicorize a whole solid wood. In order for the board to show increased mechanical strength and not crack under the injection of a knife, use hard wood species: oak, modrine, ash, maple, pea, cherry. And the beech and birch axes are not good for these purposes - the stinks are already actively absorbed by the water through a ball of varnish.

To prepare a finished board, you need a few materials that are easily found in any apartment: a ruler with a ruler, a jigsaw, an emery paper. A sanding machine will be a great help. The steps involved in preparing the test board are reasonable and logical.

- An outline is drawn on the scrap of wood. It is best to have a classic rectangular shape with rounded edges at home. If you wanted to make a handle, you need to make it strictly along the central axis of the board.
- Using a saw with fine teeth, we cut the shape along the contour or a couple of millimeters more - they can be useful for the final processing of the finished product.
- We round the corners with the help of a curved jigsaw behind the front edges of the dowel.
- Now comes the most advanced stage of the work - the thorough sanding of all surfaces of the board with sandpaper or, perhaps, a sanding bench. It is necessary to achieve perfect smoothness on all sides, paying particular attention to the end faces. Any parts of the tree that are lost can be absorbed into the human body, which is not only awkward, but also dangerous.
- We're drilling the hole by hand and thinking about how to decorate the masterpiece that's great!

How to decorate the board
First you paint and paint the board, you must clean it with a saw, dry it and treat it with hot oil, which has a bactericidal effect. Oil cannot only be used to painlessly process the board for processing any grub products, but also to grind the wood, increasing the service life of the plant.

You can decorate your home in a variety of ways. One of the latest trends is the decorative technique of decoupage. The point is that stamped and prepared fragments of paper and servettes are glued to the surface of the board, covered in front with a primer, and the surface is covered with varnish. Vikonana, with the old rules of decoupage, will delight the little boy with his new look and unique texture.
It’s time to give your loved ones a gift with laser engravings. This unique way of decorating carved wooden objects, with its range of possibilities, is offered by the Drevoshop store. For additional engraving, you can also emboss the name and greetings on the address of the jeweler, and then apply a folding pattern of different colors. Laser engraving is absolutely harmless to health and practically does not cause wear. The detailed board was made with your own hands, decorated with gravel, it will please any woman!
The last moment of great popularity came from the end plates. What is it and why the stench comes out of the wooden boards that are in the kitchen? Everything is simple here: we have standard education boards the wood fibers are parallel to the surface of the board, and the end grains are perpendicular. This key importance gives the end panels a slight advantage over their counterparts. Smut: the end board wears out less, and the blade with which you cut the products on this board is less dull. And all the geeks run the knife along the fibers. When the end plate is twisted, it is as if the fibers are being pulled apart, and therefore they rotate at the exit position. In this case, both the heat of the knife and the board itself suffer less. At the end of the original board, the bottom is simply thinner than the wood fibers across, which makes the board thinner and blunts the bottom. With intense squeezing, the pieces of wood may become firmed up from the boards. For the sake of clarity, I have painted schematic pictures:
Originally made board - the bottom cuts through the fibers  The end panel is formed - the fibers are pulled apart and then rotated on the surface.
The ends of the boards are ready to pay for hardwood trees: oak, clear, pea, cherry, maple. Exotic breeds are also sold in small quantities through their high variety. The simplest end boards are simply straight bars of the same type of wood glued together at once, and there are also folding options that combine bars of different shapes and different species, for different colors and textures, for picking up the little baby on the surface of the board. There are truly unique images from the so-called 3D baby.
 butt 3D boards from the company MTM wood (https://mtmwood.com)
To prepare my first end-finished board, I decided to choose not the simplest option, but having selected the wood, I would like to use two different species to cut out the simplest little one - “at the cage”. When several pores are combined in one layer, the strength of the wood is restored - there is no need to greatly damage the pores to be combined, otherwise there is a risk of developing cracks and other defects c. After a little analysis, I chose beech and it is clear: these breeds are close in thickness, but may have a significant difference in coloration. By adding small bars measuring approximately 500x150x50, behind my frames there was enough to prepare two boards of medium size 250x350x40. Getting ahead of myself, I will say that I incorrectly mixed a lot of material at certain stages of preparation, and only one piece came out. Such bars cost me approximately 900 rubles in leather. For the first time, melodiously, it would be more logical to take something cheaper, for example, oak. For the tool, we need a new set of carpentry benches: a jointer, a surface planer, a circular table, and maybe a miter saw.
Preparation begins with the leveling of the skin layer from the boards on a fugan and their calibration on a surface planer. In my episode, the stench appeared to be quite strong, but I didn’t have a chance to smell them much.
 jointing workbench
  Reismus Verstat
Next, the later sawing of the bars is carried out on straight-cut slats 20x30 on a circular table. Make sure that if you have a skin rash, you cut a few millimeters of the workpiece, so don’t worry about it, for example, cut 5 30mm bars from a 150mm board, the shortest cut will have 4. Also saw Ware from stock, scraps are removed from the saw after You can't get a clean cut and need sanding or surface sanding. Look, the tree is not much stronger than the pine and sawing is more important. Plus, the sawing disk, it seems, was not in the shortest form and was slightly “seared” when prepared for sawing.
 Ash and beech bars
  On the cuts you can see a dark mark - the mark of a circular saw. It is clear that breeds differ in color
After this stage, it is recommended to calibrate the skin strip on a surface planer to immediately set it to its new size and eliminate sawing defects. Then we glue into a shield, laying out bars of different types, to remove the required baby. My idea was simple, and I simply drew out the bars - one beech and one clear. For gluing the shield itself for the end panel with the closest glue, the American TitebondIII is respected for its characteristics and environmental friendliness. But it is really important to ensure the construction with some basic PVA carpentry glue, properly tighten the clamps and align the edges of the bars before gluing.

If the glue has accumulated residually (for the next day), you can start the next stage - laying out our shield. Here another disappointment struck me: when gluing the shield, I didn’t get it right, so I’d prepare a thicknesser with a width of 300 mm. So he had to cut my shield a couple of centimeters at the edges and put slats of beech and ash at the entrance of the road. After this, it is necessary to release our shield onto the slats, and then again across it. You can also use a circular saw, but in my order there was a trim with enough broach to take 300mm and so I cut it quickly. The slats were cut to 40mm, so that the thickness of the next door is planned to be 40mm.

After trimming, you will no longer need to glue the finished board together. And here again I couldn’t afford to worry about the waste of material. In order to get the texture of the surface of the board “into the cage”, it was necessary to glue the slats along the displacements, apparently “squares” that protrude, going at the exit. To avoid this, when the shield is first glued together, carefully cut out an unpaired number of slats, so that at once you can simply turn over half of them and remove the “checkered” pieces. However, due to an incident with the dimensions of the surface planer, I had to saw off just one strip and lost a couple of them. It went like this.

After gluing (again, better than ever), grind all surfaces of the board with final sanding with fine grain on an eccentric sander. Then you can make grooves with a milling cutter on both sides to make the board easier to hold in your hands, and add small gum or plastic legs to protect the board from direct contact with water.
Okrema theme – How to finish the end board after it is prepared to enhance its service life and give beauty to its new look? Most people apply grub mineral oil (or its medicinal analogue - Vaseline oil). Anyone who appreciates that mineral oil is not environmentally friendly should use unrefined mineral oil. Often, for additional protection, the dosh is coated with either white or carnauba wax or mixed wax and oil.
Finally, I would like to point out that the preparation of the end molding board is labor-intensive and difficult (through the gluing operation). The quality of the material is simply magnificent, so any adjustments or inaccuracies in the finished product are costly. Be respectful! If you want to try making an end board yourself, I recommend starting with the cheapest hardwood in your area and using a simple bevel on the end board to get the hang of it. And then, along the road, take a tree and a folding van.
In this video you can see how professionals work. To rejoice in how beautiful the baby's dog looks after being coated with oil:
Read new notes earlier for everyone - subscribe to the channel atTelegram !
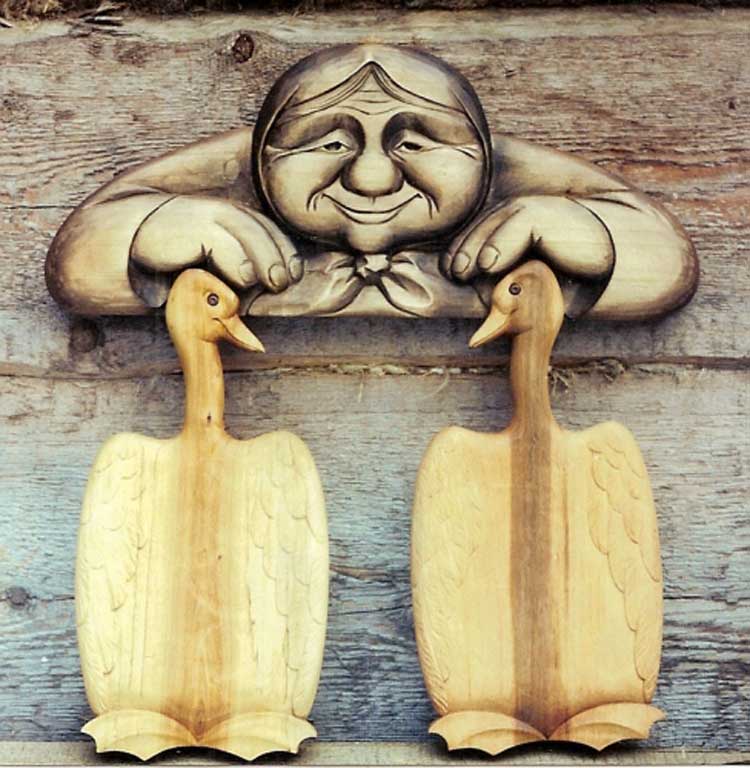
A special dosh is an unknown accessory, a handy tool in the kitchen, no matter what. They are used mainly for slicing vegetables and trimming meat. The side is prepared for serving, as a stand for hot dishes and for serving vegetables to the table.
Souvenir varnished tiles decorate the walls in the kitchen. However, modern masters began to produce such accessories based on the possibility of their further development in everyday life. One side of the souvenir board is decorated with ornate patterns, and the other side is pure wood.
Traditionally, it is important that the shape of the standard board is either square or rectangular, but today it can be given a completely different look: oval, round, whose contour resembles an apple, fish, and so on.
Instead of tirelessly searching for the right one in stores, you can prepare it yourself to your own taste.
To process the meat, it is recommended to vikorize thick and important meat. For slicing vegetables and greens, they are small, mobile and highly functional. In her kitchen, her mother has a new set of boards of different sizes and purpose. According to the classification, boards are divided into the following types: detailed, decorative, decoupage and dividing.
- End boards. The most popular stench for meat processing. On such a plate you can prepare poultry or entrecote. The board is designed to withstand blows with a hammer. The oak end board is treated with special value and is much less dull when cutting knives when replacing the original boards.
- The board is made from an array of beech, pine, birch and bamboo.
The best budget option is pine board. This board is easy to manufacture and has low hardness.
Birch and beech trees play for the yak for the growth of their hardness and strength. The only downside is that it is extremely hygroscopic. Vologa is disastrous for such dogs.
Bamboo wood from Chinese harvesting is less popular, its yield is significantly lower, and the price for oak or birch is lower.
Syrovina for the preparation of dough
Before making a board with your own hands, you need to select a material. For these purposes, raw materials from wood, silicone, plastic, stone and ceramics are used.
- Tree. At the Lord's store you can most often buy beech, oak and pine surfaces. It is important to remember that such surfaces are suitable only for sliced bread and dry vegetables, the splinters of wood of certain varieties quickly collapse under the influx of water.
Bamboo kitchen boards are distinguished by their high strength and resistance to pressure. The Vologosites miraculously rush and do not fade the smells of grub.
Selected acacia and oak trees - the choice of professionals. Their advantages are high brilliance. Nedolik is a dear one.
Doglyad. A wooden plank cannot be washed in a dishwasher. Rinse it under the tap, or just soak it at the sink. Once a week, the tree must be wiped with sap to remove microbes.
- Kamen. Marmur, granite and stone stone surfaces look very impressive. Marmur has bactericidal power, do not tolerate overly hot objects on its surface or treatment with acidic substances.
A kitchen board made of stone is ideal for rolling out dough so that it comes out evenly thin.
Doglyad. The surface of the fireplace needs to be periodically cleaned to prevent it from becoming dirty, as this material is prone to decay. With proper use, stone boards will last for a long time.
Plastic. In this case, you should choose clear plastic, which is heat-resistant and waterproof. A board made of good plastic is more durable and hygienic. If you are planning to make a plastic board yourself, then choose a barn-free material that does not contain toxic substances.
Doglyad. Plastic can be thrown into the dishwasher. After processing the meat or fish, wash the plastic plate with mild dish soap. And for disinfection, you can place them in 2 containers of microchicken with a bottle of water at once.
- Silicone. Kitchen surfaces made of silicone have long gained popularity in the kitchen supplies market. Silicone does not scratch the surface of the table, does not remove odors from food and does not dull the blade of the knife. This must be carefully preserved from a burning look. Due to its functions, the silicone knob does not disintegrate like a traditional wooden board.
Doglyad. Use the silicone squeegee in a gentle manner without acids. It is also acceptable to put him in a dishwasher. This material is resistant to both high and low temperatures.
- Scleceramics. The detailed structure of this material is resistant to impacts. It wrinkles easily, withstands high temperatures and does not fade food odors. For stagnation in kitchen sinks, this is not a very practical option, since it is easier to dull the glass on the surface. A table with glass ceramics is ideal for decorating a kitchen interior and as a hot stand.
Doglyad. Place the mitty in the dishwasher.
You can see what traditional dolls look like in the photo below.


Design of storage boards
The design of the final board can be varied. If you are looking for unusual forms, take note of a number of design solutions.
- A classic wooden board with a drain for a knife, a metal edging and a place for a knife.
- Visuvna obrobna doshka. Attach to the scarf and hang from it at times of need.
- Straight-cut board with delicious plates. Once the products have been sliced, crush them with a knife into one plate.
- There are also separate trays with hanging containers for cleaning and washing up.

Preparing one of these detailed boards with your own hands will be much easier and less complicated. But for obvious reasons, this knowledge can be developed and such a design option can be obtained.
Do-it-yourself wooden board
Prefabricated board made of plywood is a traditional option. She is practical and handy in the kitchen. Our product presents the technology of making boards from birch plywood.
For work you will need:
- olive;
- sample;
- bench and hacksaw;
- drill;
- drill;
- sawdust;
- breams.
Before you open the kitchen accessory, you need to put on the chair base.

- Prepare a 12 mm birch board and carefully mark the contours of the board on it using the template.
- Use a hacksaw to cut around the contour.
- Use an awl to mark a place for the opening and drill it out with a drill.
- Press the dust onto the breams and use a file to clean the surface. Round the edges of the piece.
- For the baskets, you can paint the outside side of the board with watercolor paints and cover it with varnish.
Prefabricated board on supports
I will prepare the dough with my own hands without great difficulty. However, building this structure with supports and a bowl for the plate will be a little more foldable. Behind the presentation of the armchairs, you can clearly see the design of the upcoming furniture table.

For work you will need:
- oak blanks for the shield (40x33x3 cm);
- 2 oak planks for supports (10x33x3 cm);
- PVA glue;
- emery paper.
The dimensions of the self-made board are designed for a plate with a diameter of 25 cm and a height of about 10 cm. You can quickly use these dimensions, or you can create a board for such a plate, which you will easily use in the future.
- Glue three planed oak plates together into a shield.
- When the shield is dry, you need to make a blank for the board. Dovzhina 40 divs, width – 33 divs.
- One edge of the prepared material must be cut with a compass and a circle. You can replace the compass with a separate plate. After 10 mm from the dotted line, place it parallel to it for less than half a century. This is depicted on a small scale.
- You use a jigsaw a little less.
- On the back of the board, mark out a place for supports and sharpen them with a carpenter's chisel. At the groove, glue the oak visors into the supports.
- Carefully sand the surface of the sample board with an emery paper.
- Spray the wood first with olive oil, and then varnish everything except the working surface of the board.
The finished oak board with supports and a bowl holder is ready. If the varnish is dry, you can proceed to the finishing touches.

To ensure that the surface does not retain the smell of fish, coat the wood with half a lemon and rinse with hot water. It is not recommended to trim meat, cut vegetables and bread on one loaf. For skin marks, it is necessary to vikorize the dossier of singing significance.
You can learn about how you can prepare a prepared meal at home in the video.