A lampshade with a glass jar. Original chandelier from cans with your own hands
On this day, the stores sell anonymous lamps for any taste. All stinks are distinguished not only by technical characteristics, but also by design, as well as by the degree of originality. And there are a few options for how you can make non-vibrant lamps from jars with your own hands. Obviously, the stench does not shine so brightly, like chandeliers, but a romantic atmosphere will be guaranteed to you. Let's look at two main options for such lamps, from glass jars and from tin ones.
If you have a candle and a jar of baby puree under your hand, you can make a very burning lamp.
At first glance, lamps made from cans may seem like a completely outlandish idea, as they do not carry any decorative value or interest. Ale ve perekonkaet, but this is far from the case.
Lamp made from a can
So, how easy is it to make a lamp from a can? Everything is very simple, as long as you have the necessary materials and tools at hand. You will spend no more than a year on the entire work. A jar can be taken as a substitute for canned peas or corn. Cream jars, for work you will need:
- small towel;
- hammer;
- long flower;
- scotch;
- soft papier and simple olive;
- markers;
- A small flat round candle.
Now get to work. For the cob, you need to prepare a plaque. To do this, fill it with water and take it out of the freezer. It is necessary for the water to become full. This will prevent deformation of your new lamp.
While the water is freezing in the jar, prepare a template using a small spoon. For this purpose, make a soft papier. Most beautiful - millimeter. To make the babies at the top as symmetrical and equal as possible, align the paper paper so that it is the same height as the jar. Dovzhina shmatochka must therefore be close to the circumference of the jar.

The simplest lighting option for a booth is lamps made from glass jars.
You can choose the little one you like. Fold what will be formed from various pieces, like a stencil and will need to be punched in the walls of the jar. This can be either a simple ornament or a specific design. Apply on the paper with an ointment or a marker.
Now take the jar with ice and wrap the sides with a paper template from a baby paper. Secure it with tape so that the paper does not move anywhere during the process. Now place the jar on the towel and start using a nail and a hammer to tap the baby dolls on the jar through the stencil. Work carefully and not hastily, so that the krieg in the middle does not split or fall off.
If all the baby is pressed on the walls, place the jar with ice and warm water. Let’s just lie there until the river completely melts and turns into water. After this, you will no longer be able to give the jar a decorative look. To do this, you can use permanent markers to put the little ones on the walls, or simply coat the jar with basic acrylic paint. It is better for the farb to choose a dark color for a clearer appearance of the baby.
When everything is dry, light a round candle and place it at the bottom of the jar. The darkness has a romantic illusion of stars. Prepare a lamp from a jar with your own hands! Just make sure that the sides of the jar and the bottom do not overheat. To do this, place a porcelain or metal stake at the bottom of the candle for protection.
Glass jars are good not only for preserving homemade preparations: with their help you can decorate your apartment or cottage - all it takes is a little imagination! As a matter of fact, you can find more than one design solution for an unnecessary drawer - so don’t rush to try it.

Do you like to spend weekends at the dacha or are you planning to spend the holidays in the fresh air? Forgive candlesticks from small glassy jars, hung on needles, look miraculously by the garden in the evening. Banks are bigger and more important, you can place them in grass - and instead of miniature "pills" you can make classic candles (to give them stability, enough to sip in a jar of pebbles or pebbles). At noon and o'clock, the plank can be covered with self-contained lights with great caps, so that water does not drain from them.

You can also take a creative route and somehow “dress up” your table. One of the simplest options is to wrap the jars with bright yarn and tie the kints. The threads can be glued (for this it is recommended to use aerosol glue). Don’t forget to remove the labels first and re-roll them to make sure they are clean and dry!

Perhaps you still have some fashionable server parts tied up with a gag? If the state doesn’t have such people, don’t be embarrassed: in any place there will be people who give away such good things for free and are ready to sacrifice their symbolic price. Having obtained serverets and a number of glass jars (more than different sizes), you will create a wide collection of candle holders for the interior of the bedroom or home. The serverette is glued evenly, without wrinkles.

If you want to achieve a touch of frilliness, you can wrap around the jars the surplus from screens from handicrafts or from their old nightgown, which you have long decided to use for the government's needs. Before the speech, the truth is that the buzzers just float away.

Try literally brewing candles in the mood. Pour acrylic powder of the required color into the bottom of the glass jar (with a ball of approximately 5 cm), then turn it completely. In this way, the farb will gradually spread throughout the entire inside of the jar, and we will get an acceptable glossy effect.

You can fill the jars with Farboy spray. This effect can be achieved by using a sealed jar, tightly wrapping it tightly with a skein or sticking awkward paper bags (you can use vikory with this method). izhinki). For a robot head with farboy spray, find a place that is well ventilated, or go to the balcony. If the farb is hanging, just cut the threads.

What about stained glass candlesticks? To create such a masterpiece, we need a glass jar, stained glass windows and an outline. There’s nothing complicated: apply the paint with a contour (you can use glitter), spread it with stained glass paints and let it dry. We place a candle in the middle, light it - and enjoy the result!

Since you are not very friendly with the Farbs, you can take a different route - paste glass jars with glass drops or collect emerald chips on the beach, which the sea needles have come to polish. Carefully presses the other parts to the surface of the jar and does not prevent the bubbles from forming under them. Excess glue (“rare flowers”) needs to be immediately wiped off with a cotton swab before it dries, and then fill the seams with caulking putty. After a quarter of a year, we give the candle a good rub with a bald sponge - and then the confession is confirmed.

Getting ready for the winter holidays, thickly coat the jar with PVA glue and roll it in salt to create a colorful “snow” decor. If you want to add flavor to the candle makers, mix with a small amount of dry grub or cosmetic barn. In addition, instead of salt, you can take beads, embellish the bliss or bits of yalinka. Apply glue to the top edges of the jar and sip the top of the jar. Let it dry for a few minutes, and then use a clean, dry pencil to wipe away any particles that have stuck badly. Cover the jar of Trioma with balls of varnish spray (with a break between the balls there are 20 hvilins). The candle maker is ready!

Today, more and more expanded ideas of handmade are emerging - the development of manual robots based on creative creativity. Making a speech with his own hands, the author incorporating his ideas, taking into account the result of his work, which gives apparently satisfaction, generates new feelings of inspiration. If you don’t know what you need, for sale, but if you want a mother, start creating yourself, realize your ideas. Creativity helps to grow the old, inappropriate speech, a unique vibrancy, in a single copy, which reflects the individual relish of the sackmaster.
One of the ideas of handmade was the creation of objects that create calmness and the unique atmosphere of the life. So, regardless of the large number in the shops of lamps and chandeliers of different configurations, a lot of unique and original lighting fixtures are swayed by home masters. This includes making a lampshade with your own hands using an original jar. Luminaries, as it happened, are vicorous to embellish the interiors and serve their direct functions, both in a private booth and in an apartment.
The most suitable material for making lampshades at home is glass jars. The slope is a miracle material. It can be easily prepared, decorated with carved elements, which makes it possible to create a stunning and stylish device for lightening.
Every one of us, under the domestic dominion, has empty cans standing idle in the warehouse. Making a lampshade and a combination of lamps from them is a miracle for any home master.
Robimo lampshade from an original glass jar
Let's take a look at the preparation of a lampshade from a can from a frozen light bulb. For lampshades and lamps with electric lamps, glass jars with a metal lid that screws on are suitable. The jars may be of different sizes, or they may contain a lamp. For lamps without electricity, simple cans, without splitters, will do.
In the process we need:
- a glass jar with cut-outs and a lid that goes up to it,
- electric lamp,
- cartridge with electric dart,
- motuzka with jutu or bavovnik,
- Prosorial glue, suitable for gluing the motuzka to the glue.
The jar can be chosen in a non-standard shape to give the jar an original look and decorate any interior.
Important! It’s better not to vikorize the frying lamp. Choose light bulbs with minimal heat. You can use modern energy efficient lamps. The stench warms up with a little peace, and shines brightly. You can replace them with fluorescent or halogen ones. Use light LED lamps.
The tools you will need are:
- to make a cut I will open the door - drill with drills;
- olive;
Steps for preparing the lampshade:
The opening for the lamp socket will be marked at the end of May. Place the lid of the jar on the table or any other place. We put a plug on the gate side, screw it in, out of the cartridge and carefully paint it with olive along the inner opening of the plug. The diameter of the stake that is highest will be the same as the diameter of the cartridge.
In the dough, drill the opening firmly along the line of the stake, the more often, the better.
- Looks like you're calling in the middle. For consumption, carefully make cuts with a knife.
- We insert the cartridge into the opening of the cover and secure it with a plug.
- Apply glue evenly to the jar and glue the coil to it, winding it in a spiral from the top of the jar. The ends of the motuzka are carefully trimmed under the oblique cut.

- We insert the lamp into the socket and screw the cap with the socket onto the jar.
The simplest lamp with a self-made lampshade ready.
From the skeins, you can try to create a different pattern by mixing a skein of two colors. The motor winding must be kept tight so that the light of the lamp can bloom.
Since we have the simplest lampshade, we can repurpose the frame of an old chandelier to create a new composition with original design solutions.
Robomo pendant lampshade with glass jars
To create such beauty you will need:
- five glass jars with split lids;
- lids for jars;
- five cords to hang;
- External lamps with sockets (5 pieces).
- skein of a necessary anniversary
We select five lampshades for the most important algorithm. You don’t have to connect them to the electrical wiring, and the pretty stele composition with pendant lamps will delight you.

How to decorate glass jars for lampshades
Beautiful lampshades come from glass jars, decorated according to the author’s imagination. Banks can be decorated:
- yarns;
- different decorative elements;
- I say;
- hems, hanging servettes;
- Farboy.
Let's take a look at the decoration behind the cursed elements, one side of which is flat. They are sold in sets for decorating aquariums and decorating bright vases.
The bank of vikorystvo is initially liters, otherwise it is possible to stagnate another obligation.
It is necessary to prepare:
- universal glue;
- pens for applying glue;
- glass elements;
- brighten the colorful stitch;
- round flat candles.
The bank is really moving and hanging. You can decorate the top of the jar with skeltsy either by covering the entire surface from the inside or by touching the singing baby. In any event, the scheme of action is as follows:
- Use a pencil to thickly spread glue onto the outer wall of the jar;
- We glue decorative elements onto the glue;
- This allows the glue to accumulate and catch.
Then we decorate the lamp with a stitch, wrapping it around the upper part of the container and tying it beautifully with a bow. So ready the lampshade in anticipation of a terrible look. Place a candle near the jar and light it. The edges of the glass elements shimmer with sparks of light. With such lampshades you can create a chandelier or just a garland on the floor.
The simplest option is to gently wrap colored yarn around the jar and tie the ends. The yarn can be glued with aerosol glue.
If you wrap the jar tightly with thread, use a skewer, or glue simple paper paper paper (aka snowflakes) to the walls, and coat the jars with Farboy spray, you will get the same effect.
For “winter motives” vikorystvoemo sil
If you smear the container with glue and roll it in salt, a little “snow” decor will appear on it. To add a lampshade to the shade, you can also add a little dry barnberry and stir the mixture.
You can apply glue to the walls of the jar and seal it. In any case, let it dry for a couple of years, after which you wipe the area with a foam, removing the particles that have stuck badly. The jar can be coated with balls of spray varnish. I'll take a break between the balls and make 20 minutes. Lampshade ready!

It is perfect for creating a fire lampshade with a glass jar if you use fashionable servettes, tied with gauze. You can use them to create a whole collection of candles in just a few years. Here the smut should be glued to the server evenly, without wrinkles.
To hang the lampshade from the jars, add excess hems glued to the top of the jar.

You can spray the jar without using a spray or a penzlik. Just pour acrylic powder of a selected color onto the bottom of the container (to a depth of approximately 5 cm), and after adding a little, start smoothly and twist it thoroughly. The mixture will gradually flow out into the middle of the jar, and a wonderful glossy effect will appear.
Lampshade near the pendant's appearance
The original lampshade in the form of a pendant with a beautiful heavy-duty moth not only shines wonderfully with light, but also looks welcoming in the interior of any apartment.
In principle, for such a lampshade, you can use any kind of motuzka - thick, tonka, bavovnyana, jute. All of them can be woven into a garniy pendant, a vikorist and an original container.
For the work above the lampshade doors we need:
- Wicker woven skein of 6-8 meters.
- Sklyana or blyashana bank.
- Povitryana kulya.
- Painting stitches.
- Bila Povst.
- Knives.
- Glue gun and a set of haircuts.
- Farba at the spray can.
- Lamp socket with cord.
- Croc first. The inflated balloon is placed in a jar and secured to the sides of the jar with masking tape.
- Croc is different. We heat up the glue and glue it with a piece of cloth right next to the edge of the skein so that the threads do not bunch up. We cut the end under the guest cut.
- Krok third. Starting from below, we sunbath the motorcycle on top of the can. The ends of the pasted ends are turned in such a manner that the cut part faces uphill. Carefully apply glue to the skin of the motuzka with a pistol. Gently, so that the molasses does not disappear, both from the outside and from the inside (you can glue the skein to the jar).
We braid the skein over the kulya. There is no opening for the cord.

- Crock of quarters. Let's pierce the sack. We trim the end of the skein: glue it onto the new skein and cut it completely. Carefully place the end in the middle of the lampshade and glue it to the inside of the pendant.
- Krok five. The jar can be easily and carefully removed if necessary using a rocker or a ruler.
- Krok is sixty. Farbuvannya. We glue the painter's stitch between the plots to prepare the preparation. We don’t skimp on paper, we glue a large plot and a bunch of balls. The spray will be powdered widely, and the mixture will allow the material of the stitch to seep through and clog the moto area under it.
- Let's prevent our solid from drying. Then we remove the stitch, put it in the other sections of the lampshade, and let them dry.
We sell the cord and cartridge in the opening. Lampshade ready!

Lampshade with plaques
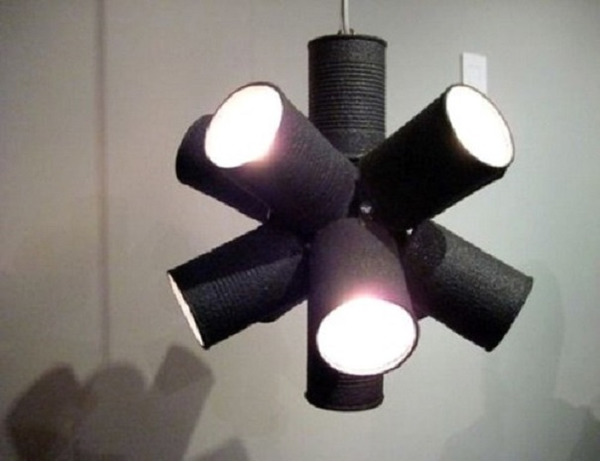
You can remove the lampshade from the plaques. This method can be used for drinking beer, coffee, and other drinks. For small lamps, you can put cans on them. If you are going to work on a chandelier, you need to get enough to cover the entire lampshade for the chandelier.
The advantages of these materials lie in:
- Their availability,
- the obvious variety of shapes and sizes. So, tin cans are ready to prepare a small lamp. For the creation of chandeliers, large compositions, which require the absence of “plafonds”, it is recommended to use containers with fruit cocktails. The beer can looks like a cute “shade” or bottom;
- simplicity of processing the material;
- a small thrifty hour, a worn-out door fitting;
- Wide range of possibilities for creative decoration.
The dough containers can be used according to the preparation method:
- a unique lampshade in the kitchen;
- a lamp in any private booth;
- lampshade for a table lamp or floor lamp, wall lamp;
- the lampshade has the appearance of a stylized woolen form;
- hanging lampshade attached to the wall of a booth or terrace on the street;
- stele composition with a lampshade made of aluminum or cans.
With plaques you can create any type of lighting fixture. You can create the decor of the lamp that fits into the interior of the room to your liking.
For work with plaque containers, the following materials and tools are prepared.
Materials:
- plaque banks;
- sandpaper is used for fastening the fittings and decorating them;
- round flat candles;
- Farbi or decorative elements to suit your taste.
Tools:
- metal knives, cutter or can opener;
- awl;
- drill with a set of drills.
Robimo lampshade from a white can
A simple option, its implementation will take a little more than a year. We take the original milk, for example, canned peas or corn. No cream needed:
- a towel or a piece of fabric;
- hammer;
- princes;
- adhesive stitch;
- arkush paper;
- markers;
- candle.
The jar is filled with water and placed in the freezer. The water may freeze in the container, allowing the jar to deform after further work with it.
While the krieg is being created in the jar, a template is prepared from the baby. Vikorist is a soft paper, which appears to be long and wide, corresponding to the size of the stake and the height of the jar.
We apply the little ones onto the papier. It is safe to say that the jar will have the appearance of different openings, which we punched in the jar for the baby’s template. The little ornament is applied to the paper with an olive or marker.
We pull a can of ice from the refrigerator and wrap it in a paper bag. We secure the paper behind additional tape so that it cannot move. Place the container on a towel or gantry, and carefully punch the holes into the jar with nails or drill holes with different drill bits.
Once you have finished making ice on the walls, place the container in warm water and allow the ice to melt the rest.
That's why we put some beauty on the jar. You can use markers to write on the walls of the little ones, you can paint a jar to match the color with acrylic paint.
Check it out if the bank is still dry. Place a candle at the bottom and light it. The dark lampshade glows beautifully and creates a romantic illusion of a bright sky.
The lampshade from the plaque is ready! To ensure that the thin walls of the container and the bottom do not overheat, place a porcelain or metal circle on the bottom under the candle to heat.
The opening on the thin walls of a can can also be made with an awl. The finished lampshade can be attached to the light bulb socket. A few pieces of such lampshades will create a nice and original chandelier with plaques.
Lampshade for table lamp
Using simple lids from aluminum cans of beer or drinks, you can create a custom-designed lampshade for a floor lamp or table lamp. The design resembles chain mail and the accessories look like they came from the Middle East.
To make a table lamp as a lampshade, we use vikoryst tabs from the lids of aluminum beer cans. One of the jars is used as a base for a tabletop lighting fixture.
The robot scheme is as follows:
- Use pliers to firmly tighten the tongues and make cuts on the skin of the animal;
- Vicor slits, weave the tabs together and combine them into a single fabric, bending the slits with pliers. You can connect the parts together using a thin and flexible tool.
- The bottom of the main can is cut and the lamp socket is inserted into the middle;
- We create a robust frame, attach it to the new “chain mail” and secure the structure to the base of the lamp.

Lampshade made from aluminum can
You can try making garna from a regular aluminum can.
For whom vikorystvoemo:
- jar;
- I have to do it for a long time;
- candle.
We cut the top part of the can. Behind the head, timidly cut holes in the jar behind the outline of the baby. The cuts behind the contours are vibrated. Place a candle in the middle and light it.
As well as ordinary glass containers, plaque and aluminum cans, you can use wonderful lampshades and lamps and create different compositions from them. You can come up with your own unique shapes for lampshades from frozen objects. We hope that our article helped you in some way.
Everything that was crushed by hand was and is priced at once. Especially, as this is a necessary attribute of an apartment or a booth. Why spend large amounts of money on what you can earn on your own?! No one is concerned about the importance of talent and patience. Otherwise, you can achieve simply unrealistic results. The smut, the waste, and you will end up sick.
As a self-proclaimed person, it is important to know the basics of wiring in order to deal with electricity. You can get through all the work in a day.
Materials required for making a chandelier
First, what is needed, here we go. Vin may be cruel
Mason jars
Light sockets
light bulbs
Tools
Devices for stripping wires or boxes
Nizh
Bichni milling cutters
Twirl
Choose, saw or jigsaw
Router, router
Drill or drilling machine

Opening box for chandelier

The box is simple and can be customized to suit your needs and requirements. The size of the box depends on the number of cans. You can create your own screenshot from everything you have around, for example, pallets, brukht and so on.
Have fun with the funny smitty
Once the base has been selected, clean it from dirt, if there is any “scuffing”, then sand everything down with an emery paper.
Now let's move on to preparing our chandelier. For this purpose, place the varto on the stand of the transfer openings. You can choose to wear them as you wish. After this, open the door.

Once opened, you need to create a number of cans, how many cans you have ready for insertion. If you open the banks, then obviously, it is necessary to open them first.
Now prepare the lamp itself.
Take the jar and carefully drill the opening at the top.

After this, secure the socket with the light bulb in the drilled opening.

After you have prepared all the light bulbs, proceed until you attach them to the base of the chandelier.

Secure the varto tops with self-tapping screws.
Turn the chandelier over and carefully secure all the parts.

The base of the lamp can be painted behind the basil.
From i all. Your chandelier lamp is ready to go.
On this day, the stores sell anonymous lamps for any taste. All stinks are distinguished not only by technical characteristics, but also by design, as well as by the degree of originality. And there are a few options for how you can make non-vibrant lamps from jars with your own hands. Obviously, the stench does not shine so brightly, like chandeliers, but a romantic atmosphere will be guaranteed to you. Let's look at two main options for such lamps, from glass jars and from tin ones.
If you have a candle and a jar of baby puree under your hand, you can make a very burning lamp.
At first glance, lamps made from cans may seem like a completely outlandish idea, as they do not carry any decorative value or interest. Ale ve perekonkaet, but this is far from the case.
Lamp made from a can
So, how easy is it to make a lamp from a can? Everything is very simple, as long as you have the necessary materials and tools at hand. You will spend no more than a year on the entire work. A jar can be taken as a substitute for canned peas or corn. Cream jars, for work you will need:
- small towel;
- hammer;
- long flower;
- scotch;
- soft papier and simple olive;
- markers;
- A small flat round candle.
Now get to work. For the cob, you need to prepare a plaque. To do this, fill it with water and take it out of the freezer. It is necessary for the water to become full. This will prevent deformation of your new lamp.
While the water is freezing in the jar, prepare a template using a small spoon. For this purpose, make a soft papier. Most beautiful - millimeter. To make the babies at the top as symmetrical and equal as possible, align the paper paper so that it is the same height as the jar. Dovzhina shmatochka must therefore be close to the circumference of the jar.

The simplest lighting option for a booth is lamps made from glass jars.
You can choose the little one you like. Fold what will be formed from various pieces, like a stencil and will need to be punched in the walls of the jar. This can be either a simple ornament or a specific design. Apply on the paper with an ointment or a marker.
Now take the jar with ice and wrap the sides with a paper template from a baby paper. Secure it with tape so that the paper does not move anywhere during the process. Now place the jar on the towel and start using a nail and a hammer to tap the baby dolls on the jar through the stencil. Work carefully and not hastily, so that the krieg in the middle does not split or fall off.
If all the baby is pressed on the walls, place the jar with ice and warm water. Let’s just lie there until the river completely melts and turns into water. After this, you will no longer be able to give the jar a decorative look. To do this, you can use permanent markers to put the little ones on the walls, or simply coat the jar with basic acrylic paint. It is better for the farb to choose a dark color for a clearer appearance of the baby.
When everything is dry, light a round candle and place it at the bottom of the jar. The darkness has a romantic illusion of stars. Prepare a lamp from a jar with your own hands! Just make sure that the sides of the jar and the bottom do not overheat. To do this, place a porcelain or metal stake at the bottom of the candle for protection.
Lamp with glass jar
Another option is a lamp based on a glass jar. For this you will need an initial liter, triliter or any other bank account. To use this cream, you will need to take care of your mother:
- silicone glue;
- Penzliks;
- glass bags, one half of which is flat (sold in sets for decorating aquariums and the surface of clear vases);
- knives;
- garna stitch;
- a small round candle.
Before work, you need to carefully wash the kidney and dry the jar. Then you need to decide how you will decorate the walls of the jar with skellies. There are two options. First - completely cover the entire surface. The other is to stick them in order, creating a specific pattern or ornament.
Whatever you choose, the principle is the same: the outer wall of the jar, using a pencil, is generously smeared with glue, onto which the sticks are gradually placed. Politely, spit out the glue quickly. Once you make it, wait a few hours until the shells are attached to the surface and caught on the dance.
Then take a stitch and wrap it around the top of the jar, tying it with a bow. So I look at the lamp on Christmas Eve. As a result, the lamp from the glass jar looks more visible. Now you can no longer put a candle in the jar and light it. Now you know how to make a lamp. And friends will burst into ecstasy at such simple and ornate beauty!
Descriptions of the methods for producing such lamps are also the cheapest and most original.
And since you don’t have such knowledge, you can easily prepare them yourself in a short period of time.