Metal swing gates with their own hands. Sliding doodles with their own hands (57 photos) - species, features, installation instructions
Any household plot is fenced by a fence and gates. Such structures ensure the safety of personal property. The choice and construction of the gate can be carried out independently. Before work, you will need to create drawings, take into account the basics of setting the column and correctly select the design material. In the process of installation, it is better to follow the advice of experienced builders. When installing the gate, you will need drawings, photos and video of finished designs.
Advantages of swollen gates
Regardless of the design, the area owner can choose the method of opening the sash - outward or inside. Installation of swollen gates is carried out without special difficulties. If you correctly perform all stages of the construction, the design will serve for a long time and regularly. Classic swing gates have a number of benefits:
- high functionality;
- compactness;
- lack of restrictions in size;
- the possibility of using any materials;
- ease of operation.
Also, such a gate is characterized by simplicity of installation, they are undemanding for maintenance, strong enough and can be erected in a variety of designer solutions. Also, swing structures are distinguished by a long service life. If there is a need for them, you can install the automatic control system.

The disadvantages of such gates include:
- the importance of taking into account wind load is relevant for this region;
- the need to exemplate sufficient space to open the closure of the gate.
Simply account of these factors makes it possible to understand that the advantages of the swollen gate are much more than minuses.
Design of swollen gate
Regardless of the sizes, finishes, directions of opening and execution materials, the swollen doors include:
- Support racks. Poles must match the type of gate.
- Frame. It is performed from metal or wood. The main requirement for the frame is greater rigidity.
- Tailing material. Metal profile is very popular.
- Loops. They are chosen according to the mass of the gate and their constructive features.
- Castles and constipation. They are devices that prevent attackers hitting the territory of the site. Also, such mechanisms have a variety of execution.
Each part of the swollen gate performs an important function. The correct setting of each of them is the key to the long service of the gate. When building a gate with their own hands, drawings, schemes, sketches of structures are needed.
Gate from Proflist
Swing doors enjoy the greatest popularity among private developers. Fasteners can be opened both in one and both sides. As a material that is attached to the frame, they use professional flooring. Also in the door canvases can be made of gate.
The popularity of swollen gates is achieved at the expense of the long life of such products. Metal structures do not require repair in comparison with wooden. Often complement automation systems. In addition, the profiled sheet has several advantages:
- cheapness used materials;
- simple manufacturing process;
- quite a long service life;
- external appeal;
- excellent characteristics.
The disadvantage of the gate from the proflist is the exposure to wind loads. Such sash must be installed on reinforced loops. It is also worth taking care of the correct installation of pillars in advance. The disadvantages of such structures include the need to release space for opening.

However, the advantages of the gate from metal profile significantly exceed their shortcomings. Moreover, many problems are not as critical to pay attention to them.
Installing swing gates
If the swollen doors are planned to be made from the professional leaf, you will need to install sufficiently strong poles. For support, it is better to choose pipes with a diameter of 80 mm. It will also be perfectly cope with loads and square pipe.
The flaps are welded from squares of square section. It is better to choose products with dimensions of 10x25x3000 mm. To connect them, you will need to use welding. The frame must be reinforced with diagonal tensioners. It also necessarily provides for a place for constipation, lock and limiters.
Start work from mounting supports. This stage requires a certain preparation. It is also important to enjoy ready-made drawings of the photo. From the video on which the swollen gates are installed in stages, you can also get a lot of information. Useful information on the topic is in this material:
Ways to install pillars
Support poles can be simply forgotten into the ground or concreted. In the second case, the supports will be much stronger and more reliable. Also, do not forget about the need to properly install the loops. When driving, it is necessary to immerse the supports into the soil at 130 cm.
Using this method of installation of pillars for the gate allows you to save time. Almost immediately after clogging, the supports can be attached to the hinges and hang the sash.
Another way is concreting. It is better to combine with the reinforcement of support. The depth of the yam is 150- 200 cm. The diameter of each pit depends on the section of the corpusted pipe. First, the pillow is prepared (from sand and rubble, and then poured concrete).
Important! In front of concreting in the pit it is worth placing a waterproofing "glass" from the rubberoid. Thanks to this, concrete milk will not go to the ground, which will make the solution more durable. Concrete periodically should be tamped, kicking out excess air.
Production and installation of sash
After installing the poles, you will need to perform the sash. This process should be given particularly much time. The work is performed in stages:
- First, on a flat surface, you must lay out the profile tube or corner, and weld the shape according to the drawing.
- So that the strength of the structure was high, it is important to strengthen the sash diagonals.
- When the frame will be ready, you can start it with a profiled sheet. The material should be 2 mm thick. Too thick metal should not be chosen - then you have to think about strengthening the racks.
- After that, the loops are installed. First, they are welded with one half to the gate frame, and then the second to the post.
- When all work is done, you need to take care of safety - the lock and constipation are installed on the gate.

The same principle underlies the installation of wicket. Painting of the sash can be performed both on weight and on Earth - even before mounting on supports. The difference is that on the already installed gates in the process of applying paint may occur. For this reason, you need to treat work with special care.
Sliding doors
Sliding gates are characterized by special functionality. They do not occupy a lot of space, silent, open quickly. There are several types of sliding gates:
- retractive;
- suspended;
- console.
The least in demand is the gate of the suspended type. This is explained by the emergence of travel restrictions, the complexity of the installation, many requirements of such structures.
If strong frosts are observed in the region, it is not worth installing a retractable gate on its site. Guides will be covered by Founding, which will reduce the functionality of the design. Such gates will require constant care. Otherwise, they are good enough.

Everyone can build a rollback gate. To do this, you need to have drawings and decide on the sash size. Various videos and photos of finished designs can also help. The main condition for the installation of the retractable gate is the need to exemplate space along the fence.
A special profile is installed on the surface of the soil. The sash will move on it. Special rollers are also installed on top of the gate. To keep the gate in the right place, install special fixing elements. Useful information is in this video:
Installing Console Gate
Console gates are considered one of the most difficult. The advantage of such structures is the lack of need to equip ground rail. The gate does not touch the surface of the soil while driving. Also when installing console gates there are no height restrictions. In addition, you must install only 1 support column. These designs are used at any time and with any weather.
The sash is quite simple. It consists of a frame and plating. To the lower part of the sash, the guide is welded, the roller carriages are placed inside. On them the gate can move in both directions.

Tip! As soon as the frame will be welded, it is necessary to clean the welding seams. In addition, from all surfaces should be removed traces of corrosion.
The sash of the cantilever gate is conditionally divided into two parts - the one that closes the opening, and the one that serves as a counterweight. The second part must have a length equal to 35-50% of the first length. A special foundation is equipped under the console part capable of withdrawing significant loads during the operating of the gate.
For the foundation equipment, you will need to prepare a channel, which will be equal to the length of the cantilever part of the sash. It is also worth digging the pita, which will be covered with a concrete solution. The length of the pit should have several dozen centimeters to exceed the length of the chapellery. The foundation is poured on the depth below the level of ground freezing. In addition, to securely fasten the channel in the foundation, you will need to perform a special reinforcement frame.
After the fill of the foundation is completed, you can install the sash. Such work also has its own nuances and requires a special approach.
Required fittings
Elements required for installation of console gates are presented in building stores in a wide variety. To properly choose accessories, you will need to determine the mass of the sash and its dimensions. It is also important to know the width of the opening.
The standard set of elements for installing sliding console gates includes:
- guide beam;
- caps that are equipped with the beam;
- end rollers;
- an additional device equipped with 2 rollers;
- roller supports;
- cattle rollers.
This set is necessary when installing the console gate. In the process of choice, it is important to know the opinion of the specialist.

Lifting - rotary doors
Similar structures are great for the standard garage. Apply them as a gate on the plot is not recommended - they have a limit in height. The principle of operation of structures is quite simple - the cloth shifts up, taking a horizontal position. Such gates quickly open and closed, differ in the relative simplicity of installation.
When the sash of the lifting rotary gates occurs, it begins to protrude a little. It should take into account, customizing the car to the garage. If you do not calculate the distance, the gate can hurt the car.
Such a gate has become popular in part thanks to their compactness. In the folded state, they practically do not occupy space. They also differ available. Putting frame from wood, metal sheets or composite. If you compare such structures with swing, they clearly have more advantages to install in the garage.

For the manufacture of lifting rotary gates, you will need to draw the scheme. Features of structures:
- When preparing for the installation of the lifting - turning construction, you will need to perform 2 frames - for the sash and the one by which the gate will move.
- Inside the garage frame will be g-shaped.
- The canvas is equipped with sash top and bottom.
- Also, the levers are mounted, lifting the canvas in the opening process.
- Be sure to provide shock absorbers that will soften the punch of the cloth during closing.
The support frame is fixed to the imaging with anchors. Installing automation should be carried out only after all the procedures for mounting the gate. Work is better to entrust specialists who will help to carry out power.

Setting the gate of the lifting - turning type does not take much time, if well prepared for work. Also, the process will accelerate if you invite an experienced master. In addition, it is necessary to use the drawings of the design in advance to calculate the dimensions of the sash and the guide frame. How such a gate is installed, you can learn from the video:
RESULTS
Installing the gate of any type is better according to the drawings. Swing structures are more often used in individual construction, sliding - both for the closure of entry into private areas and during the fence of industrial facilities. Lifting - rotate structures are ideal for equipment entry into the garage.
Each type of gate has certain advantages. They also have certain disadvantages. The easiest and most affordable option is a swing gate with two sash. In the process of installing such structures, special attention should be paid to the installation of support pillars.
If you plan to make a gate with your own hands, you will need a step-by-step instruction, which will help calculate all the nuances of the work and make it easier for their creation.
Before buying the necessary materials, decide on the type of gates that are suitable for a particular case, and in a convenient way to install them.

Types of designs
There are many varieties of the gate that can be made from different materials, to be equipped with special mechanisms. A wide selection allows you to create a homemade gate based on the features of the room or territory, your needs and frequency of operation.


Before making the gate, the main varieties of structures that are popular with popularity should be studied.
Sliding
Sliding canvas are divided into several categories. Depending on your preferences, you can choose the necessary option. For each type of design, it will be necessary to free the free platform along the fence so that the sash can freely open.
There are console sliding structures, suspended and retractable. The structure of such cloths involves moving along rails and other metal profiles.


Suspended options are not popularfor operation in a private area, as the height of the arrival is limited to the top profile on which the cloth is fixed. The movement of the flaps is also on this profile.
Some country house owners install ferry structureswho received such a name due to their appearance.

Retractable canvasMoves along the rail located along the wall are also not popular in the snow-covered and northern cities.
In order for the sash of retracting designs fluently moved along the rail, it will be necessary to constantly remove the ice and other trash, which is not always comfortable in winter.

The cantilever canvases are considered the most optimal design of the sliding gate. The canvas is rigidly attached to the beam, which moves through the console node and moves the sash. Despite the fact that the structure of products is characterized by complexity, they work perfectly in the winter season, because the sash does not come into contact with the earth.

Rotary-folding
This design is optimally suitable for garage conditions. For installation in the yard, they are not suitable, since the gate limit the height of the race. The canvas should freely function with the help of lifting and shifting the sash under the ceiling of the room.

Swing
Such designs with the door are often installed in the private sector on the fence. The opening gates are based on the pillars, two of which are located on the width of the canvas, and the third pillar is located next to the gate, if it is located next to the design.


Rolled
These designs appeared on the market recently. The gate is made of steel strips, which are combined into a flexible canvas. When it is necessary to open the gate, they begin to turn around and wound on the shaft. This solution allows you to drive up close to the room.


Folding
Folding gates are known to many entitled "Harmoshka". The opening of the canvase can be carried out up and sideways. Sealing gaskets are located between metal grids. Wide distribution received designs, the opening of which is produced up.

Production features
Each type of gate has its own features in the design. Before proceeding to the manufacturing process, the schemes of the structure of the canvas should be studied and to work out the action plan. Swing gates are not among the exceptions in this matter. Make your own hands the gate of a swollen type from a professional flooring, even a newcomer, who has not previously worked with metal products.
To make products, you will need skills to work with a brown, welding, screwdriver, construction tape measure and a grinder. The design of products is designed in such a way that the operation of free space must be accompanied by maximum functionality. The reliability of the gate corresponds to the blocks of the rollers, which are located at the bottom of the profile beam and move through the opening or closing of the flaps.


There are several features of the gate of this type that distinguish them from other structures:
- when assembling the web, push-button angular connectors are used, thanks to which you can eliminate the seasters during use;
- material fasteners are hidden, thereby retain the decorative properties of the gate. Also, such a decision does not allow foreign objects to enter the space between the profile;
- the fastening of the sash is made with the help of three-section loops. Details allow you to extend the service life.


Studying the drawings of the standard canvas made from the professional leaf, you can notice that the framework of the metal profile of the square shape is used as the basis of the design. Alternatively, a thick-walled pipe is used, the diameter of which is 30 mm.
To strengthen the sash, metal straw is used. It should be placed horizontally. Such amplification allows the geometry of the canvas.

You can consolidate the sash with the help of electric welding or screws for metal. Since the professionalist is lightweight, there will be enough two strong loops with a diameter of 20 mm. In the role of carrier supports can be pipes made of metal with a diameter of 60-100 mm.
Fastening of portal sash is carried out on the basis of a fence that is present on the site. If you are planning to install a brick hedge, refer to the installation of mortgage sutures between bricks. Mounted supports will be welded to them.

The optimal width of the entrance gate on a private area is 3 m. Data dimensions are enough to make a cargo or passenger car into the yard. The height of the gate should not exceed 2 meters.
In the role of a locking mechanism, you can use pins in the form of the letter "G". They must be located at the bottom of the sash. Special fixators are laughed into the ground, which are metal tubes, the diameter of which exceeds the thickness of the locking mechanism.
So that the new gates harmoniously fit into the overall interior of the plot, you can use professional flooring for decoration framework. As a rule, the material is attached to a frame of the canvas.
Observe the distance from the Earth, which should be 50-70 mm.

Selection of material
The type of material from which the gate will be manufactured will affect the design dimensions, its weight and other factors. Typically, frames for flaps are made from the profile pipe with a cross section of 60x40 mm. Choose a metal whose thickness is 1.5-2 mm.
The size of the section is also dependent on the mass of the gate, but experts are recommended to make a choice based on the following indicators:
- if the total weight of the carrier sash does not exceed 150 kg, the pipe can be used, the cross section of which is 80x80 mm. Metal thickness should be 4 mm;
- with the weight of the metal gate from 150-300 kg, it is necessary to use a pipe with a cross section of 100x100 mm and a thickness of 5 mm;
- if the weight of the design exceeds 300 kg, the iron pipes are suitable, the cross section of which is 140x140 mm with a thickness of a material of 5 mm.


To create racks, you can use brick, wood or concrete. When choosing a material, it is necessary to study the properties and its resistance relative to the estimated loads.
The loops can have adjustable or unregulated mechanisms. Make sure that the manufacturing material has high quality, as the loops must withstand the weight of the canvas.
The lock may have a mechanical structure or function based on electromechanics. The choice should be carried out on the basis of its preferences. You will also need paint for staining racks and plates from metal products.
The casing can be made from any material. Many people make a profile skin, some owners of country houses choose the combined versions of wood and metal or PVC. For this purpose, any option will suit you.


If you are planning to create an automatic gate, make the frame more durable. Automation can be installed immediately or later.
Dimensions
The optimal option is the construction of the gate simultaneously with the hedge. However, many people face the situation when they need to expand the passage or replace the old product. In this case, it will be necessary to make an accurate calculation of the future gate.
Carrying out measurements and calculating the required number of material, take into account the coverage of driveways. If your territory is equipped with an asphalt, concrete or tiled surface, you can leave the lumen of 5 cm. If the grass is present on the road, increase the lumen up to 10 cm for a comfortable opening of the gate.


Do not forget to leave the gap between the flaps so that in the future it was possible to level the offset of the supports.
Tools and components
Gate can have a variety of build. Many people equip the canvas with built-in wickets for convenience. Before creating the gate, you will need to thoroughly think about how the finished canvas will look like, draw a diagram or sketch of the design. Such a solution will help you to decide on tools and materials that will be required to create a canvase.

The standard list of components for creating a gate consists of the following positions:
- cleaning for sash, support pipes;
- fittings for creating rigidity;
- pipe from the profile or a square of metal under the frame frame;
- soil, material for painting;
- sewing, clamps or shutter mechanisms;
- loops for sash, guide and closers if necessary.

The following tools will also need:
- construction cord from Capron;
- apparatus for welding;
- the hammer;
- screwdriver or drill;
- electric Bulgarian;
- special metal scissors.


When planning a new gate, you will need to pay special attention to the design dimensions, the presence of gate. At the expense of large flaps, the mass of the entire structure increases, so the frame should be made from reinforced material.
How to make it yourself?
The gate is manufactured in stages. The process is divided into two steps:
- installation of racks for placing the canvas;
- creating a swing gate.

You can replace the steps, but the pillars for a portal design must post at least seven days, after which you can hang on them frame. In order not to spend in vain time, you can proceed to welding.
Installation of supports
Supports can be made of:
- profile pipe;
- pillars from concrete. You can buy a finished product or make fill yourself;
- brick or natural stone.
- wooden timber.


Mounting supports can be carried out using the following methods:
- bounce. The depth of the driving should be about 1.5 meters. This method is considered the fastest and economical. When choosing this method, you should closely monitor the level so that the gate does not shift;
- concreting with reinforcement. You will need to strengthen the column with a concrete.


Step-by-step instructions for installing supports:
- if you decide to make concreting, you will need to drill a hub with a minimum depth of 1 meter. Make drilling is needed by a brown, the diameter of which is more than 200 mm.
- the depth of the pit will depend on the degree of soil freezing in your region. The width of the parties can be determined by the quality of the soil and the size of the support itself.
- create a concrete pillow with a height of 150-200 mm. It should consist of sand and rubble. The pillow is used to eliminate racks;
- then it will be necessary to mount a pillar and align it using a construction level. After leveling, the support can be started to the fill;
- boot design should be perfected during the week. This is the minimum deadline that is necessary for pouring concrete. Do not forget to periodically wet the concrete with water to eliminate the appearance of cracks;
- to increase the reliability of the supports, it will take reinforcement and remove a pair of reinforcing mortgages under the loop.


Creating sash
Before starting construction construction, you should decide on the location and appearance of the gate. The place where the installation is made can affect the appearance of all elements.
If you plan to install the gate on the rear yard, when entering the garden zone or create a fence for the future construction site, you will need to choose simple materials. For the front gate, you should choose more expensive and presentable products..

Universal guide for the manufacture of the gate with their own hands:
- prepare a drawing of a future design. With the help of the scheme you can produce the exact calculation of the necessary materials;
- rama for the gate must correspond to the dimensions of the finishing finish. Observing this condition, you can simplify the entire process of work and will not come across the connecting seams on the front of the canvas;
- in the work of calculations, the operating width of the finishing materials should be used;
- to create components for the frame, you will need to cut the pipe of the desired length and polish it;
- grinding is required for cleansing products from rust. If oil lubricant is present on the metal, it can be removed using solvents.


Welding
When interacting with welding, you should not forget about precautions. If you are not enough experience, refer to the specialists. With this method, you can improve the quality of work and get the design of an attractive type.
Joints should be carried out in such a way that water fails into the pipe. If you cook the joints wrong, snow or water will fall into the pipe, which in warm weather will begin to increase in volume. This will lead to the expansion of the walls of the product and deformation of the entire design.

If you boil an external and internal framework, a chess order will be performed. Thus, it is possible to eliminate the gaps of welding seams during thermal extensions.
Stiffness ribs affect the resistance to wind loads. If you are filling the fence with finishing material, make the pipe welding in the middle part of the exterior seam. In this way, you indicate the place of attachment of the casing material.
The welding of the loop should be made to the columns and to the frame. If you used for the manufacture of columns of bricks, and the removal of the reinforcement was not produced, it will be necessary to fix the channel on the brick, after which you begin the welding of the loops.

Primer
Regardless of which material you use to create a frame, it will take priming. The primer prolongs the life of the paint and makes the process of applying it more comfortable. Welding places should be primed more carefully.

Coloring carcass
Before painting, remove all the dust from the frame. To paint the item, you can use any type of paint. Most people use the spray, as it guarantees a more smooth layer overlay. The use of brushes delays the process, but lowers paint consumption.

With this step-by-step guide, you can independently make the gate and simplify the process as much as possible.
About how to install the gate with your own hands, see the next video.
Beautiful examples and options
A beautifully decorated gate will attract attention to the site and demonstrate a good taste of its owner. Popular benchmarks. Decorative flaps look expensive and sophisticated. The inner side of the design can be sewed with polycarbonate sheets. Externally, such a gate looks like a real work of art.
Products can be installed in the country or in the country site. By patterned elements you can show the individuality of your territory.

Stained-glass inserts on the entrance gate give the whole territory and unusuality. Designs demonstrate their brightness and non-standard, attracting the attention of others. You can choose any design depending on your fantasy. The style of ideas should be combined with the rest of the design components.

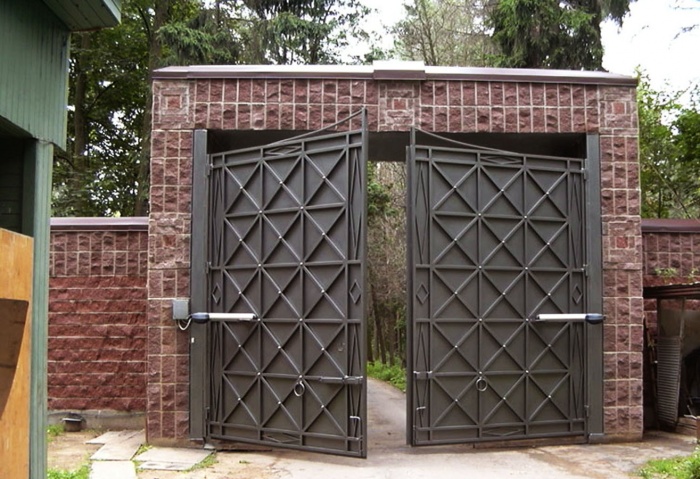
If you want to give a plot of a more rigorous appearance, pay attention to the deaf gate of the metal with the forging elements. They will harmoniously combine metal with a decorative ornament. The selected design will show a good taste of its owner and hobs the territory from curious views.

A gate from natural materials can be installed on a plot that borders landings. For support you can use a stone. Such canvas look beautifully on the background of nature. Natural components will serve for a long time if you handle the surface using protective equipment.
The strength of the gate is guaranteed by stone supports. This design is convenient, since when replacing the main web, it will not be necessary to dismantle all the goal.

Compact white gates always attract attention. White color solution gives products lightness and weightlessness. Although the gate has a catchy color, they will be organically combined with the overall style of the territory.
The design will add up of passersby eyes, as it is believed that such a gate can afford only wealthy people.

Retractable products with original design will look good at the cottage. They are able to save space on the plot and will delight you with their modern style.

Many people equip the gates with wooden wickets, which can be used not only as an entry into the territory, but also for zoning space.
Swing gates - no rural courtyard of Russia, no country house will no longer cost them. It does not matter what their design is: deaf metal or wooden, openwork forging or simple welding of rods, corners, pipes.
You can make your own hands
Their design is the simplest of all known: retractable, lifting, one or two-dimensional. They are letting and produce a car owners, a cargo scooter "ant" or a motor-block with a trailer. It can be with a signal yellow lamp or antenna remote control "Close-Open" mechanism. With a gate for adults and children in one part of the unincuff or separately.

Who has not yet borrowed similar, read our recommendations for creating limiters for entry, consider photos of the drawings of the gate, assemble the necessary tools, purchase materials and proceed to work personally.

And if they decided to build a garage in the courtyard, the experience gained at the assembly of the dispenser on the estate is suitable for mounting entry into it.

Also on the site can download the drawing of the garage gate. The design of these gates is simple and understandable, installation is simple, ease in opening / closing, reliability.


Principle of device
The design of such fences remains unchanged century. Only materials for disassembling are replaced. Elegant profiles and polycarbonate are added to traditional variants (from simple metal or wood).

The advantages of unincuffs are:
- easy assembly, mounting
- minimum cost when assembling do it yourself
- durability
- convenience service
- suitable for office territories, technical complexes, garage cooperatives
- variation width of sash up to fifteen meters

Pay attention to the installation
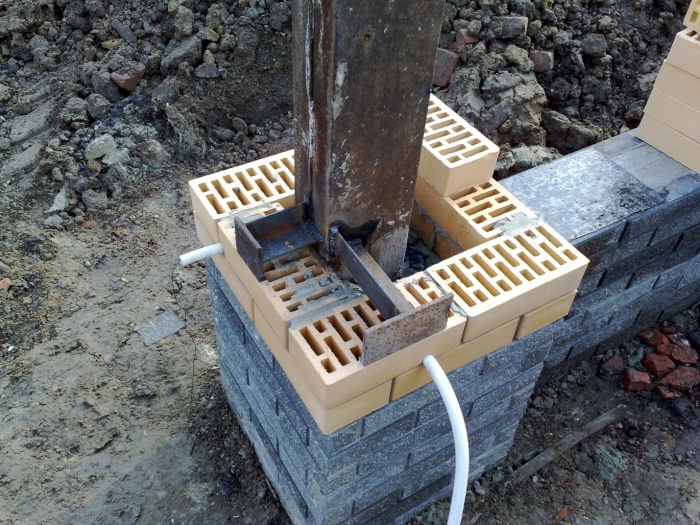
Gates are attached on lateral racks from pipes with a diameter of 10 cm, welded pairs of corners or finished profiles. They are concreted to a depth of at least a meter so that the frost does not "led" the gate.

Heights are enough two meters, as much width of each sash. They swallow or immediately, or each other, inside the yard or out. This must be thought out immediately. Hung on a loop, well blurred graphite mixture so as not to creak.

In the closed state, if there is no opening mechanism, they are fixed in several ways. Either transversely mounted inch tube on a pair of hooks on each sprinkle or fastener at the junction of the zinc, mounted in concrete. The bottom mount will be needed in the case of simple fixation of each disinteg.

Facing, painted professional flooring or polycarbonate, attached to Ramam on bolts or self-tapping screws. The last hardware for the square meter of fastening should be eight - ten pieces.

The last material leaves it in its transparency or color your taste color. Successfully looks professional flooring, which is continuing in the form of a fence from the gate along the entire length of the front of the estate.

Minus gate format - the big turn. This is a special drawback for winters when you need a lot of snow to clean up to open the gate.

Mechanization
This convenience will have to acquire as a finished product, the same for a long time will have to make. The mechanism is similar to the door closer in the entrances, only much massive and more powerful.

It is possible to install closer to Earth, if the winter is minor, and better in the middle of each side of the gate. For the middle, less bulky closers are sold.

In both cases, it is necessary to weld the designs to fastening the spindles. Our descriptions are minimal, you can see all the procedures on the video drawings of the gate.


Alternative to a swollen gate
If you are not satisfied with you because of the opening area of \u200b\u200bthe gate, look at the possible drawings of the retractable gate. Perhaps build them at home. Only such a gate will be doubly harder. Since instead of the area of \u200b\u200btwo sutures of swing, here they will be cooked together. A cone is added at one end of such a design.

It is necessary to completely close the space of entry. Therefore, moving such a gate on one line along the fence manually problematic.

Therefore, we need a mechanism in the form of a gearbox or worm transmission to the sled teeth. For winter use, it is necessary to consider protection from snow and rain.

Their length for standard gates on the estate is equal to four meters. The driving angle adds at least 1.6 meters. Fastening is radically different from swinging.


On the length of the gate at the bottom of the profile sled to promote the design on them. From the two sides, rectangles are rectified in concrete with a slightly higher than the gate with a distance between verticals 10-15 cm. The frame moves through them, and when closing they hold it. On the one hand, two meters are concreted the platform, it strengthens the continuation of the profile and the entire mechanism of movement.


On the site you can also download the drawing of the garage gate. Below we will talk about one garage design.

Garage lifting gates
There are two more types of gates - lifting and garage. Actually lifting are mounted in the garage separately and built into some kind of building. They are not suitable for outdoor air, because they have a complicated design for the street. When lifting, it will create sailboat in the wind, which will lead to the deformation of the frame.

The drawing of the lifting gates for the built-in garage shows that it can be opened in the winter even at a snowdrift in front of the engine compartment.

The end of the entrance simply goes along the lower salads upwards, and the two top wheels in the same guide lead the design almost horizontally.

If the gate is not made of too thick metal, but from the profile, then lift and empty can be manually. Provide on the outline of the gate soft seal from wind, snow, rain.


Photo of the drawings of the gate


When homeowners are engaged in the construction of fences around their real estate objects or in the process of building garages, there is always a need to solve the task of building a gate. First of all, it is necessary to accurately determine the appropriate variety of gates. In such a question, an important role is played by the miscalculation of the smallest nuances, since there are often situations when after installing the gate, it is necessary to carry out additional work on the arrangement of its site. It is for this reason that the design features of various types of gates must be studied before buying materials.
- Retractive;
- Swing;
- Lifting-swivels.
Each such design has its own certain differences, so it is necessary to study them separately.
Swing do it yourself with their own hands
Stages of construction:
- Installation of racks for hanging.
- Making the gate themselves.
The sequence naturally can always change.
Such materials can be used as racks:
- Profile tube with a certain cross section;
- Reinforced concrete poles;
- Laying of brick or natural rock rock. In most cases, the stone is used for the purpose of cladding;
- Ordinary wooden timber.
Consider existing column installation methods:
- Metal pipes are buried in the ground approximately 1.5 m. This technique will always differ from the other financial benefits and time savings. There is also an emergency rack replacement. In order not to have a challenge, it is recommended to clearly withstand the same level when instilled posts;
- The equipment of a kind of foundation from concrete as a base for pillars.
More attention should be paid to the second installation method.
Sequencing
- With the help of an earth drum, the drill is digging, the minimum depth of which should be 1 m;
- A special cushion for concrete from sand and a crushed stone with a thickness of 150-200 mm is equipped. Such a platform is necessary in order for the rack to never deepen;
- A post is installed and gradually aligns with the use of a regular construction level;
- The rack is poured concrete.
To assemble the gate, it is necessary to determine the size of the upcoming design. To simplify the work, it is recommended to create a drawing on which all sizes will be indicated.
 After that, you can start making parts for the frame for the drawings in advance. When performing welding work, you should always remember the safety technique. It is advisable to entrust this business to a qualified specialist. It should always be remembered that the number of rigidity ribs largely determines the stability of the future gate to external weather conditions. If pipes are used as racks, it is advisable to prevent water from entering them.
Also the gate can be decorated with products made by cold forging. After the gate is collected, you can put them on the loop.
List the main advantages of swing gates
- Economy;
- Relative simplicity of installation;
- All stages of installation without much difficulty can be performed by their own;
- For the manufacture of such a design, different materials can be used.
Disadvantages of swing gates

In general, the installation of the swollen gate is nothing complicated.
Sliding gate with their own hands
Retractable gates are set a little harder. On both sides, the equipment of such a design is put by brick pillars, on which rollers holding on the altitude of the bracket and fixation elements are installed.
The main weight should always withstand a channel that is fixed to a reliably established foundation from the inside of the gate or on iron supports.
 Under the channel you can install a solid foundation or several durable columns. For the foundation you will have to equip the pit, at the bottom of which the pillow of rubble and sand is equipped. After that, a formwork with waterproofing is put in the pit. A reinforcing lattice is installed in the formwork, after which the concrete is poured into the pit.
A cower with reinforcement is mounted on a concrete foundation. This element is strongly pressed into the solution to its full immersion. When concrete solidifies completely, it turns out a sufficiently durable railway. Only after solidification of the concrete and the installation of the channel is engaged in the installation of the gate themselves.
 For a frame, you can use a square tube or a regular iron corner. Additional stiffeners are required to be welded to the square frame to increase the stability of the design being created. Each welded seam is necessarily cleaned by the slag formed. The frame is ground, after which is covered with special paint capable of protecting against corrosion. Only after that the framework can be installed on the frame.
When all the components of the design elements are prepared, and the foundation with the built-in console channel will become quite strong, you can begin the attachment of the components of the sliding system.
Installing the sliding system

Console beams are mounted at different heights. When developing such structures, the definition of dimensions must be performed with particular accuracy, since the console can be deformed even with the smallest errors.
Only 2 features can be attributed to the disadvantages of the sliding gate.
- If compared with swing, the sliding gate is a little more expensive.
- To roll back, it will take a bit of space along the fence.
List the main advantages of such gates

More information on the installation of a rollback gate can be obtained in this video:
Installation of lifting-rotary gates
First of all, it is necessary to design a lifting switching system. To do this, you need to change the dimensions of the opening and personally make a suitable sketch or find a suitable drawing. After purchasing all components and tools, you can start a setup, which consists of these steps:

After the assembly is completed, finishing and painting work can be carried out. At the bottom of the profile, there must be a special groove for the seal.
Dignity

The disadvantages of lifting-turning systems include

More information about the installation of lifting and sliding systems can be obtained by looking at this
Video:
For the sake of ensuring the safety of residential premises or an industrial facility, today it is customary to install fences and gates. Today, modern homeowners use three main technologies for assembling the gate. The essence of technology is the way they are discovered. To assemble any variety with your own hands for anyone will not be much difficulty.
Having conceived the construction of any type of fence for your country house or during the construction of such an object as a car garage, in any case the question arises about how to make the gate with your own efforts.
Types of gate
Before you start purchasing the various materials necessary for further construction, as well as start the work yourself, it is very important to understand the sliding gate as a whole, you want to quickly make a sliding gate with your own hands or any other kind.

If you do not pay attention to all different important details and choose this is not the best design, it is possible to obrace yourself for additional not only financial, but also time costs

One of the easiest options, which in practice, most often can be seen in a country house, is a swing gate with an additionally built-in or directly adjacent to the installed gate.
This design of the gate consists primarily of two poles. The wicket flaps, as well as the gates themselves, are installed on the loops, welded to the support pillars.

Depending on the wishes of the owners of the house and the councils of builders, they are sometimes fixed to the inside of the support, and sometimes to external. Actually, in the future, this will have an impact on how the goal flaps will be opened - out / inside.
Very often if the photo is a gate of such a look, we can see that they are made entirely of high-quality wood. An important moment to pay attention to: when creating sashs, they do not need to be too massive. Otherwise, the load on the installed loops and the reference pillars themselves will be too large.

It should always be remembered that the parts for the suspension in size, as well as according to the properties of strength, should ideally correspond to the weight of the selected sash.

Despite the fact that this design has a huge number of various advantages in contrast to many others, she also has its own minuses. For example, over time, the tilt of the support pillars may occur, or, which also also happens quite often, sagging.
However, it is worth it in mind that this kind of drawbacks can be manifested only in one case - if the installation technology was originally broken or if the weight of the sash was incorrectly calculated.

Advantages of sliding gate
In the past few years, sliding gates became especially popular. In principle, the drawings of the gate of these can be found in free access practically on any resource. Their peculiarity is that they have a division into several subspecies and choose first of all necessary depending on the specific conditions.
It should be borne in mind that this option of the gate is suitable only when there is enough space along the fence that was installed. Otherwise, when opened by a movable sash, it simply will not be able to move.

Having so much to make a rollback gate, it is worth it in mind that their installation is somewhat more complicated than, for example, at the gate of the swing type. On the sides of the passage when installing this popular variety, the gates most often installed quite bulky pillars straight from white or red bricks.

They are later mounted videos. They support fixators, as well as brackets.

Lifting gate.
This is the perfect option for subsequent equipment, such as a garage. If you select the perfect protection in the form of a gate for a closed passage to the courtyard of the house, then this type of gate is not suitable due to the fact that they limit the height.
At the same time, such a gate should always be enough just to open and, accordingly, close by easy lift and the subsequent movement of the entire canvas sharply up into a smooth horizontal position.

Most often, the canvas for this type of gate is created from the metal, which is further trimmed or high-quality wood, or any other material.
Go to the setting of the gate should in any case, solely after absolutely all drawings and instructions are studied in detail. Only then are the materials that may need and the design is assembled.

Note!

Photo goal with your own hands


Note!


Note!


