How to make a miter box from wood yourself. Miter box - from simple to precise, how to properly use a tool
Navskisnik- this is a tool device that looks like a U-shaped tray with barrel saw slits, designed for sawing under a given cut of lath material.
When installing base or frame skirting boards, trim on doors, laying electrical wiring in cable ducts or manufactured furniture, there is a need to cut the material into sections at a given time under direct or It's 45 degrees here. You can initially saw out the material after application using a special cutting line. However, in this type of robot, there is a sense of importance and it is easy to commit inappropriate reprisals.
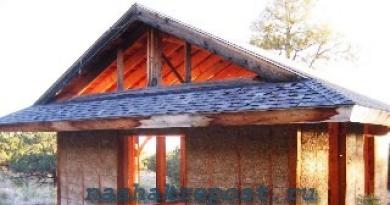
To increase the productivity and quality of sawing, a simple addition was invented, which is called a miter box. In the photo, the miter box is made from commercially produced plastic, with the help of a hand saw you can saw slats, bars, bundles of wood, chipboard, MDF, plasterboard, plastic and other soft materials under the cut with sufficient accuracy 45° and 90°.

It is enough on the rack, which must be adjusted to the size, to mark one point, insert the rack into the miter box in such a way that the mark is on a straight line, and with a hand knife inserted with a blade at the slot, saw the rack. The miter box should not be allowed to move with the saw blade and the end of the rack is no longer necessary.
Commercially made plastic miter boxes have a low quality, due to the larger width of the slots of the straight lines and the cutter they are worn by the saw teeth, the accuracy of the cut is low and in places where the baseboards come into contact or the waste is often lost Lines up to one millimeter wide. We sell high-precision miter boxes, which have the ability to change the cut at any intervals, and clamps for fixing the material that is being cut. However, it is very expensive to repair stinks, and for a one-time renovation in an apartment, it makes no sense to obtain such a requirement. What’s more, you can make a high-precision miter box with your own hands in a couple of years using available material.

To prepare a self-made frame you will need a bunch of metal or aluminum plates with a thickness of 1.5-2 mm and a board for the base of the frame about 10 cm wide made of wood, chipboard or plywood.
Making a miter box with your own hands
The dimensions of the parts are not important. If the board is wider, the sawing and the ability to saw wider slats will be more accurate. The width of the miter box must exceed half the width of the hacksaw blade, otherwise it will be difficult to saw.
The preparation of the miter box begins with cutting out the parts and their markings. In the middle of the base of the miter box, apply a straight line under a straight line to the side walls. A perpendicular line can be drawn by cutting it with a special braid or by taking any kind of paper or bent paper.

At the ends of this line, at the end of half the width of the board, lines are applied every day, which are connected with a marker using cut lines. The result was lines drawn out between 45 and 90 degrees along the bottom sides of the board. The head on the stand is perpendicular to the line in which the side walls of the miter box are oriented during installation.

On both side walls, in the middle, as well as on the stand, apply the coating along one perpendicular line. In addition, at the edge of half the width of the base, less than 5 cm, two more parallel lines are applied. Mark the marking using an additional ruler or caliper. Here you need to try to apply the lines accurately, so that the accuracy of sawing the material is dependent on this. What needs to be taken into account is that the wider the base board, the more accurate the sawing will be.

Next, you need to strengthen the section of the skin wall so that it touches the base of the miter box. Since the base is made of 18 mm chipboard, then you need to add a layer of 18 mm width to the chair. Draw a line in the middle of the stitching and mark points on it at a distance from one side for drilling the openings for self-tapping screws.

To ensure that the drill bit does not leak onto the cob, at the designated points, drill small corners with a core, then drill holes with a diameter of 4 mm and screws with a countersunk head, then it is better to create a countersink, although this is not obligatory Kovo

The stepping stone involves sawing out the grooves on the walls of the miter box. The mixture needs to be fixed in breams or using clamps on the table and sawed along the designated lines with a hacksaw. The middle line is sawed at a cut of 90˚, and the extreme lines at a cut of 45˚. High precision is not required here, but the robot must be carefully selected. The cut must only reach the line of fastening the walls to the base of the miter box.

Since the chipboard base is a soft material, it is best to use screws with a low rate of splintering for fastening the walls. If you want, you can use it either way, or under the arm of a 25-50 mm wedge.

After preparing the base and walls, you can proceed to the beginning, collecting the miter box. To do this, you need to accurately place the middle cut at the station with a perpendicular line on the miter box stand, pierce the solid wall of the side edge of the chipboard with an awl and tighten the screws. In plywood, it is better to drill a hole with a diameter equal to the diameter of the internal self-tapping screw to the depth of its depth.

Fold the miter box manually, securing its base with clamps on a self-made table for repair. In this way, the lower end of the barrel wall can easily be placed on the same plane as the lower surface of the miter box base.

During a trial sawing in a cutting angle of 45˚, it was found that the blade of the hacksaw was moving tightly, rubbing against the walls of the cuts. I had a chance to sharpen them a little with a flat file.
The side walls of the miter box are made from aluminum alloy, but they can also be made from plywood or other durable sheet material. The thicker the barrel walls are, the longer the miter box will last.
Apply robots from a frozen miter box
The miter box helps me to cut the lath material accurately. For example, when laying electrical wiring, it may be necessary to cut the cable channel at a straight line of 45˚.

To do this, it is enough to place the cable channel on the stand of the miter box, resting it against the far wall and, using a metal saw, accurately cut out the required cut.

After removing the walls from the place and cutting out the burrs, the parts are obtained with virtually no gaps.

In style, you can easily cut out the polystyrene foam plinth. Using the fine teeth of a hacksaw file, the end of the plinth comes out ready for hammering without additional trimming.

So the skirting board itself is cut at 45˚. It can be rotated in any way and create a better fit both on the internal and external walls.

An indispensable miter box even when the plinth is installed for the base. You can not only cut out the necessary sections until the plinth is finished, but also, when supplied, shorten the plinth by one millimeter, which is practically impossible to produce without a miter box.
As you know, a miter box is a necessary device for extracting high-quality work with minimal effort. Raju, it’s a must to make a miter box with your own hands; you’ll need it just in time to renovate your apartment. With the help of this step, you can make a frame for a photograph or a painting, or saw through a plastic tube using a plumbing tool. It is important to handle all cases of miter sterilization by the home master.
In order to quickly and accurately cut a plinth under the required cut, create a framing frame for a picture or decorate a French city, you will need a carpentry tool to create the correct joints of cut and smooth cuts - a miter box. In this case, you don’t need to be a professional carpenter. It’s a good idea to let the perfect kitchen tools work for beginners who are the first to take on the task of renovating their apartment on their own.
Household stores offer a wide range of various types of woodworking products, made mainly from plastic. A commercially available plastic miter box has few defects. Direct openings are made of a standard width - for saws with teeth of different sizes, and not for your special wood hacksaw. As a result, after a number of times the stench wears off and becomes larger. This will lead to death if the necessary cover is removed.
To avoid ruining your home with an unclear tool, it’s easier to make a miter box with your own hands.
Advantages of a self-propelled miter box:
- Yogo vygotovlennya not vimagatima rich time;
- Expensive purchased materials for preparation at home can be replaced with scraps of wood, such as;
- The dimensions of the miter box and cutter will be adjusted to suit your needs;
Let's take a quick look at how to make a miter box with your own hands.
Lesson 1. Preparation robots
The simplest version of the prepared miter box is a wooden box made of three parts: the bottom and two sides. Need:
- A wooden plank made from hard wood, about 1 meter long. For oak, the thickness of the board is sufficient at 10-15 mm, for pine - no less than 20 mm. The height of the beam walls is selected depending on the planned work. For example, if there is a robot with a plinth, then the height is no less than 30 mm, with wooden slats - 50 mm. The width of the bed is selected depending on the type of workpiece that is being cured. For skirting boards, the size is no less than 150 mm.
- Hand saw. It is important that the emptying parameters are prepared for the file you plan to use further, and not at random. It is therefore recommended to select a hacksaw with optimal parameters of hardness, tooth size and blade thickness.
- Ruler, olive, straight cut tool.
- Samonarise and emery papier.
Saw the board into three parts for the next day. Sand the workpieces, especially the ends, and level the edges to 90 degrees. Connect them with screws that reliably fix the skin. For reliability, you can glue additional dowels and secure the elements of the box with an additional clamp. Let the glue dry. The base is ready. You can stick gum on the bottom part, then the miter box will fit perfectly on any surface
Croc 2. Layout
You can put a front marking on the paper, or you can make chairs without the middle on a wooden box.
Draw perpendicular lines at the ends of the side parts. Measure the outer width of the miter box and create the first mark. Then make another sign on board on the riser, which is the same width as the box. Similar to the other side. Having reached the pressure marks, move to 45 degrees. You have to create a square to visually project all the signs onto the surface.
Check the accuracy of the marking several times – the lines between the marks may be the same, but they are strictly parallel. Place the brush of your robot in the middle of the marking.
Croc 3
Using a wood saw, cut slits on the sides of the box using three marks diagonally and perpendicularly. This requires maximum precision from the robot. The grooves can be widened by finishing them with coarse-grained emery paper. Please, polish and prepare your instrument.
In three short minutes they described how to make an elementary miter box with your own hands from wood.
You can also make it with your own hands using a miter box. With this method, a non-crushing base is formed directly, which is wrapped around the saw, which is fixed under the part required for cutting from 0 to 360 degrees.
This is also a practical professional tool that allows you to set and adjust the required cut to one degree. The more foldable structure of the rotary miter allows you to accurately fix the material that is being formed, as well as cut vicor and special marks under the skin.
Vikoristannya
Once the miter box is ready, you can print the prepared and cut parts. Ale varto master a few rules of your literate wiki:
- Correctly signify kuti. It is necessary to ensure that the plinth is wrinkled on the left and right sides. Therefore, if the plinth is nailed to the right side of the room, then we saw it out and inadvertently.
- Don’t confuse your inner and outer worlds. For this purpose, make a front marking of the material, and then place marks with grooves on the miter box. For reliability, the structure must be secured with a clamp and then sawed.
- Remember that the baseboards and bed sheets are one and the same, so their sawing must be done in the same order.
- In case of failure, it is necessary to fasten the plinth that is being sawed, in the same position as it will be placed on the base or on the wall.
- Once again, we won’t forget to fill our hands in advance - practice on scraps.
Making a miter box with your own hands is not at all difficult. Such a carpenter's tool will be at your disposal in the future for sawing out the baseboard and baseboard, cutting out different lugs and frames, closing the door and creating beauty in the city.
Vilna has the right
Creating frames for canvas or baguette frames for paintings takes just one hour. A miter box is also an ideal tool for slicing bread, eggplant, watermelon, syringe and anything else your imagination desires.
Good luck in mastering this incredibly useful and richly-cut tool!
The miter box is one of the most practical tools in the world, and can be useful for carrying out routine and repair work. This article will show the specifics of the preparation, the scope of its preparation, and also describe the convenient method of preparation.
What is this miter box and why is it vikoryst?
The miter box is an additional tool that is used in work with different materials, where it is necessary to cut an object under a specific cut. The tool comes in different types:
- standard;
- rotary;
- electric

Well, let’s take a look at the skin displays.
The tool has a simple shape - a tray with grooves on the ends for sawing. This design helps to carefully cut the installed plot under a specific bush. The standard form has a miter box of 45 degrees and 60, which is most often used in everyday life.
Find out other variations of the chair, which are suitable for professional work. One of the variations is the turning miter box. This form helps to create a section of an object with maximum accuracy and the least effort. A similar miter box forms a stand and is fixed to a new rotating part, which is a direct element for the file. This part can be fixed literally up to 1 degree, which helps to cut the object accurately and accurately.
One of the most expensive and convenient variations is the electric miter box. Behind your form, place two parts: an electric file and a turning miter box. Roads and professional applications are marked with the help of a laser. This type of miter box allows you to create an accurate cut of objects in a minimum amount of time.
In fact, it can be seen that these tools are used in carpentry robots. In its form, it represents a pattern used for cutting the material under the cut. The most popular method of curing is the miter box for baseboards, both baseboards and pedestals. With the help of an additional tool, the worker can efficiently powder elements made of plastic, wood, plastic, as well as cable channels.

The process of using a miter box is practically not that easy. First of all, you need to place the object in the middle of the tool and carefully cut it with a knife under the desired cut. Still, in any robot there are present nuances and particularities. Before cutting the cob, it is necessary to take into account the cut: internal and external. It is clear that every worker and worker in the building can create such a tool himself. The process of preparing the steel is simple and does not take too many hours or a lot of materials.
Advantages of a self-containing miter box
Such a tool can be purchased from the store for a low price. Ale, the self-contained design has its own advantages and peculiarities:
- the ability to create a richly functional tool from various external parts;
- The prepared material is made of sterile material, which helps the machine last for more than one river;
- quick preparation method;
- minimum quantity of wasted items;
- The preparation of the tool will be cost-free, since you have old boards in need of repair at home.

One thing that is missing in a self-made tool is to create the correct layout for the designated cuts.
List of required materials and tools for work
Making a miter box with your own hands is not so difficult, as long as you follow the recommendations of the fachivts. For the cob, make sure that the materials prepared for the work are polished. To prepare a miter box, it is important to choose wood that is dry, without dents, and has a smooth surface without any defects. It is not good to choose plastic as the output material, even if it is not plastic, otherwise it can easily get damaged during operation. The boards, prepared for tools, are about 2 centimeters thick.

Before starting the cob, prepare the following devices:
- Line and olive;
- fine-grained skin;
- hacksaw for metal;
- bream;
- drill with a different set of drill bits;
- Euroshurupi (confirm);
- A hacksaw with small teeth is used for sawing plinth.
All the above-mentioned tools may be sufficient to carry out the work. In the middle of the additional devices, you can use a hex wrench, which will make it easier to tighten the lock. Before the cob, it is necessary to prepare the grain elements for a self-propelled tool. First of all, proceed to the description of the instructions: how to make a miter box with your hand, be very careful about the detailed inspection of the preparation of parts before drying.

Vibir drank and miter saws
First of all, before the cob, it’s time to pick up a hacksaw to prepare a miter box. It’s best to choose a miter box for your hacksaw, not in order. A good clear file has the following characteristics:
- mati tonke lezo;
- fractional teeth;
- garnu cruelty.
The presence of split teeth is avoided by sawing the wood carefully and without wads. A ton of steel ensures that the material will be cut exactly along the line. Overly elastic blades for hacksaws are the only drawback. You can put it in with a pad - a special rib of softness and toughness. Knife blade - the photo shows all the features of this blade for the tool.
For sawing skirting boards and polyurethane, it is recommended to use a metal file. Such a tool is ideally smooth and has a thin blade, as well as the necessary rigidity to exceed the tension of the blade. Also, a hacksaw for metal can be useful for sawing patterned slots, and in robotic work.

Preparing the barrel walls for the miter box
To prepare the basic parts for the miter box, combine pieces of plywood or scraps from boards. To keep the instrument as clear as possible, follow the following recommendations:
- The approximate dimensions of the side walls are 10 millimeters for plywood and 20 mm for the board;
- their height is selected from 30 to 50 mm depending on the tool (for wall skirting boards we recommend 30 mm, and for wooden ones about 50 mm);
- The thickness of the side walls of the miter box should be 250 mm or more, otherwise it is not recommended to tighten it, as it will be difficult to handle. How wines can be used for a large dovzhina miter box, but it is better for massive objects.
After curing the side parts of the boards, two absolutely equal and identical elements are cut. This is very important for further sawing of boards and their markings for the tool. For prepared tools, there are special markings at the bottom for confirmation.
How to correctly make a marking for miter box cuts
Food tips: how to make a miter box? - It is important to first mark out the layout for the cuts, after which you can begin the remaining stage of the work. So, the process of preparing markings is immediate:
1. Two prepared barrel walls are applied to each other.
2. We check all the edges to ensure they are exactly the same.
3. After help, two workpieces are joined together.
4. Place a dot in the middle of the line and mark it with a marker.
5. After that, we measure 45 and 90 degrees on the protruding edges.

6. We begin to work by cutting diagonally with the help of a hacksaw. This device has split teeth to ensure a smooth and neat cut.
7. For direct sawing of clay, the cut is important so that you can continue working with a carpenter's saw. The cut should only be done in a miter box, but not deeper.
8. Using the same method, we cut another gap perpendicular to the point, which is important for smooth cutting the edges of the plinth.
9. After everything, use a sanding paper or a file to clean the cut to remove the smudge.
Preparing the miter box: the remaining stage
At the remaining stage of the robot, it is necessary to eat all the workpieces:
1. The barrel parts of the workpieces are applied to the base, so that the end area of the guide boards can be connected to the barrels.
2. According to the previously indicated signs behind the drill, open firmly. It is better for the drilling process to set drills with different diameters, less than one-stage ones intended for confirmations. Using large-diameter drills, we create an area for confirmation, and using a sharp drill with small divisions, we make a hole of the required length at the base of the end.
3. After confirmation, all details are tightened. For greater ease of use, you can make an opening in the middle of the tool and connect it to the table or other flat surface.
5. You can prepare a hole in the base of the device that will stick as marks for handiness during the robotic process.

Insanely, the miter box can be used practically for leather, but in any case, the nuances and particularities of the work can be taken into account. For example, if you want to make a disassembled tool, you can secure it with sealants, and the glue should not be too hard to set. For professional and stationary work, it is better to attach the tool to a surface, for example, to a work table.
If the work is very important, on the reverse side of the working surface, attach a piece of material, for example, gum, to prevent the tool from collapsing. During the process of preparing the tool, be sure to correctly open the width of the base. As a rule, it should be stored in the size of deposited materials.
Vikoristan miter box rules
To learn how to use a chair in a robot, you don’t need any singing skills. It’s not so difficult to figure out the option of sawing out the cuts, and all the knowledge will become available to you in repair robots around the booth.
Zrobiti miter box is just one piece of work. To learn how to accurately sand parts, it is important to properly position the tool on the robot. Tim, who first comes to the right of sawing kuti, needs to follow the world of kuti. To improve your skills, you can practice from scratch on samples made of wood and polyurethane baseboards.
Please note: When choosing a machine, it is necessary to remember certain details and features of the work. It is also important to ensure that the baseboards that are connected are the fault of both parties – right and left:
- the right side should be placed on the right side of the plinth, and the part to be cut - on the left;
- The left side of the plinth is placed in the tool from the left side, and the cutting is on the right side.

This rule is good for beginners, but it’s still not good to ignore it in work.
Another rule is to press the necessary item to the sides of the miter box, so that it is necessary to identify closer or further from the master the item to be cut. This modification can be clearly seen on the butts and commodities used by the practitioners.
You can see the main mistakes that practitioners make when using a miter box with a hacksaw incorrectly.
1. The first mixture is placed on an inaccurately curled plinth. In most cases, the failures result in the cutting of the skirting boards becoming uneven with each other. To eliminate the cost of grinding, carefully divide the plinth into small parts, and adjust them along the periphery, and not along the edges, using straight inserts.
2. Another mistake comes from the confusion of both external and internal affairs. To assemble, it is important to mark the item by applying marks along the main lines. After this, you need to connect the marks with the grooves on the tool, secure the plinth and dust it.
3. The final cut lies in the wrong profile of the baseboards. The stinks of the skirting boards, and it is necessary to saw them off in vain.
4. The only advantage is that after cutting the baseboard you won’t get rid of the stench. In this manner, secure the object in the instrument in the same way as it is on the stele.

When working with a swivel chair, it is necessary to follow the same instructions and recommendations, regardless of the position set.
With our recommendations, you can easily prepare your own miter box without any hassle. We hope that the instructions and explanations we have given will help you work on your work without difficulties and will become useful to you in practice.
When sawing, be sure to do everything carefully so as not to cut the enemy and not to overdo the work. If you don’t have the skin, you can get the perfect cut for your eye, fortunately in the 21st century this is not required. Maistry has long been using a miter box for plinths, which helps to dissipate the materials under the necessary, and the smut - the right cut.
Suspension makes it easier for the robot, and You don't need a special set of skills for vikorstan. There are a number of types of tools with a different set of features.
Vidi

In everyday markets and specialty stores you can find different types of miter box. The stench can be detected at a low level, the skin from which infuses functionality and aroma. The simplicity of the design allows it to be manufactured from a variety of materials, expensive and cheap. Mainly for virobnitstva vykorystvayutsya:
- wood;
- zalizo;
- plastic;
- polyurethane.
The miter box for plinths can be entirely made from one material or a combination of decals. Here it is necessary to select the type of construction. Because here there is a variety:
- just a miter box;
- rotating mechanism;
- electrical attachment
The skin from them has advantages and shortcomings. The simple design is similar to a cinnamon with threaded slots for cutting under the cut. 45 and 90 degrees. Another variety is functional, allows you to fix the position of the cut under a different cut, and also includes a sawing mechanism with an interchangeable blade. The electric wort is similar to the front analog and can also have a turning point, but at the same time the hand saw is equipped with an electric one.
Trees

This type of miter box is problematic today, although it would be the first prototype of all other analogues. Wooden models are good because they are made of metal, so that when sawdust gets on the body, the teeth are not damaged, but the body itself is damaged.
Therefore, you will need to be especially careful and careful, or use a special file for baseboards. Due to impracticality, companies do not engage in production of this type. Ale wine is noticeably cheaper than others, especially if you work for it yourself.
Plastic

Wooden boats have been replaced by plastic options, made from plastic and special polymers. Since in the past I think the main disadvantage is the rapid wear, then this problem is even worse.
The structure is rapidly disintegrating and becoming unusable. Therefore, you need to keep an eye on the tools in order to mark the moment of breakdown and not damage the unwanted tool. And the advantages you can see:
- low varity;
- wide model range of sizes;
- the vaga virobu is small.
Metalevi

It’s not easy for a master to distinguish this type through grading, but it will serve the metal well better than its analogues. Because it’s easy to damage the property during work hours. Even in the steel body of the miter box, you can cut into structures made not only from wood but plastic, but also from molding.
Vikoristannya principle

In essence, the miter box for skirting boards is easy to use, but the fact is that robots are carried out on dangerous, foreign objects, requires the student to familiarize himself with the instructions.
Since the design is simple, the design rules will be much shorter, with less technical documentation available for electric models. The structure itself must be placed on a flat, stable surface, so that it is not cut during cutting. It is also necessary to prepare the following speeches:
- hacksaw, saw blade, disk (depending on the type of construction);
- correction knife for working with soft materials;
- vimiruvalny tool (roulette, ruler, vimiruvalny cut); olive for notes;
- sanding machine or “sandpaper” to clean the splits from unevenness.
In order for the robot to proceed without problems or defects in the result, it is necessary to take care of the file and the file itself. according to the material sawed object. Most often, a lot of problems arise from the incorrect selection of teeth on the instrument. You can also talk about clamps that can ensure reliable durability during the working process.
The very principle of robotic dosit is simple. Take a plinth or other object, measure it, place it in the cutting area, then place it in the hole and secure it (if possible). The saw is placed in the required hole and sawed to the required location. Cut the object in such a way that the saw is at the side of your working hand, so it will be more comfortable to cut.
Rules for sawing
The main rule is to choose the correct side for the cut. Frequently, incorrect fastening occurs, resulting in cutting in the wrong direction. In order to avoid such incidents, stock up on the witchcraft and sheep, which means the required side, kut.
Fasten the material, press it against the wall with its end so that the fixation is maximum and there is no damage. Finally, if the vikorist is not just a simple design, but a professional skill, then you can adjust the way without being limited by the framework 45, 90 degrees. You can start working only after you ensure that the material is recorded correctly and reliably.
And the rules for cutting are:
- Curing, marking;
- Fix the material, the marks will be avoided with a cut in the tool, it is better to place it so that the file is at the side of the working hand;
- Press the additional end as needed, take a file and saw;
- Learn more with other details;
- Smooth out any unevenness with a sanding or emery paper.
The rules may be subject to change due to changes in electrical, mechanical adjustments and other modifications of devices (clamps, clamps, cushions, nozzles, etc.).
DIY miter box

Professional chairs cost great pennies, and considering the rarity of money in everyday life, it is a dubious waste of pennies. In this case, the choice is liable to fall on the simple korittsa, which is less and simpler for the vikoristan. However, the basic models are not always suitable for work beyond the size of the cut.
In such a situation you can use a miter box with a hand to keep our orders in order. It is very easy to assemble such a tool and quickly, the head is properly prepared before assembly. And the following components are required:
- saw on wood, metal, or, more precisely, a hacksaw with alternating blades;
- clamps, breams, clamps;
- sanding, corrugating papier, needle file, blade with narrow stitch;
- set of affirmatives, hexagons;
- drill or screwdriver with a set of drill bits;
- visual devices: rulers, protractors, cutters;
- olive, marker.
All speeches must be placed on the table prepared for assembly. The first ones need to remove the box, and the bottom and walls. Here you need to think ahead about the parameters of the plinth or other object from which the height of the sides and the width of the bottom are selected.
Maistries, with great satisfaction, can make not just a box, but a miter box from everyday thresholds and changeable sides. This model is much easier to develop, and the result is a more effective and durable model. Let me tell you again about the frequency of the vikoristan, since the miter box is needed a few times, then there is no sense in fooling around, and if for frequent vikoristan, it’s easier to buy a professional analogue.
Side height is more ancient 30 or 50 millimeters, lie down to the width of the virobu. Afterwards you can push it manually, but most often 10 – 30 centimeters. This parameter affects the durability and strength of possible cuts when cut (not only 45, 90 degrees ). The width of the bottom should be no more 15 – 20 centimeters. Having selected the necessary parts, follow clear sequence of actions:
- The bottom and sides need to be sanded, especially the ends. Follow this so that the details fit together.
- Check the removal of the edges and the place of cutting using an additional ruler, transport or cutter.
- Secure the sides to the bottom, so that in places where there are cuts, the sides will spill heavily. The sides are attached not to the bottom, but to the sides. For fastening, it is best to use a hexagon with confirmants for the most effective fastening. To make it more handy, with less damage for parts, use a drill bit.
- They drank for the badges, so that the equals drank in 90, 45 degrees, There are two pieces of the other opener.
- The width of the openings is due to the fact that you drank a little more, as you practice. And go deep down to the very foundation, but don’t overdo it so that the structure doesn’t lose its reliability.
You can make a disassembled model, but for this purpose use self-tapping screws or self-tapping screws. It is also possible to create such a structure from metal, but for this it is better to use a ready-made crawler box and other tools for working with metal. Such a design will last much longer, even though it will be more foldable and more expensive than the one made.
Video about how you can make a miter box with your own hands
Visnovok
The mold is an effective tool for working with cutouts, such as skirting boards and any other interior elements. For help from such a helper you can quickly and effectively visconate exactly cut It's not like you're hurting your eyes.
And the main thing is that there is a great selection of models, varying in price, size, principle of operation and materials of manufacture. This means that it is possible to choose the tool that will be most effective in individual minds. And the simplicity of the design and construction makes it possible for beginners to use the miter box without having to worry about repairs.
If you want to install the plinth or install carpentry yourself, you will be faced with the need for careful cutting of wood or PVC chips. You can cut this out “on the eye”, but let the knife be cut in such a way that it will not be too high. Therefore, for such work, a special woodworking tool was found - a miter box. It is sold in convenience stores. Well, considering the awkward design of the attachment, most people have the will to prepare it with their own hands.
See the miter box, that sphere of stagnation
The tool is a tray with slots in the barrel walls for inserting a hacksaw. This design allows you to clearly trim the sprouts under different tufts. The standard miter box has three grooves at the skin edge, so that the cut can be made under the cut at 45 to 90 degrees.
There are other variations of this addition. One of them is a miter box. Its shape allows you to cut objects with an accuracy of up to 1 degree. Such a tool consists of a base fixed to a new rotating part with no direct openings.
For sale you can find a saw and an electric carpentry device for sawing wood. This is a professional and expensive tool that consists of a circular saw and a rotary mechanism. Marking in such devices is done with the help of a laser. This variation allows you to quickly create the most accurate cut for any profile lumber.
As a rule, miter bars are used for cutting baseboards, grooves, framing strips, cable ducts and other materials. With this help you can easily cut out germs from plastic, wood and polystyrene.
Variants in the photo
Necessary tools and materials
Oak is a very good material. And the miter box will be as good and durable as possible
Prepare a tool with a power hand for the skin's strength. For this purpose it is necessary to follow the previous recommendations. As a material for the independent production of miter boxes, wood is most often used, because it is easy to manufacture. The production of plastic only breaks down in production.
When choosing lumber for the sidewalls of the varto, we consider only hard wood types. For example, you can add 2 centimeters to a conifer board. If the choice falls on a clear or oak tree, the amount of damage can occur within a range of 1 to 1.5 cm. The width of the board (the height of the wall) is selected depending on the purpose of the miter box. So, if you decided to cut the plinth, then the most important parameter is to add approximately 30 millimeters. When sawing wooden objects, the height of the board must be no less than 50 millimeters. The depth of the walls, as a rule, does not exceed 50 centimeters. This is due to the hand-holding of the robot and the chair. If the base of the carpentry structure is missing, it can be made from chipboard, MDF or a solid piece of wood 10 centimeters wide.
When purchasing, inspect the wood for signs of chips and cracks. The surface of the product is clearly sanded.
In addition to materials, the following tools are required for work:
- caliper ruler and olive;
- mark;
- emery paper;
- saw with teeth on metal;
- bream;
- screwdriver and drill set;
- Self-tapping.
If the base for the miter box will be made of MDF or other soft material, then use the screws with large grooves.
After preparing the tools and materials, you can proceed to unpacking.
Preparation robots
If the thickness of the base of your miter box exceeds 4 centimeters, then the opening under the screws can be removed in a checkered pattern
It is immediately clear that the size of the pieces of the steel is not important. However, it became clear that the greater the distance between the walls, the greater the accuracy of the cutting. Thus, if it is specified earlier than 10 cm, it is important to consider the optimal width of the installation for a larger installation. In this case, there is one important rule - to stand between the sides you will need less than half the blade of the cutting tool that will be used for cutting. Otherwise, the movement in the openings will become short, which will simplify the cutting process.
The development of the Teslar tradition begins with the laying out of its future foundation. The first prepared board is divided by lines into equal quadrants. Through the identified central point, two bisectors are drawn in opposite directions, so that a symmetrical letter “F” appears on the back.
Carry out the markings as accurately as possible, and this also ensures the accuracy of cutting profile lumber.
Now let's take the barrel walls. The skin of them is divided by lines across into two equal parts. On the opposite sides of the central mark, two more lines are drawn, on the edge, which is equal to half the width of the base. So, if you put the sides to the base, the lines will become extensions of the ends of the previously crossed letter “F”.
At the next stage, the basic weight is measured. It is acceptable to set it to 1.5 centimeters. We take the side walls and draw parallel lines on a similar surface from the bottom faces. We pulled off the narrow straight cutters dilimo all the time. The remaining drawn lines will be the axes for the screws, through which the beam walls will be screwed to the base. Here it also means the place of fastening. On the axial line with an even edge, place the dowels into which the metal rods will be screwed.
Make the marking only on one side of the material. At tsyomu bazhano vikoristovuvati caliper.
Where will the robots’ preparations end? Now let's move straight to the preparation of the Teslyarsky Pristosuvannya.
Instructions for making a miter box with your own hands
The cushions for the miter box are made from white wood
The folded tool for precise cutting of lumber is bent in the following order:
- Open firmly to tighten the screws. To simplify this procedure, first take the core and make small dents at the designated points.
- We cut the grooves on the side walls. Carefully fix the material on the work area with the help of a flatter or clamp. The cutting along the central line is carried out perpendicularly, and along the extreme lines - at 45 degrees. The drink was drunk strictly according to the markings, until the sides were removed from the base of the miter box. The handles of the saw need to be trimmed with a knuckle near the center line.
- The sides are ready - and now we move on to the assembly process. We apply the walls so that their middle grooves are in the same plane from the central line of the base. After this, we fasten the parts with self-tapping screws. Vikoristovuye with this screwdriver.
- The miter box is practically ready. It was impossible to polish the surface with an emery paper and clean the slots from the chips.
To make the process of folding the device easier, secure its base on the table so that it rests firmly on the entire surface.
Video with preparation instructions
Typical instructions for use
Let’s take a look at the pitfalls that most people experience when working with a chair, and also for the sake of proper use of this tool:
- Before cutting the plinth or boards, practice on scraps. In no time you will understand all the delicate work and do not waste too much expensive material.
- The coming peace is associated with the incorrect viconn of the extinctions. To avoid such unpleasant moments, use a small amount of material (5 centimeters will be enough).
- Another popular problem occurs in the weeds when the right and left corners of the plinth are cut off. We know the correctness of such cuttings a little over a year.
- The remaining problem arises from the uneven stickiness of the skirting boards after cutting them. Everything on the right is that the choice in style needs to be placed as it will be installed at the installation site.
Turning to the problem of cutting the cut parts of the plinth, we give instructions on how to cut the inner cut of the plinth element:
- We place the miter box on the table parallel to our tubule.
- We take the left strip of the plinth in our left hand and press it against the side of the carpentry tool, which is far in front of us.
- We insert the file into the near left and far right grooves. Vikonuemo sawing.
- We take the right part of the plinth in the left hand, turn it over and place it in the miter box so that the bottom edge of the mold touches the wall of the miter box.
- The cut is made from right to left.
The cutting of the plinth for lining the outer layer of the lining is carried out as follows:
- We install the miter box.
- The left bar is installed on the far side.
- I cut right-handed to the left.
- We take the right part of the plinth in the left hand, turn it over and apply it to the far wall.
- We cut off the evil direction to the right.
In this way, to decorate the outer corner, the left strip of the plinth is cut in the same way as the right one for the inner corner, and the right one is cut in the same way as the left one.
As you know, making a miter box with your own hands is a simple task. By adhering to the rules and recommendations specified in this article, you can create a good carpenter's tool that will be in no way inferior to a store-bought device.