Azi: roztashuvannya dzherela svetla. We can combine the lighting patterns to create a classic light scheme
Classic portrait photography has a number of fundamental principles of lighting that need to be known and controlled during the process of studying and understanding, which of them should be used in order to convey the required mood, rules in the portrait The best image or the best way to reveal the model.
It’s important to memorize these rules so that you can easily follow them, and be sure to know when and how they can be broken. Follow these 6 rules - they will become your milestones on the road to great portrait photography. And don’t forget that the best skill is to alternate theory with practice.
What are lighting modes in portrait photography? You can say that this gra is light and dark, as you can change the shape of the appearance. As they say in simple words, what form the shadow lies on the surface, lies in the method of illumination. It is clear that there are the broadest bases for the illumination of people:
- more lightening;
- classic lightening;
- Rembrandt illumination;
- snowstorm
To the main 4 types of color, add two additional methods, which have greater elements of style and can be combined simultaneously with the basic lightening modes in a portrait: with a wide and narrow lightening.
Let's take a closer look at the skin type of lightening.
1. Side lighting (Split Lighting)

In this mode, the light “splits” the appearance into two equal halves, one of which is in the light, and the other in the shade. This type of lighting is more suitable for people who are often used when taking portraits of musicians or artists, as it adds drama to the portrait. There are no strict rules for establishing one type of lightening, other than recommendations based on average principles. It is necessary to know such rules in order to be able to use them as a main reference point.

To achieve this effect, place the trace at 90 degrees with your left or right hand in front of the object, and perhaps place a few pieces behind your head. The place of growth of light is entirely dependent on the subject depending on the form of the individual person. Marvel at how the light falls on the accusations and satisfy yourself with the proper order. The light from the dark side falls only on the eyes and shapes the face in such a way that there is a clear line between the light and dark in the middle. If you wrap yourself around the face of a person, you see that the light falls more on the cheek, it is entirely possible that the model is not suitable for this scheme, in which case it would be ideal to spread the light.
NOTE. Please be aware that in order to maintain a coherent lighting picture, your light rod can be moved smoothly so that the model collapses. Whether you take a frontal photo, photograph ¾ of the individual or create a profile, it is easy to “finish the schemes”. As soon as the model turns her head, the whole picture changes. It is your responsibility to adjust the lighting, moving the heater or slightly burning the model as needed.
What is it like?Is there anything else you need?

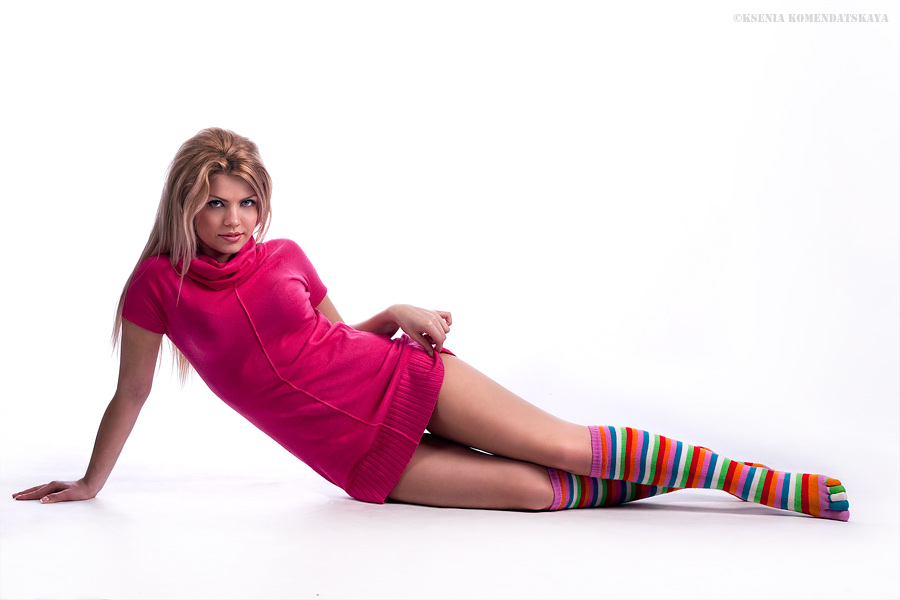
Pay attention to the image of the actual light fixture in the eyes of the model. The glare looks like white spots in the eyes of the child in the photograph above. If you are surprised, you can draw the contours of the fixtures, which were used for taking a portrait.

For example, in the photo you can see the bright flame of the shestikumnik with a dark center. This is light, as it was in Vikoristan, -
This effect is called flashing. Without the glare, the models' eyes become dark and look inconspicuous. When you take a look, browse through what you see in one view, and the views are displayed in a new world. Please note that the glare also slightly changes the color of the iris and the brightness of the eyes in general, which adds a sense of vitality and gives brightness to the eyes.
2. Classic lighting (Loop Lighting)

The classic value is such lightening, which creates a slight shadow from the nose on the cheeks, creating a light-shade loop. To remove this, you need to spread the little bits more than your eyesight, and approximately 30-45 degrees from the camera (stay in front of people, you must read people’s faces).

Marvel at this image and admire those as the shadows fall. Left-handed and right-handed you can improve the nose whiteness slightly. To remove them first, stitch behind them so that the shadow is slightly straight down. For this purpose, the shade of the light should not be too high, otherwise it can lead to the creation of unimportant shadows, revealing the loss of highlights in the eyes of the models.
Classical lighting is considered the most popular model of lighting when taking portraits, because creating light and shadowy images is the most beautiful and enhances the qualities of most people.

In the diagram, the black ash marks the dark trees that are behind the pair, the sun with which is the greenery. For additional help, enough illumination was spent on exposure. If you change its position a little, you can select different lighting options.
With the classic method, lighting is set at a temperature of 30-45 degrees. camera view and a little more than the models' eyes. It is necessary to stitch behind this so that the light-shade loop does not stick to the nasolabial fold. Among the newcomers, such a position is extended, if the stand is placed low, strongly highlighting the lower part of the face, through which an unattractive baby is created for the portrait.
3. Rembrandt lighting

Lighting is named after the famous artist because Rembrandt often used such little light in his paintings. For example, this one has self-portraits.
Rembrandt of the light is depicted with the tritube of the light on the face. To replace the lightening loop, without scratching the shades of the nose and cheeks, in Rembrandt lightening, it is necessary to remove the small light tricube in the middle of the cheek. When creating deep shadows, make sure that enough light falls on the eye on the shadow side of the portrait, otherwise it looks lifeless. Lightness Rembrandt appreciates the dramatic, because through the “split” in the lightness a special mood is created in the portrait, which can suit the tragic image of the face.


To create Rembrandt lighting, it is necessary to light the model of the three pieces under the light. Dzherelo must have grown taller than the man’s head, so that the shadow from his nose fell straight down to his cheek.
Not all individuals are suitable for such a scheme. If the model has high or visible faces, Rembrandt lighting can give you the best results. A small nose and a flat transfer significantly complicate the work of the photographer and is unlikely to achieve the desired effect. The choice of these and other lighting schemes depends only on the model, which is determined by the mood of the photographer who wants to convey the image.
If you want to highlight the lightness of the window, which has been painted close to the background, you can close its lower part to try to achieve a Rembrandt-type lightening.
4. Butterfly Lighting

It’s not without reason that this kind of lightening is called “blizzard” or “butterfly”. With its outlines of lightness it suggests the shape of a snowstorm, creating such shades under the model’s nose that it suggests a wing. Basically, the lights hover near their well-ordered place and directly behind the camera. This scheme is often used for photography in glamor style, and it is also optimal if you photograph older people, since there is less emphasis on wrinkles.

The “blizzard effect” scheme is created due to the obvious presence of the light behind the camera and a little more behind the eyes of the subject of capture. In the core of the additional equipment, a light highlighter is installed, which is placed below the face of the model in order to highlight the shades under the selection of the model. A similar lighting scheme is suitable for people with pronounced faces or objects with thin faces. For a round or wide individual, it is better to use the standard (classical) lighting scheme or use the Rembrandt type of lighting.
The circuit is difficult to implement, since it only has a light disk - so it will be important to use it without an assistant.
5. Widely brightened
A wide method of lighting is not the color scheme of the light, but rather the style of lighting. If you take a look at the lighting diagrams, you can use a wide or narrow method of lighting.

This option is called wide if the surface of the object is lightly lit in the center and most of its part falls lightly. The dark side will probably be smaller.
Wide lightening is used to capture high-key portraits. This type of lighting visually expands the appearance (from the name). It’s better to vikorist for those who have a very narrow oval lining, thin browned rice. Most people want to look slim in portraits, so this is important when photographing chubby people. It seems simpler, more widely illuminated, to put emphasis on most of the exposure.

To create wide illumination, the model of the track is lit up from the light shaft. To restore respect, from the side of the face, which is closer to the camera, the light itself is such that it forms the correct shadows on the part of the face of the model that is far from the camera.
6. Vuzke lighting

This method is similar to wide lightening. As can be seen from the butt, the model must be decorated in such a way that most of its appearance is hidden. This technique is most often used when taking portraits in low key. Individuals become more sculpturally decorated, which enhances the image. This is a very different way of lightening for most people.

The denunciation was heated to the point of light. Please note that part of the veil, which is turned away from the camera, also has significant shadows. A little bit of lighting shows peeping little shadows that need to be controlled.
Let's collect everything at once
Once you learn to recognize and differentiate the skin from different lightening models, you will understand how their traces become stagnant. Light and shadow are a very important tool for a photographer when taking a portrait. Various types of people, by practicing, you will figure out which light patterns will be suitable for a different type of expression and transmission of the singing mood, you will find your unique style.
Although the even round faces, melodiously, want to seem stringy and radiant, as if the portrait would enhance the subtlety of the face. You can figure out the correct scheme if you are facing the task of removing anger or taking a group photo. Once you learn to read and recognize images, master the brightness of the light, be able to correctly form the dzherel light and know the correct proportions, you will be fully prepared for professional work.
It is much easier to learn how to keruvat with light, since the dzherelo can be re-sewed. But the rules of illumination themselves apply if the main element of light is the Sun. Having trained here, you will find yourself stuck in the rules of work with natural lightening and easily, just one step - you won’t have to twist around the model, but the model will be razgort so as to eliminate the need for you to lighten. You will have to destroy the model or change the position of the camera in order to change the direction of the light and, with the help of additional shadow, create the little ones that are necessary for the idea, but as practice shows, you won’t be able to!
On the side, the light divides the veneer into two equal parts, one of which is illuminated, and the other is in the shade. Vin is often used to create dramatic portraits, such as a portrait of a musician or artist. This light is more suitable for human portraits and, as a rule, rarely stagnates for women. However, keep in mind that photography has no strict rules, so I advise you to use this information as a starting point or reference point. Until you sing of your knowledge, it is better to act as the classic companions preach.

To achieve the effect of the bright light, you just need to place the light shaft under 90 degrees, either left-handed or right-handed from the model, or behind your head. The placement and position of the dzherela light is dependent on the individual person. Marvel at how the light falls on the cover and re-shoulder the dzherel. If the barrel light is positioned correctly, there will be a visible glare on the shadow side. If it is not possible to avoid getting light on the cheek, it is entirely possible that this type of face is not suitable for light.
Note: any light scheme can be distorted at any turn of the head (full face, if the offense is visible, facing in ¾ or even profile). Just keep in mind that the position of the light-colored jowl can change depending on how you turn your head, to support the desired light-brown baby.
What is "vidblisk"?

To restore respect, what is most important in the photograph in the eyes of the child is the image of the light. The stench looms in the sight of small white flowers, but if you look closer, we can improve the shape of the dzherel, as I was a victor when taking this portrait.

Marvel, is it really a bright flame with a six-layered structure with a dark center? This is a small six-layer softbox on my Canon sleeping bag, which I use for rent.
This is "blink". Without lights, the eyes appear dark and lifeless. You must reconfigure what you want to see in the same model so that the image sticks. Please note that the glare also brightens the iris and generally makes your eyes brighter. This enhances life and gives them happiness.
At the same time, our family often hears about the fact that our colleagues and friends are looking to buy a set of custom lights, and it’s not surprising. We want to make a lot of money with our photographs, and if it is necessary to hang a large number of photographs of garnished fruit consistently and periodically, we don’t want to lie around the size of the windows of the apartment, geographical location This is your life, it’s time for fate and just wait outside the window. However, it is difficult to make the transition from working with natural light to artificial lightening. And there are more than one sleeping bag in the set.

Let's talk about our possessions.
I have one cheap set of piece light RayLab AXIO 200 – 3. This set consists of three light holders of 200 J each, with 2 softboxes 50x70 cm. It can serve me for 7 years. The wine is far from perfect and is already old. I’m actively using this for both food photography and portraits. I very often vikorista all three dzherel.
I know, like Oksana, on a low coffee table from Ikea, but I often serve it as a waste.
Last time Oksana wrote a lesson on robotics with one piece of light (it could have been a piece of a piece of light, so be it). And most importantly, Oksana spoke about different types of lighting. And now we will try to add one more element of light, wondering how to work with them, and how to identify similar types of illumination in such a context.
What does a robot with two piece light fixtures look like?
First of all, I want to say that the use of artificial lighting fixtures gives us much greater control over the light than the use of natural light. As with natural lightness, we firstly rely on the reshaping of the object according to the lightness and highlighting, which can also be influenced by the lightness and nature of the lightening. Vikorist is a piece of light, we can easily change directly the character and intensity of the light. Since we have two horns, then behind the singing schemes, without rearranging the horns, we can distinguish different types of lightening, operating only with exertion.
The basic scheme and adjustment
Let's take a look at how these schemes work in practice:

This has broadened the scheme so that two light fixtures stand approximately one opposite the other, diagonally. In this situation, I often have to deal with the worn-out sleeping bags in the studio.
It’s worth it that we put our jaws to the same level of tension. Let's set the tension on the skin to approximately half, using the following parameters: ISO 100, F/5.6, 1/160
Please note that the pieces have varying degrees of tension and adjustment - you may need to adjust your grip settings.

As you see, in whose appearance we do not have any obvious light or shadow. Finish the clarification step by step. Alya Svetlo is not very expressive and conveys obscenities in a bad way.
Now let's wonder what will happen if we only change the tension of the neck. We set the intensity of the one closest to us to approximately 2/3 - it will be light, and the one far away to 1/3 - so that the contours will be highlighted. The cameras that have been adjusted will become deprived of such things. As Oksana has already said, this model of illumination is widened among the cobs, let it not always visibly highlight the subject of the loan. As you know, the background in the background will also add a lot of lightening, as will the subject itself.

The model that I fell in love with the most will come, and it will be a tiny light posterolateral. So we change the tension - the back part is 2/3 and the front part is 1/3. This is the result. This model best describes grapes. The photograph turns out to be much bigger.

In this case, in order to illuminate the object a little in front of the evil, and allow the grapes to ripen a little, the following scheme and such a result will emerge.


This scheme is well suited for complex compositions with many elements, which gives an excellent volumetric result, and we have the ability to highlight those elements that were insufficiently illuminated by two softboxes.
Let’s take a look at two more types of lighting, which Oksana has already described, but we can now create them from two light sources.
Malyuvalne light – control. In this situation, we place a distant photobox opposite the camera behind the subject. And the other one is on the same page. Here we have to slightly adjust the intensity of the light and adjust it, but in this case the lens loses a lot more light and the photo appears overexposed. I set the control light to 1/2 intensity, which is back to 1/3. Camera parameters: ISO 100, F/8, 1/160


I often use this lighting scheme if I just need a white background in the background, which allows me to avoid using additional light switches to highlight the background; instead, the softbox itself plays the role of the background. As it may be noted, it is often difficult to convey the meaning of the subject well. It is necessary to pay attention to the illumination of the front part of the object.
Malyuvalne light – bichny. We rearrange the softbox on either side of our subject. The tension is eliminated by yourself. Camera parameters: ISO 100, F/5.6, 1/160


The side light is best suited to convey and highlight most objects.
The tension of the neck
I would also like to pay special attention to the fact that by adjusting the difference in the intensity of the light between the light, which is subtle and complete, we can control the “dramatic”ness of the lighting. The greater the difference (the less light is reflected) - the more contrasting the images will be, the shadows will be deeper, the images will be more dramatic.

The lighting scheme is the same as in the front photograph (Malyuvalny light - light), but only changed the intensity of the background light to a minimum.
The very ability to regulate intensity, and not just change the lighting according to the subject, reveals to the photographer great possibilities to create the mood and character of the photograph!
Zavdannya
Select one herb or object and take a photo of it using different light schemes. Choose the camera settings and the tightness of the jigs for your situation (check out the measurements with me, wonder what stinks will come out in the robot with your light). Experiment with different pressures of the sleepers.
In the comments before the post, show a few photographs of the results of the work. Write what light you have chosen, what parameters of the camera and light you have chosen.
A classic portrait has a lot of things that you need to control and think about how to create the most attractive portrait of the model, showing them from the best side. This is due to the lightening of the light, the light-colored baby, the type of face and the dawn. I encourage you to get to know these basic concepts, but in order to break the rules, you need to know them. However, if you learn and understand this knowledge in practice, it will help you take portraits of people much better. This article is dedicated to light schemes: what is it and why it is important to know and understand. Perhaps in the future, in other articles, as it suits you, I will tell you about other sources of a good photographic portrait.
I recognize the light-colored baby as a group of light and shadows on the face that creates different forms. Seemingly simpler, this is the form of shadows on the surface. There are several basic light patterns for a portrait:
- Side lighting
- Loop illumination or “loop” scheme
- Scheme of Rembrandt's light
- "metelik" scheme
There is also the concept of wide and short light, but a quicker lighting style and can be combined with more schemes that are more focused. Let's take a look at the skin diagram
1. Side light

On the side, the light divides the veneer into two equal parts, one of which is illuminated, and the other is in the shade. Vin is often used to create dramatic portraits, such as a portrait of a musician or artist. This light is more suitable for human portraits and, as a rule, rarely stagnates for women. However, keep in mind that photography has no strict rules, so I advise you to use this information as a starting point or reference point. Until you sing of your knowledge, it is better to act as the classic companions preach.

To achieve the effect of the bright light, you just need to place the light shaft under 90 degrees, either left-handed or right-handed from the model, or behind your head. The placement and position of the dzherela light is dependent on the individual person. Marvel at how the light falls on the cover and re-shoulder the dzherel. If the barrel light is positioned correctly, there will be a visible glare on the shadow side. If it is not possible to avoid getting light on the cheek, it is entirely possible that this type of face is not suitable for light.
Note: any light scheme can be distorted at any turn of the head (full face, if the offense is visible, facing in ¾ or even profile). Just keep in mind that the position of the light-colored jowl can change depending on how you turn your head, to support the desired light-brown baby.
What is "vidblisk"?

To restore respect, what is most important in the photograph in the eyes of the child is the image of the light. The stench looms in the sight of small white flowers, but if you look closer, we can improve the shape of the dzherel, as I was a victor when taking this portrait.

Marvel, is it really a bright flame with a six-layered structure with a dark center? This is a small six-layer softbox on my Canon sleeping bag, which I use for rent.
This is "blink". Without lights, the eyes appear dark and lifeless. You must reconfigure what you want to see in the same model so that the image sticks. Please note that the glare also brightens the iris and generally makes your eyes brighter. This enhances life and gives them happiness.
2. Petlyov’s lighting

Loop highlighting creates a slight shadow from the nose to the face. To eliminate such illumination, you need to place the camera a little further behind the eyes and under 30-45 degrees from the camera (depending on the individual person, for the correct setting of any scheme you need to read in front of people).

Look at this photo to see how the shadow falls, and on the left side you can also create a slight shadow near the nose. In the loop scheme, the shade from the nose does not need to go to the cheek, so there is no need to sit with the shade from the cheek. Make sure that the shadow is small and looks a little down, but be careful that if you raise it too high, the shadows can look amazing, and they can also disappear into the eyes. The loop scheme is probably the most popular because it is easy to create and suitable for most people.

In this diagram, the black background represents the background of trees. It’s brighter when I walk from behind the trees behind me, but I see the stench in the shade. The white beater, holding his left hand towards the camera, turns the light back on the person being photographed. By choosing the color of the highlighter, you can change the lighting of people. Loop lighting reaches the camera approximately 30-45 degrees from the camera. The winner is also responsible for spreading a little more than his eyes, so that the shadow from his nose falls lightly down to the corner of his mouth. One of the widest amends among the cobs is the price of low growth of the victor and yogo nakhil. As a result, the skin is illuminated from below, which looks unsightly.
3. Rembrandt light

The scheme is called Rembrandtian, because in Rembrandt’s paintings there is often a type of lighting that can be applied to your self-portrait. Rembrandt's lightening is indicated by the presence of a light-colored tricut on the face. When replacing the light loop, the shadow of the nose and cheeks does not stop, here they are angry at the same time, which creates a light knitted sweater on the cheek under the eye. To create the correct pattern, you need to switch over so that there is a bright glare on the shadow side, otherwise the eyes will be “dead”, without receiving the glare. Rembrandt's lighting is more dramatic, and a similar light-tint baby creates a more restless mood of the portrait. Vikorist yogo with proper rank.

To create Rembrandt lighting, it is necessary for the model to stand slightly to the light side. The dzherelo is supposed to be positioned above the top of the head so that the shadow of the nose falls on the cheek. No person is suitable for this scheme. Since there are high and prominent faces, the scheme may work. If the model has a small nose or a flat nose, such lightening may be important to achieve. Again, remember that it is not your fault to work on this very scheme with this very model. Choose those that will enhance the model’s advantages and present it with the most prominent rank. This clarification will work as follows. If you see the window as light, and the light from the window falls on the frame, you may need to close the bottom of the window behind another panel or panel to achieve this type of lightening.

4. Scheme "blizzard"

This scheme is named “blizzard” because of the shape of the shade from the nose that is being created. It was a good idea to place the animal right behind the camera. Basically, for these schemes, the photographer is under the light. The “blizzard” pattern is often used to add glamor to the model’s prominent face. It is also similar to the practice of older people, because it is less susceptible to wrinkles than other schemes.

The “blizzard” pattern is created by the light shaft behind the camera and a little higher than the eyes and head, depending on the type of guise. In some cases, the scheme can be supplemented by combining it with a selection of components, and the model can also be trimmed by itself. This scheme is suitable for models with tall faces and narrow faces. A circle or a wide one looks better with a loop pattern or a beam of light. It is easier to create this diagram using additional light from the window or the window. Often, in order to make the shadows appear more pronounced, it is necessary to tighten and straighten the light, such as when sleeping or sleeping.
5. Widely brightened
Widely illuminated not so much by pattern or pattern, but by style or variety. Whether from the next schemes you can choose a viconan with a wide or short light: loop, Rembrandt, more light.

Lighting is called wide when the face of a person is slightly turned and the side of the face that is closest to the camera is highlighted. The flatter side is lightened, the side is larger, the bottom is darker. Wide lightening is ideal for portraits in high key style. This type of lighting creates a wider appearance for people (sounds and names) and can be used for models with narrower appearances in order to visually make them wider. Most people, however, want to look thinner rather than wider, so highlighting should not be too harsh for wide and round people.

To create wider illumination, you need to rotate the face to face the light shaft. Note that the side of the face closest to the camera is illuminated, and the shadow falls on the far side. To put it simply, a wide light shines on most of the individual, as we know.
6. Brief lightening

The lightening is short and the length is wide. As you can see when taking a photo, with a short light in the shade, the facing side is close to the camera (wide), and the light is far from the camera (high). This type of lighting is often used for low key and dark portraits. Try to present a voluminous, sculptural, visually broad message that suits most people.

For this scheme, a person must be brutalized to the point of light. To restore respect, in which the side of the exposure is illuminated, zoomed in front of the camera, and the shadow falls on the side that is zoomed in front of the camera. It seems simpler, with a short light, most of the appearance, as we all know, is in the shadows.
Let's collect everything at once
Once you learn to recognize and create skin lightening patterns, learn to recognize them in different situations. Different types of people, you discover which lighting scheme is best suited for a given person in order to create moods in the portrait and show the person best. If a person has a round appearance and wants to seem like a string, then they should show it differently than a person who wants to create a dramatic impression. If you know all the schemes, understand the kernel of light, and its direct relationship, then you can get away with any tasks of the loan.
It is actually much easier to change the lighting by changing the light. However, as always, every day or every day, you don’t particularly bother them. Here, instead of moving the object, it is necessary to change the status of the model or object, wrapping them completely in light. Or change the adjustment of the camera. Therefore, if you cannot move the light shaft, you need to move it yourself and move the object being captured.
Practical right
Choose your subject (preferably a human, not your dog) and practice creating skin lightening regimens. as we sorted it out:
- Metelik
- A loop
- Rembrandt
- Side light
Remember that it is also wide and short in lightening and tightening for different types of models, where this is not necessary. Don’t worry about other aspects (the relationship between light and shade, what replaces the light, etc.), just concentrate on catching the hot little thing. Vikorist the light from the window, the floor lamp without a lampshade or the sun, so that it is the kind of thing you can see, how the light and shadow casts on the face. I advise you from the very beginning not to be victorious in your dreams, because you still don’t have enough evidence to see the result before you take the photograph. This can make your learning easier.
It’s also better to start working with a special one, straight to the camera, without turning (in addition to the practice of creating wide and short lightening).
Show us your results and write about the problems you encounter. I will try to help you overcome them, so that you and others do not indulge in such pardons in the future.
The word “photography” is literally translated as “painting with light.” The garnet itself is light - a lock for the garnet. Steady practice is required in order to learn how to “batch” the light, “catch” the light and clearly vikorize it. It would be bad for you to acquire a little bit of theoretical knowledge about light in photography. Let's get busy!
Light in photography can be classified according to the following parameters:
- the nature of the lightening (m'yake or zhorstke light);
- method of removing illumination (straightening, scattering, highlighting);
- Light directly to the object of capture (front, side, back, top, bottom);
- the role of this or that dzherel in the background light-shade little one (drawing, reserving, backing, modeling and background);
- Depends on the character of the dzherel (natural and artificially light);
- according to the color temperature (warmer or colder light).
You can endlessly see more and more types of light, but not on the given division.
It's light and bright.
 It's light for Zhorstka It has a characteristic picture that is easy to recognize by the sharp contrast between light and dark, with a minimum of shadows. With high light levels, the shadows of the objects become deep and the highlights become brighter. The texture of the photographic objects is also evident. The simplest butt of a hard light is the sun at the bright noon. Also, a light-colored jacket can be created with the help of splits that are directly directed to the object of capture without the use of twisted attachments. It's light for Zhorstka Use a studio set with a reflector or an attachment such as a beaker, tube, etc.
 It's light characterized by a calm little one – a maximum of hyphens and gradients. Therefore, in a classic portraiture, the main device is a soft light device - a studio device with a photo umbrella or a softbox or a soft light from the window. Also butt soft light Can serve as natural lightening in gloomy weather or light in the shade on a sunny day.
How to get rid of the light baby you need.
You can use light colors (when filming near a studio or in a sleeping area) or vikorize those that are nearby (when filming on the street or in a room without a sleeping bag). Even if it wasn’t there, the photographer can choose three massacres for the method of capturing kind of light.
 Straightened light go out with a vikoristan to finish with a tight jig, straight to the object of the lift from a small stand without a vikoristan of additional attachments. That's why it's light - call it a zhorstka with a characteristic light-colored baby.
 Turn on the light come out when the main body of any surface is exposed. This could be a mirror, a white uniform material, a polished surface or a plain wall, painted in a uniform color. On the surface of white and silver colors, do not change the color temperature (to preserve natural colors). Color surfaces, when light is displayed, give color reflections, so they need to be treated with care. The hardness of the light occupies the middle position between straight and diffuse.
Russians are bright– this is light from the main body, which passes through the surface of the substance, first applied to the object of capture. As a solution, cups of clouds on the sky, pieces of light-colored fabric, arched paper, franks or professional accessories (parasols for light, softboxes, etc.) can serve. Also Russians are bright- It’s light in the shade on a sunny day. Pink light is the most soft, which gives smooth transitions between light and shadow on the subject.
You melodiously visually demonstrate that the light can be straightened under a wide cut of the object of the lift: directly on the model (“in the forehead”), from the side, at 45 degrees, from behind, from the top and from below. This clarification includes the method of transferring obligations to the subject of the lease. Chantly, you felt expressions like “flat light” and “volume, artistic light.” So, in order for an additional photograph, a two-dimensional image to convey the volume that we need in real 3D light, it is necessary to use light that emphasizes the volume of objects.
The best way to cope with these tasks more light, and when combined with accent lighting at the back, it creates the maximum artistic effect. Only very light - the concept is wider, it can be placed under different coats. How to correctly set the current light will also depend on the model and the characteristics of its appearance. The same bright light-shade baby creates upper light, which is often used for modeling in the studio. And the bottom axis is lightly painted, it is important to fill the shadows or to create a specific film effect.
The role of light fixtures in the lighting scheme
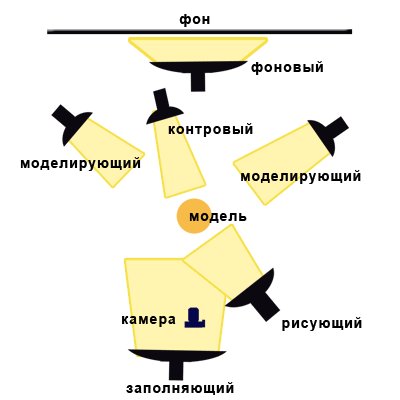 Now let's look at the role of the different drills in relation to their part in the hidden picture of the illuminated object of the seizure. You, who have known for everything, have already started chattering about such concepts as “forever light”, “what paints the light”, “backlight” etc. Let's figure out what these scary concepts mean. In reality there is nothing complicated:
Malyuvalne light- This is mainly due to the lighting in the light installation scheme. It itself outlines the main obligations of the object given its name. In the English world this light is called “key light”, then. key light. Dzherelo tiny light There may be one, and the most pressing one is at the level with the mouth. How to paint the light is classically vikorist or upper light.
Forever light- Light, as it is used for uniform illumination of the entire scene. You need to use it either to highlight the shadows or to adjust the lightness in the frame in order to eliminate the ability to normally expose the photo at the appropriate value of the window and aperture.
Modeling light Used to create accents (emphasizing highlights) or softening the surrounding shadows on the subject. Make sure that the modeling is light and narrow, so that the tightness is set so as not to interrupt the main light shade.
Control light(This is also called contour) is created behind an additional dzherel, modeled after the model. It is used to strengthen the model against the background, to create accents and to artistically highlight the contours of the figure. In the classic portrait style back light direct either from the back or from the back under the skin (over the shoulder). Schemes with backlight variations are the most beautiful. Backlighting looks great in human portraits, and also looks great for highlighting girls' hairstyles. Before the speech, the backlit photos themselves, taken at sunset, seem so enchanting!
Background light– as you can guess from the name, it is used to highlight the background. On the right, through the separation between the background and the model, when, for example, one lightening element is removed, the background appears darkened. This does not mean that any background needs to be highlighted, but the background light itself should not be used to create such an effect of depth and space. Direct the light onto the aphid either pointwise (creating a light flame behind the model), or evenly (however, highlight the entire surface of the background), or create a soft gradient transition. The last option is not to be used in inexpensive studios with cheap paper backgrounds, because they may be imperfect. As a result, such a homeless effect appears on the photographs, so please punish me for such an expression.