We brew with a transformer-based automatic brewer without capacitors. Bringing the budget drink machine to perfection
Those masters who work with welding robots have repeatedly wondered how to manage the installation to obtain elements and parts. In the descriptions below, the automatic brewing machine has the following technical characteristics: electrical voltage, which is the same as 220 V; a level of compressed pressure that does not exceed 3 kVA; works in repeated short-hour mode; koriguwane
The operating voltage is variable and varies between 19-26 V. The brewing material is supplied with fluidity between 0 and 7 m/h, so the diameter is 0.8 mm. Rhubarb of the brewing strum: PV 40% - 160 A, PV 100% - 80 A.
Practice shows that such a brewing machine built demonstrates the obvious efficiency and the trivial term of living.
Preparation of elements before the cob works
The role of the welding dart is to be frozen, which has a diameter of 0.8 mm, and is sold in a 5 kg container. It would be impossible to prepare such a brewing machine without the presence of a 180 A welding tip, which is subject to European corrosion. You can get more from a company that specializes in selling welding equipment. In Fig. 1, you can create a diagram of the brewing machine. To install it you will need a vimikach zhizvitlenya and zakhistu, for this you can use a single-phase automatic circuit breaker AE (16A). During operation, the device no longer needs to switch between modes, for which you can use PKU-3-12-2037.

You can see the presence of resistors. This situation is due to the rapid discharge of the throttle capacitors.
As long as capacitor C7 is running out, then in tandem with the throttle, it stabilizes the burner and supports the arc. The lowest capacity can be 20,000 µF, while the highest possible level is 30,000 µF. If you try to install other types of capacitors that are not of the same size and larger capacity, then they will not behave reliably enough, and the fragments will burn hotly. To prepare a brewing machine, it is better to use old-type capacitors; you need to rotate them in the amount of 3 pieces in parallel.
Power thyristors at 200 A have a sufficient supply, it is permissible to install them at 160 A, to keep them functioning, otherwise there is no need to increase the pressure of the fans during operation. B200, which is vicorized, is then installed on the surface of an oversized aluminum base.
Transformer winding
To prepare a brewing machine with your own hands, the process must begin by winding the OSM-1 transformer (1 kW).
![]()
This must be thoroughly dissected from the very beginning, and the trace must be placed at the appropriate time. The frame of the coil has been prepared, which has been frozen for the textolite with a thickness of approximately 2 mm, this necessity arises from the same reason that its frame does not have a sufficient supply of material. The dimensions of the cheeks have been increased to 147x106 mm. For the cheeks, you need to prepare a window, the dimensions of which will be 87x51.5 mm. On this point, you can make sure that the frame is completely ready.
Now you need to find a winding wire Ø1.8 mm, preferably one that can strengthen the fiber protection.
To prepare a brewing machine with your own hands, you need to create the following number of turns on the first winding: 164+15+15+15+15. The space between the balls needs to be lined with insulation, leaving a thin, wrinkled fabric. The wire must be wound with maximum strength, otherwise it may not fit.
![]()
To prepare the secondary winding, you need to twist an aluminum busbar, which contains insulating glass with dimensions equal to 2.8 x 4, 75 mm; additional additions can be made at the winding machine. You will need about 8 m, otherwise you will need to add more material in plenty. Start winding the track by making 19 turns, then you need to make a loop straight under the M6 bolt, then you need to make another 19 turns. The ends of the guilty mother are 30 cm long, which will be needed for further work.
When preparing a welding machine, you should twist the trace, since for work with dimensional elements you may not have enough flow at such a voltage, then at the installation stage or even in the process of further repairing the machine can be recycled Well, the winding, supplemented with three more turns on the shoulder, in the end result It is not allowed to deduce 22+22.
The automatic winding machine has to do with its winding, which is placed flush against the body, so you need to wind it very carefully to ensure everything is placed correctly.
When choosing to complete the primary winding, the enamel wire then needs to be treated with additional varnish; the minimum hour of cleaning the coil in this case is separated by 6 years.

Now you can install a transformer and connect it to the electrical limit, which allows you to determine the no-load current, which should be approximately 0.5 A, the voltage level on the secondary winding should be equivalent to 19-26 V If you lose your mind, you can turn on the transformer at any time and proceed to the end of the offensive stage.
Do-it-yourself brewing machine, OSM-1 for a power transformer can be used for 4 units of TS-270, however, they have much different dimensions, if necessary, you can independently download the data for construction winding.
Winding the throttle

To wind the choke, use a 400 W transformer with enamel wire Ø1.5 mm or larger. The winding needs to be formed into 2 balls, laying insulation between the balls, in which case it is necessary to ensure that there is no need for thicker laying of the ball. Now install an aluminum tire with dimensions of 2.8 x 4.75 mm, when wound it is necessary to make 24 turns, the excess of the tire must be 30 cm. 1 mm, parallel to this it is necessary to place the textolite blank.
When making your own welding machine, the choke can be wound on a cage positioned like an old tube TV.
To liven up the circuits, you can use a ready-made transformer. This voltage may become 24 V at 6 A.
Folding body
At the next stage, you can begin to assemble the installation housing. For this purpose, you can use a seal, the thickness of which is about 1.5 mm, and you need to join it using the welding method. It is recommended to use stainless steel as the basis of the mechanism.
The role of the engine can be played by the model that fits into the squeegee of a VAZ-2101 car. It is necessary to get rid of the knitsevika, which is working on turning to extremes.
In order to remove the tension rod, a spring is used in the recoil pad, which can be frozen for this purpose, as is obvious. The galvanic effect will be greater if the compressed spring is injected into it, for which it is necessary to tighten the nut.
In order to make a automatic machine with your own hands, you need to prepare the following materials and tools:
- emalprovid;
- drit;
- single-phase machine;
- transformer;
- beastly fingernail;
- zalizo;
- Textolite.
The preparation of such an installation will be a feasible task for the master, who has previously become aware of the advanced recommendations. This machine appears to be very prominent in terms of performance compared to the same model that was created in the factory, and its quality does not appear inferior.
There are a number of methods for seamlessly joining metal elements, but in the middle of all this, the capacitor welding itself comes into play. The technology began to gain popularity around the 30s of the last century. The tap is used to supply the electric jet to the required location. A short freeze is created, which allows the metal to melt.
Advantages and disadvantages of technology
It is clear that capacitor welding can stagnate in industrial minds, and in everyday life. It transfers a voltage to a small device, which carries a charge of constant voltage. Such an attachment can be easily moved around the work area.
The advantages of the technology include:
- high productivity of work;
- durability of the installation that is being tested;
- Possibility of joining various metals;
- low thermal vision;
- availability of additional expendable materials;
- the accuracy of the elements being combined.
However, the situation arises if it is impossible to seal the capacitor without welding to connect the parts. This is primarily due to the short duration of the process itself and the limited cutting of the elements that come together. In addition, impulse control will prevent various interruptions in the boundaries.

Features and specifics of curing
The very process of joining the workpieces involves contact welding, for which a large amount of energy is consumed in special capacitors. These images are observed for a period of time (lasting 1 – 3 ms), as a result of which the thermal zone changes.
It is quite easy to weld the capacitor with your own hands, as the process is economical. This device can be connected to the main electrical circuit. For high-pressure production, the industry has developed special high-pressure devices.
The technology has become particularly popular in workshops designed to repair vehicle bodies. During the hour of operation, they do not burn out and do not succumb to deformation. The need for this additional straightening disappears.
Basic benefits before the process
In order for the condenser to be welded in Vikon on the high yak region, it is necessary to reach the attention of many minds.

- The pressure of the contact elements on the part that is being crushed immediately at the moment of the impulse must be sufficient to ensure reliable connection. The pressing of the electrodes is carried out with little rubbing, thereby achieving a short regime of crystallization of metal parts.
- The surface of the workpieces to be joined must be cleaned to remove impurities, so that the oxide and iron deposits do not create too much pressure when the electric jet is poured directly onto the part. Due to the presence of third-party frequencies, the effectiveness of the technology is significantly reduced.
- How electrodes need to vikoristovuvat copper haircuts. The diameter of the point in the contact zone depends on at least 2-3 times the thickness of the element that is being cooked.
Technological techniques
There are three options for embedding on the workpiece:
- The condenser welding point is mainly used to connect parts with various components. She is a successful victor in the field of electronics and equipment.
- Roller welding consists of a large number of point connections that appear as a seam. Let the cat guess what to wrap around.
- Impact capacitor welding allows the creation of elements with a small cross section. Before cutting the workpieces, an arc discharge is created, which melts the ends. After sealing the parts, welding occurs.

If there is a classification according to ownership, if it is stagnant, then the technology can be divided into the characteristics of the transformer. As a result, the design of the main attachment becomes lighter, and the bulk of the heat is seen in the middle contact zone. The main advantage of transformer welding is the ability to provide a large amount of energy.
Do-it-yourself capacitor point welding: diagram of the simplest installation
To join thin sheets up to 0.5 mm or smaller parts, you can assemble a simple structure, prepared in a commercial kitchen. In this case, the pulse is supplied through a transformer. One end of the secondary winding is connected to the main part, and the other to the electrode.

When preparing such a device, the circuit may become stuck if the primary winding is connected to the electrical circuit. One of its ends is output through the diagonal of the switch near the diode bridge. On the other side, a signal is supplied directly from the thyristor, which is located under the start button.
The pulse vibrates at times from an additional capacitor, with a capacity of 1000 - 2000 µF. To prepare a transformer, you can use a Sh-40 core, which has a thickness of 70 mm. The primary winding with three hundred turns can be easily made from a 0.8 mm core with PEV markings. For control, use a thyristor with the designations KU200 or PTL-50. The secondary winding with ten turns can be made from a copper busbar.

More tightly sealed capacitor: diagram and description of the self-contained device
To increase the signs of tension, you will have to change the design of the device that is being prepared. With the right approach, it will be possible to join the darts with a webbing up to 5 mm, as well as thin sheets of stitching no more than 1 mm. To activate the signal, a contactless starter with MTT4K markings, rated for an 80 A electric current, is activated.
Set the core block to turn on a thyristor connected in parallel, a diode and a resistor. The demand interval is adjusted by an additional relay located in the main circuit of the input transformer.
The energy is heated in electrolytic capacitors, connected to a single battery; in the following table you can learn about the necessary parameters and the number of elements.
The main transformer winding is made from a 1.5 mm crossbar, and the secondary winding is made from a copper busbar.

The operation of a self-propelled device is based on such a scheme. When the start button is pressed, the trigger relay turns on the transformer of the cooking unit behind the additional contacts of the thyristors. The shutdown occurs immediately after the capacitors are discharged. Adjustment of the pulse action is carried out using an additional exchangeable resistor.
Attachment to contact block
The preparation of devices for capacitor welding requires a manual welding module, which allows the electrodes to be fixed and moved without interruption. The simplest design relies on manually tightening the contact elements. With the folding option, the lower electrode is secured in a stationary position.
For this purpose, on the required support, the screws are fixed with a height of 10 to 20 mm and an overcut of more than 8 mm. The upper part of the contact is rounded. Another electrode is fastened to the Maidan, and it will collapse. In case of any emergency, adjusting screws will be installed, in addition to which additional pressure will be applied to open the additional vise.
The trace is sure to insulate the base from the dry maidan until the contact of the electrodes.

The procedure for carrying out the work
First, you will need to break up the point capacitor welding with your own hands, you need to become familiar with the main steps.
- At the cob stage, the elements that are to be combined are prepared in the proper manner. From these surfaces one can see obstructions in the appearance of saw particles, soil and other substances. The presence of third parties will not allow the workpieces to be firmly pressed together.
- The parts are connected one by one in the required position. The stench is to blame for spreading between the two electrodes. After squeezing the contact elements, a pulse is sent by pressing the start button.
- If the electrical power is on, I am about to jump in, the electrodes can be pulled out. The part is ready to be assembled. If there is a need, then it is installed at a different point. The thickness of the element that is being welded determines the amount of space between the centerless infusion.
Stacking of ready-made devices
Robots can be equipped with special installations. This kit includes:
- impulse-generating apparatus;
- attachment for welding and clamping;
- gate cable, equipped with two clamps;
- collet set;
- instructions for use;
- plugs for connecting to the power supply.
The enclosed part
This technology for combining metal elements allows not only the welding of steel particles. With this help you can, without much difficulty, press together parts made from colored metals. However, when testing welding operations, it is necessary to ensure that all specific materials that are being tested are protected.
Disintegrated in the 30s of the twentieth century, the technology of capacitor welding began to expand widely. Tsyomu hid low factors.
- Simplicity of the design of the cooking apparatus. You can pick it up with your own hands.
- The energy intensity of the work process is noticeably low and there is little need for electrical interference.
- High productivity, which is incredibly important when producing serial products.
- Reduced thermal flow on materials to be joined. This feature of the technology makes it possible to freeze them when welding small-sized parts, as well as on visible surfaces, where the use of primary methods would inevitably lead to unnecessary deformations of the material.
Once we add that a mother of average qualification is sufficient to apply clear sutures, the reasons for the popularity of this method of contact welding become obvious.
The technology is based on primary contact welding. The difference is that the stream is supplied to the welding electrode not continuously, but appears to be a short and forceful pulse. This impulse is removed by installing high-capacity capacitors. As a result, good indicators of two important parameters can be achieved.
- A short hour of thermal heating of the parts to be joined. This feature is successfully exploited by manufacturers of electronic components. Best suited for transformerless installations.
- The tightness of the stitch is high, which for the strength of the seam is much more important for its tension. Vikorist and transformer systems must overcome this pressure.
Depending on the selection process, choose one of three technological methods.
- The point capacitor is not sealed. A vicoristic and short pulse of the jet, which is ejected by the capacitor, connects the parts in precision machinery, electrovacuum and electronic technology. This technology is also suitable for welding parts that are subject to significant wear and tear.
- The roller suture allows you to cut off the sealed joint that is created without any welding points that overlap. This is due to the stagnation of technology in the process of manufacturing electric vacuum, membrane and bellows devices.
- Stick cooking can be done in both contact and non-contact ways. In both cases, melting occurs at the place where the parts are joined.
Galuz zastosuvannya
Areas where the technology is used are different, but with particular success, vikorist is used for fastening bushings, studs and other fastenings to sheet metal. Due to the peculiarities of the process, it is necessary to adapt to the needs of the rich variety of plants.
- In automobiles, it is necessary to reliably connect body panels made of sheet steel to each other.
- Aircraft equipment that hangs special equipment up to the value of welded seams.
- The vessel operates in a highly efficient manner, saving energy and wasted materials gives a particularly positive result.
- Finding precise adjustments and unacceptable deformations of the parts to be joined.
- Budivnitstvo, in which a wide range of structures emerged from sheet metal.
Everywhere it is required simply from the device and awkwardly from the vikoristan ownership. With this help, you can improve the production of serial products or improve your garden plot.
Self-contained capacitor, not sealed
In stores you can get ready to purchase without any problems. But through the simplicity of its design, as well as the low quality and availability of materials, many people are willing to select equipment for capacitor welding with their own hands. Pragnenya will save money wisely, and you can easily identify the required scheme and report description. Proceeds like this in the following manner:
- The flow is directed through the primary winding of the live transformer and the other place where it is rectified.
- A signal from the thyristor that controls it, equipped with a start button, is supplied to the diagonal of the bridge.
- The thyristor has a capacitor in it to serve as a storage impulse. This capacitor is also connected to the diagonal of the diode bridge and connected to the primary winding of the transformer coil.
- When the device is connected, the capacitor accumulates a charge, powering an additional circuit. When the button is pressed, this charge is directed directly through a resistor and an additional thyristor directly to the welding electrode. There is an additional barrier when it comes to contact.
- To recharge the capacitor, you need to release the button, disconnect the resistor and thyristor and reconnect the auxiliary circuit.
The strength of the pulse pulse is regulated by an additional resistor that controls it.
This is an important description of the operation of the simplest equipment for capacitor welding, devices of which changes can be made, depending on the required tasks and the necessary output characteristics.
Need to know
For those who want to pick up their cooking equipment on their own, please pay attention to the following points:
- It is recommended that the capacitor capacity be close to 1000 - 2000 µF.
- For the manufacture of a transformer, the most suitable core is the Sh40 variety. Yogo optimal thickness is 70 mm.
- The parameters of the primary winding are 300 turns of copper wire with a diameter of 8 mm.
- The parameters of the secondary winding are 10 turns of copper bus with a cross-section of 20 square millimeters.
- For heating, the thyristor PTL-50 is a good choice.
- The input voltage can provide a transformer with a voltage of at least 10 W and an output voltage of 15 V.
Considering this, you can collect a completely useful device for spot welding. And although it will not be so thorough and manual, as it is the possession of a factory-made product, with its help you will be able to fully master the profession of a welder and then begin to prepare various parts.
This type of cooking is carried out using the spot method. It is easy to use if you need to weld small parts one by one, and one by one. It is important that the capacitor is not made with vicor for robots with colored metals.
Since it has become possible to carry out brewing exactly in the home, the method has become increasingly popular among unsettled brewers. This situation has added to the relevance of nutrition today. What is this process and how to prepare a brew for home brewing? We will try to present this in detail.
The first importance, which comes from the diet, is the fluidity of cooking and its environmental friendliness. A standard capacitor welding unit operates at high voltage. This allows you to save electricity and remove a clean and straight seam. Basically, it should be frozen in a micro-cooked tank, or if necessary, make large cuts. This is based on the following principle:
- Capacitors collect the necessary amount of energy from themselves;
- The charge is converted to heat, as it is used for cooking.
As we thought earlier, this type of cooking is environmentally friendly. The system does not require space for cooling through the presence of thermal radiation. This advantage allows you to add an hour to the term of operation of the capacitor device.
The principle of robotic capacitor welding
In the process of spot welding, parts are pressed together with two electrodes, which results in a short-hour jet. Then an arc is created between the electrodes, which heats the metal, melting it. The welding pulse arrives at the robot for 0.1 seconds, and it supplies a hot melting core for both parts of the workpiece that can be welded. If the impulse is removed, the parts will continue to shrink under the pressure of pressure. As a result, the welded welded seam is developed.
The secondary windings are generated, their current flows to the electrodes, and then to the primary winding, the pulse generated by the capacitor charge is generated. The capacitor accumulates charge during the interval between the necessary pulses on two electrodes. Particularly good results come when you go about or media. Due to the nature of the workpieces, there is no need to overextend 1.5 mm. It is possible, for all intents and purposes, that such a scheme works wonders when boiling different materials.
See the spot spawn
There are two main types of do-it-yourself capacitor welding:
- Transformer. If there is a capacitor, discharge the energy charge onto the winding of the transformer device. In this case, the workpieces are moved to the welding field, which is connected to the secondary winding.
- Transformerless.
Advantages
As with all other types, self-welding capacitors have low positive characteristics:
- With stable operation, it is possible to save electricity;
- Reliability and practicality. The fluidity of the robot allows spot welding to be accessible when cooled by air;
- Robotic speed;
- The brewing strum is very thick;
- Accuracy. With a dose of renewed energy, the dot creates a reliable seam, a compact structure. This method is widely used for thin welding of color metal;
- Economy. The current level is maintained at 20 kVA maximum. This requires additional selection of tension and stabilization of tension at the edge.
Do-it-yourself assembly diagram for the unit
The primary winding is passed through one place (direct) and then connected to the voltage source. The thyristor sends a signal to the brook diagonal. The thyristor is equipped with a special button to start it. The capacitor is connected to the thyristor, more precisely to the junction, to the diode bridge, then connected to the winding (primary). To charge the capacitor, an additional lance with the same bridge and transformer is turned on.
As the pulse corresponds to a capacitor, its capacitance is 1000-2000 µF. For the design of the system, a transformer is vibrated from a core type Ш40, the required size is 7 cm. To create the first winding, a wire with a diameter of 8 mm is required, which is wound 300 times. The secondary winding transmits the vicor of the copper bus, 10 windings. For the input, use practically any kind of capacitors, with a voltage of 10 degrees and a voltage of 15.
If the robot is able to assemble workpieces up to 0.5 cm, then make several adjustments into the design diagram. For manual signal transfer, use a MT4K series starter, which includes parallel thyristors, a diode and a resistor. The additional relay allows for working hours.
This self-sealing capacitor operates in the following sequence of actions:
- Press the start button to start the time relay;
- The transformer is turned on with the help of thyristors, after the relay is turned on;
- The resistor is used to determine the value of the pulse.

How is the cooking process carried out?
Once we have completed the DIY welding of the capacitor, we are ready to begin work. To cook the cob, prepare the parts by cleaning them from dirt and other grains. Before placing the workpieces between the electrodes, they should be brought together in the position in which they need to be welded. Then the device starts. Now you can squeeze the electrode and check 1-2 hvilini. The charge that accumulates in the high-amplitude capacitor will pass through the welded fastener and the surface of the material. As a result, the wine will melt. Once everything is crushed, you can proceed to the final edges and weld other parts of the metal.
Before welding robots, in your home, you should prepare materials such as emery paper, grinder, knife, twist, or press or pliers.
Visnovok
Condenser welding is very easy to freeze, both at home and in the industrial zone, as we most importantly, it is even easier and easier to freeze, plus there is still a great number of transfers. With the additional information provided, you can take your knowledge to a new level and further improve the welding point in practice.
Technical data of our brewing machine – automatic brewing machine:
Power supply voltage: 220 V
Tension: no more than 3 kVA
Robot mode: repeated-short-hour
Operating voltage regulation: stages from 19 to 26 V
Feed speed of brewing dart: 0-7 m/h.
Dart diameter: 0.8 mm
Dimensions of the brewing strum: PV 40% - 160 A, PV 100% - 80 A
Range of regulation of the steam generator: 30 A - 160 A
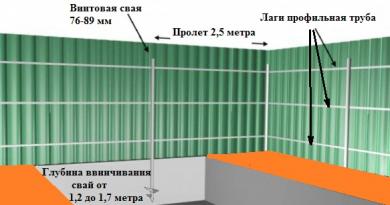
Since 2003, six such devices have been built. The device shown in the photo has been in service since 2003 and has never been repaired.
External appearance of a brewing machine

Zagali

View from the front

Rear view

Type of evil

Yak zvaryuvalny drіt vikoristovuetsya standard
5kg cat dart with a diameter of 0.8mm

Brewing tip 180 A together with euroroz
Bula was purchased from a food store.
Diagram and details of the welding basin
Paljuadi on those, the scheme of the navvavtomata analized by such Aparativ Yak PDG-125, PDG-160, PDG-201 I MIG-180, the principle of the scheme of the VD of the Mount Pay, the Scheme Vimalovyu was vimalized in the process in the process. It’s better to finish the wiring diagrams. On the other board, all points and parts are marked (open Sprint and point the mouse).

Installation view

Keruvanya fee
Yak vimikach zhivlennya zahistu zastosovani single-phase automatic circuit breaker type AE for 16A. SA1 – switch of welding modes type PKU-3-12-2037 for 5 positions.
Resistors R3, R4 – PEV-25, otherwise you can not install them (they don’t have them). They are intended for rapid discharge of choke capacitors.
Now on to capacitor C7. When paired with a throttle, it will ensure stabilization of the arc and support of the arc. The minimum capacity is not less than 20,000 µF, optimal is 30,000 µF. Several types of capacitors with smaller dimensions and higher capacity were tested, for example CapXon, Misuda, but they found that they were not reliable and burned out.

As a result, Radian capacitors were installed, which are still in use today, K50-18 at 10,000 uF x 50V with a number of three pieces per parallel. 
Power thyristors rated at 200A taken from spare parts. You can install it at 160 A, but you will need to install good radiators and fans. The B200 is placed on a small aluminum plate.

Relay K1, type RP21, 24V, variable resistor R10, type PPB.
When you press the SB1 button on the pin, voltage is supplied to the heating circuit. Relay K1 is activated, and through contacts K1-1, voltage is supplied to the electromagnetic valve EM1 for acid supply, and K1-2 - to the life circuit of the traction motor, and K1-3 - to the voltage supply of the power thyristors.
Using the SA1 switch, set the operating voltage in the range of 19 to 26 Volts (with the addition of 3 turns on the shoulder up to 30 Volts). Resistor R10 regulates the supply of the welding dart, changing the welding flow from 30A to 160A.
When adjusting, resistor R12 is selected in such a way that when R10 is turned to minimum speed, the engine will still turn around and not stand still.
When the SB1 button on the pin is released, the relay releases, the motor starts up and the thyristors close, the solenoid valve for charging the capacitor C2 is no longer open, supplying acid to the welding zone.
When the thyristors are closed, the arc voltage is detected, and through the flow of the choke and capacitors, the voltage C7 rises smoothly, preventing the welding dart from sticking in the welding zone.
Motaemo brewing transformer
![]()
We take the OSM-1 transformer (1 kW), disassemble it, and put it in there, marking it in advance. Robimo has a new frame of the cat with 2 mm thick textolite (the original frame is too weak). The size of the cheek is 147 106 mm. Size of other elements: 2 pcs. 130×70mm and 2 pcs. 87x89mm. The cheeks have a window measuring 87-51.5 mm.
The frame of the cat is ready.
Find a winding wire with a diameter of 1.8 mm, using reinforced fiberglass insulation. I took this wire from the stator coils of a diesel generator). It is possible to harden the primary enamel wire type PETV, PEV, etc.

Scattered fabric - in my opinion, the best way to insulate
The winding begins - the first thing. The first fruit takes 164+15+15+15+15 turns. Between the balls there is insulation made of thin fabric. The wire should be laid more tightly, otherwise it would not fit, but there were no problems with it. I took scraps from the remains of the same diesel generator. That's it, the first fruit is ready.
Prodovzhuemo motati - secondary. We take an aluminum bus in insulated glass measuring 2.8x4.75 mm (can be purchased from winders). Approximately 8 m is required, but there is a small supply. We begin to wind, laying it more tightly, we wind 19 turns, then the loop for the M6 bolt, and again 19 turns, the cobs and ends are 30 cm each, for further installation.
There is a small opening here, especially for welding large parts under such a voltage, the wire was jammed, during operation I rewinded the secondary winding, adding 3 turns on the shoulder, at once I got 22+22.
The winding fits tightly, so if you wind it carefully, everything can come out.
If you put enamel on the primary coating, then it’s easy to apply varnish, I soaked the coil in the varnish for 6 years.
We take out the transformer, plug it into the outlet and measure the no-load flow of about 0.5 A, the voltage on the secondary market is 19 to 26 Volts. If everything is so, then the transformer can be removed, but for now we no longer need it.
Instead of OSM-1 for the power transformer, you can take 4 pieces of TS-270, although there are little bits of a different size, and I only bought 1 welding machine on the new one, I don’t remember the data for winding, otherwise you can save it.
Motatimemo throttle
We take an OSM-0.4 transformer (400W), we take an enamel wire with a diameter of at least 1.5 mm (less than 1.8). We roll 2 balls with insulation between the balls, lay them carefully. Next we take an aluminum tire 2.8-4.75 mm. And we wind 24 turns, the outer ends of the bus are 30 cm long. We select the core with a gap of 1 mm (place mats on the PCB).The choke can also be wound on the slide of a color TV, type TC-270. There is only one cat per person.
We have lost another transformer for the life of keruvannya circuits (I'm ready). It is necessary to supply 24 volts with a current of approximately 6A.
Housing and mechanics
We've sorted out the trances, let's get to the building. The seats do not have a 20 mm beading. The cutlets are cooked, everything is 1.5 mm thick. The base of the mechanism is made of stainless steel.


Motor M is built like a VAZ-2101 chip cleaner.
The end cap has been tidied up and turned to its extreme position.
The spring under the coil for the valve of the galm zusill has a spring, so that the first one has sunk under the hand. The galvanic effect increases when the spring is compressed (or the nut is tightened).