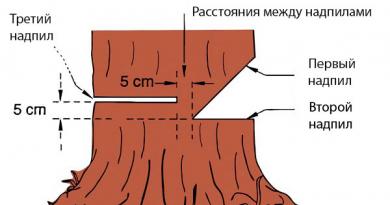
Do-it-yourself foundation for a state block is an economical option. Let's make a shed with cinder blocks with our own hands. We will make a shed with cinder blocks with our own hands
For the skin of a private household, food arrives early and very late in the barn, for the needs of the ruler. For living sheds, call inexpensive vicorists
Bud materials
The most extensive budget option is a cinder block shed.
The focus of the report is on how to build a cinder block shed.
Cinder block is an inexpensive waste material that can be produced by pre-pressing concrete with a variety of inexpensive materials (slag, ash, etc.), often changing its properties, cinder blocks can be cut independently from available materials .
Features of cinder block masonry
Cinder block masonry is characterized by ease of installation and a fast pace of daily life.
Just like a cinder block can reach great dimensions when leveled with soil. Working with a cinder block practically does not require any special skills, so you can work on building a shed on your own. The walls are made from cinder block, have good sound penetration, last a long time and are not susceptible to fire. True, walls made from cinder blocks will always be subject to plaster, since the cinder block is durable before being ruined, with a gradual influx of moisture. When creating a shed with a cinder block, think carefully about the construction in order to protect the shed from the steady influx of moisture.
To successfully build a cinder block shed, follow all the steps:
1. planning and design of materials.
2. Building the foundation.
3. Raising the walls.
4. installed dahu.
5. plastering the walls.
Basic stages of everyday life
First of all, before you start building the barn, you need to clearly see the size
future life, it’s important to know for what needs the Vikorist has a barn.
It is important to consider the size of the materials necessary for the construction, so that one square meter of cinder block wall contains 13 standard cinder blocks. Coming from this, the destruction of a number of cinder blocks, necessary everyday life, is generated.
Once all the necessary materials are prepared, you can print the recipe.
For a shed with a cinder block, it is necessary to build a foundation, to protect the clay from the soil, to protect the walls from premature ruining. The foundation should be laid in a strip type, then dig a trench with a depth of approximately 50 cm, install formwork, fill it with concrete, with reinforcement along the entire perimeter. Allow the foundation to dry thoroughly, periodically pouring water on it to prevent cracks from appearing in the foundation.
Building walls
After that, since the foundation is good, you can start building the walls. Raise the plinth to a high height to avoid getting caught
There was board water on the walls. Before you start laying the cinder block, you need to hydroisolate the foundation. The masonry itself takes only a short period of an hour in connection with the great size of the target.
After the walls have been established, you can proceed until the dahu is established. Yes, you can have one or two skins. Covering can be done with such materials as slate or corrugated sheeting, branding, or waterproof.
After all the main stages of construction are completed, you can proceed to plastering the walls, which will further protect the walls from the influx of atmospheric moisture.

In this article, we took a step-by-step look at how to build a cinder block shed. Following these simple rules will allow you to obtain the sovereign's property in the shortest possible time with minimal expenses.
In order for the shed to “not lie on the ground”, a good foundation is necessary. You can allow the booths to be raised and provide external ventilation in the lower part of the booth. In addition, small additional spaces may be built up in the middle of the foundation, which may eventually become stagnant.
The fragments of the barn and most of the ruler's households will be brought down until a small amount of money is needed, a completely crushed foundation is enough, which can be formed to fill the water and having spent very little money. If, in such situations, you need to make more effort to build the foundation through the high viscosity of the soil (to penetrate deeper into the ground to ensure the stability of the future shed, turn off its reaction).

Different types of foundations have their pros and cons. All of them are easy to follow, as long as you follow the recommendations of professionals.
Approximately the latest popularity is indicated by:
- stitch;
- guintovium (palovium);
- hundred parts foundation.
And anyway, why bother? Before reviewing the following, two main initial officials must take action:
- peculiarities of the soil;
- The massiveness of the outbuilding (shed) has been transferred.
If the soil is stable, string and other structures are ideal. The stench does not require great depth. On more viscous soil, you will have to twist the screw shafts and install them at a depth of about 1.5 meters.

Croc first. We mark out the area behind wooden stakes and stretch the twine or reel to mark straight lines. The markers run along the line that is avoided from the external and internal walls of the future foundation (the trench will be wider than the entire line).
Respect that the great rulers were pushing for sectional planning. So the foundation flood does not only pass along the edges of the structure, but also underneath it - it is necessary so that the “bottom” of the barn does not sag, but lies on the concrete.
Croc is different. Now the time has come to move through the trench. Here it’s easy to get by with a shovel and physical labor without the need for excavator equipment. The width of the trench channel is recommended ~45-70 cm for the pure width of the foundation (without formwork) ~30-40 cm horizontally.

If the clay is dry, then get a little bit of it below the freezing point. This nuance should be taken into account in advance. And since you have begun your daily life unsatisfactory for yourself, ask your neighbors and relatives. Of course, among your acquaintances there will be those who have already laid the foundations in this locality and will show you.
Krok third. At the bottom of the trench, apply crushed stone with a ball of 8-10 cm, then sand with a ball of approximately 4-5 cm. The pillow will provide the necessary “use”, although it is not accessible to the naked eye, but in fact it is due to temperature changes in the ground, from change the region of the region from minimal seismic impulses.
Crock of quarters. Wooden formwork is constructed using planks and plywood. There is no reason to install a shed on a foundation, the upper edge of which is level with the ground. You also need to protect the lower part of the barn from rotting. In addition, the relief on the site is not always equal - it is necessary to “distribute” it for the correct burial of the foundation foundation in such a way that at the top point of the ground the concrete looks at least 20 cm (or more accurately it is 30 cm).

Krok five. Reinforcing elements are laid in the middle of the formwork - metal mesh, dart, etc. The elements are joined together by dart, or boiled. At this stage, do not forget about ventilation. Without it, excess soil will be created in the middle of the foundation, which will inevitably lead to the collapse of not only the concrete, but the barn.
Vents (vents) come from scraps of plastic or metal pipes and may have a square cut. Golovne, so that the openings are located in several places and open the broach through the air.

Krok is sixty. Prepare concrete scraps in quantities sufficient for repeated use - there is no reason for the concrete mixer to run out of anything “for tomorrow.” Pour the mixture into the formwork evenly through the pipe, using a shovel and manually helping the concrete to spread into the same ball.
It is recommended to first form a thin ball, allow it to harden slightly and then fill the foundation to the top. So you will be able to enjoy yourself by spending only a little cement milk. Then the bottom ball will be a kind of insulation against the sand and crushed stone pillow.
The period for complete hardening of the concrete foundation is 24-27 days, but the construction of the shed can be started only after a repeat or two, if ~70% of the value has already been achieved.

Explain the character of the soil in your business. If it is unreliable, contains a lot of water, has a high viscosity - you will need it. These are special parts that are sold in convenience stores. There are hammers with a screw thread along the barrel. The poles are driven (screwed) into the ground to the depth specified in the instructions upon purchase. The main thing is to preserve verticality. Vikorist in work daily rhubarb, whiskey and other methods.
Video – Foundation on guint poles

As life has shown, this foundation provides the widest possible range for amateur experimentation. In principle, it is allowed to use any kind of material, even if the wealthy rural residents and summer residents accumulate various everyday “valuables”:
- a couple of pallets aimed at the drops in front of the front ruler;
- they look like old concrete blocks that stand in a long-term stagnant state;
- scraps of asbestos pipes and other related materials.
Robot order
Croc first. The points of placement of the stops are significant. 1 PC. An obligatory stench lingers under the skin's cutaneous element. Plus, on the runs between the edges, since the end of such a run is over 1.8-2 meters.
Video – Partial foundation
Croc is different.
- square pits – like our ordered square (cubic) elements;
- rectangular - with a small depth of the foundation that is planned, and our elements form a parallelepiped shape;
- vertical drill bits - which are suitable for targeting columns or asbestos (or other) pipes.

Krok third. The bottom is covered with a ball, which cushions it. As a rule, the size is 4-6 cm. Sometimes crushed stone, sometimes subdividing one or the other. The mixture is necessary so that the load-bearing element does not “merge” with the soil, but rather emerges on its own. And during the period of moisture movement, such a foundation will not disintegrate into different sides.
Crock of quarters. Place it near the ready-to-open stage. When working on the pipes, make sure that the stink is not to blame for being left empty in the middle. If it's dirty, it will rust over time, and you won't be able to tell how good it is in the middle of the columns that support your shed.

The asbestos walls can cause screams behind the designations - it’s difficult to rely on their durability, as the middle is empty. Mix a concrete mixture containing sand and a few pebbles and/or crushed stone. Don’t forget to put elements into the barrel to reinforce it. Fill the cracks at the pipe after they are installed and aligned vertically.

Krok five. This method does not require heavy soaking until the concrete hardens (as with a line pour). At a maximum, when manually placing blocks or blocks, it will take 3-5 days until the concrete accumulates at the joints and hardens. After this, you can safely begin the everyday life in the middle of the barn or the ruler's dispute.
In fact, any private person who is busy with everyday life will easily choke in the process. As your appetite grows, it becomes necessary to redesign the layout, increase the size of the foundation and the entire shed. Fahivtsi please be consistent. Beforehand, cover all dimensions, prepare for burial, and consider a number of steps.
Otherwise, there may be unexpected surprises. For example, unexcavated rubble nodes in the ground, connections with pipe-conducting underground communications unknown to you, and so on. Plans and smart approaches will lead you to ultimate success.

When designing the foundation for a barn or a large state-owned building, the main aspect is to reduce the household budget with your own hands and secure the maximum possible resource. Therefore, floating slabs and strips of the MZLF are rarely installed, and fingerboards and grillage parts are sold. However, on folding soils, with a high groundwater level and steep slopes, comply with SP standards and ensure the protection of underground power structures with hydroisolating materials and insulating materials against moisture and swelling.
When selecting a foundation for a shed, an individual memorial, which does not require adequate lighting, is often placed on the joints of wall blocks in the format 2 x 2 x 4 dm. This is motivated by the fact that the state block will be small and light, without affecting anyone according to the laws of nature:
- on clay soil, either fill up the steps with horizontal forces, or press them with the so-called force, or apply them to the foot of the step;
- A small amount of money here is rather insufficient, and if it’s not an advantage, the fragments of wine can be made more equal;
- In order not to bypass the boards and thawed spring water, remove the reinforcement in the middle of the reinforced concrete or eliminate the opening of cracks in the concrete blocks when the structural material is frozen and wet.

Therefore, it is necessary to restore the relief, to determine the level of water supply and the structure of soils in the area. However, geological research will cost more than the entire turnkey project, so it makes sense for the home master to complete this service. The “like a susida” option also reduces the logic, the fragments of the layer lie unevenly, the floats are practically not visible from the surface, the actual terms of operation may differ.
The simplest way to independently investigate soil in the flames of oblivion is to test screwing the screw. The screw is tightened manually, allowing you to determine the level of groundwater and the depth of the load-bearing layer at the moment of tightening, which has sharply increased.
Important! The layer must lie lower due to the sign of freezing in the region of operation, in order to turn off the forces of swelling throughout.
The most important thing is to carry out testing of any technology for building foundations on heaving soils, mounds or sandy sands that sit under your feet very quickly.
Options for the foundation of a barn
After independent improvised geological investigations, it is possible to determine the nature of the soils near the Forget River:
- Sand of a large fraction, rock or gravelly soil is the best option for a base for a state-owned block, sufficient materials from the target or a wall block, buried in two - one row, similar to the grillage of the bottom frame beam wilted";

- sandy soup - in case of possible swelling of the front option, it is necessary to add additional insulation to the footings under the sole or pour the drill bits into a permanent formwork made of roofing felt, burned into a cylinder, asbestos or polyethylene ї pipes;

Shed on drilling poles
- loam, clay, folded topography, loose soil (ground water is high) - only screw holes are cheaper, for which it is not necessary to drill holes, lay drains, insulate structures and hydroisolate them.

The monolithic composite foundation and the MZLF stitch are not considered in this statistic in principle, because their installation will cost more for a frame shed, which is not economically viable for an overhead spore.
Considering that a monolithic grillage for a state block is extremely expensive, all important structures have wooden beams at the tops of the pillars. In this situation, it is impossible to pour a foundation over the ground, and the foundation will be built to overlap the zero level with beams.
However, when building a shed for the sake of thinness, this option is unacceptable in principle, since the wood rots and is scraped off by shovels when collecting the necessary partial repairs. Therefore, for calf and poultry farmers, it is easier to increase the building budget by pouring a monolithic ground belt, which is also a modification of the stitch foundation for light buildings.

Pali guints
The main problem with this technology is the search for a SHS generator with a design. Due to the availability of the welding machine and the practice of this vikoristan, you can make guints with your own hands. The skin tester has a table of non-specific data on different soils, which allows you to determine the size of the finger.

Table of non-knotted production values of SBC screw pins
A frame outbuilding rarely weighs more than 2 tons, so it will be shown that the foundation for the shed can be built on a single pallet. However, it is important to note that the rolled metal and lumber from which the grillage beams are made sag under their frame by 2.5 - 3 m. Therefore, the track is placed more often, with a maximum length of 1.5 - 2 m. look:
- - the enclosure is extended 1 m beyond the perimeter of the walls, a string or cord is stretched along them;
- leader holes - drilled with a hand tool or dug with a shovel, serve as a conductor for the shovel, set straight, depth 0.4 m, diameter of the hole is less than the size of the shovel;

- tightened - the SHS is screwed in by hand or by drilling with a force of 1.5 kW (the required torque to turn is a multiplier, the price of power is 3 - 5 thousand or rental equipment);
- verification - using a laser instrument or a hydraulic jet, a single horizontal line is marked on the body of the skin, the pipes are cut with an angle grinder with metal equipment;
- concrete bath - empty SHS will be filled with thin concrete to stop corrosion of the internal walls, the procedure does not in any way affect the existing building, the next stage can be started without worrying about hydration of the cement stone;
- Heads - a steel grillage is too expensive for a state block, and wooden beams are simpler to fasten on pedestals, which secure the ends of the beams; fixation is carried out with bolts or anchors, so that during emergency heating, self-tapping screws can be cut with horizontal reinforcements.

The head of the pole screw for fastening the beam of the lower frame
Important! There is no swelling left, the outer edges of the pipes are protected with anti-corrosion agent. However, the design will eliminate a subpill, the perimeter of which must be covered with decorative material (such as an asbestos cement sheet covered with shingles, corrugated sheets or basement siding). To ensure proper ventilation of the underground chamber, remove ventilation vents of 1/400 size from the perimeter of the underground chamber.
Pali drills (drill rigs)
The next option for the foundation of a shed on clay soils is to use drill bits, which you can make with your own hands using the following technology:
- full-scale axles - the layout is similar to the front fall;
- drill bits - drilled with hand tools or motor drills, depth 1.5 - 2 m, depth from razhunka;
- formwork - prepared from roofing felt burned into a cylinder (the edge is fixed with staples), polyethylene or asbestos cement pipes;

- – by twisting up to 4 vertical rods (diameter 8 – 10 mm, periodically cut through “corrugated”), round or square clamps are fastened (smooth reinforcement, diameter 6 mm), the slurry ball is secured with round polymer washers, so stick to rods;

Variants of frames for reinforcement of drilling pins
- Concreting - pour the mixture manually through self-propelled mortars, strengthen it with rods or a clay vibrator.
Stands from a wall block 40 x 20 x 20 cm
On non-heaving soils, foundations can often be completed within a few minutes and are considered the cheapest option. Since the soil is clayey, the forgetter has two options:
- work (the main mental heaving is eliminated by the drainage of thawed/groundwater), insulate the sole (through small dimensions, high-density polystyrene foam will have to be laid along the entire perimeter and, apparently, for puppies to save heat);
- or bury the feet lower due to freezing, fill the sinuses with non-metallic material (sand, crushed stone);

Partial foundations on heaving soil are liable to freeze deeper
In the first period, the foundation for the shed is more expensive, and the fragments of the EPP have a higher price. Another option will dramatically increase the burden of earthworks. Therefore, we will look at the technology at the same level with low groundwater level for high sand, rock or gravel soil:
- natural axes - hang with cords on cast-offs, distanced from the pit by 1.5 m;
- shurfi - an eagle ball is visible under the skin (approx. 40 cm);
- pillow - an underlying ball 20 - 40 cm thick, crushed with crushed stone on loose soil or sand on dry soil, skin 10 cm compacted with a vibrating plate or manually with a block;
- drainage - perforated in the lower part of the corrugated pipes are laid along the perimeter of the pavement, draining melt and dirty water, filled with crushed stone, covered with geotextile on all sides;
- masonry - using ceramic or blocks 20 x 20 x 40 cm, pedestals are built on which the beams of a wooden grillage will be laid.
The collection is completed in a similar manner to the fawn-grillage foundations.
Stovpi z pokrishok auto
Individual forgetters often use the wheels of machines to extract resources from everyday life and landscape design. The tires are formed as a structural material for the foundation or formwork. Technologies are being developed, selected carefully depending on the amount of clay in the soil:
- on heaving soils, holes are drilled along the edges and with a 1.5 - 2 m edge under the long walls, wheels are placed in the middle, the internal space is filled with crushed stone, which is impeded by ramming, sloping gates coating with inert material (for example, sand);

The surfaces of the tires are sunken lower due to the signs of freezing and filled with crushed stone.
- on rocky, crushed stone or rich soil - it is enough to collect a mineral ball, sand the pit, strengthen it with a vibrating plate, create concrete grade M15 and higher, fill the inner empty tire and strengthen the sum of the bayonet Yum.

The covering serves as a formwork for concrete and dampens the soil.
The only downside is the large diameter of the rubber beads. The wall spirals in the center of the wheels, on the edges the gum protrudes on two sides, on straight plots - on one side. This makes the preparation of the collection more difficult, without any penetration of the vologist and rodents. Therefore, the cladding is mounted on a frame that has a base, or openings are cut in sheet materials, and wheels are made for a more pleasing design of the facades.

Important! After the concrete has been hardened, the structure often loses power dampers, so due to the possibility of swelling it is better to use the first method.
Monolithic ground belt
This technology is the only one that allows you to create a substructure on the ground, optimal for long-term operation in poultry or barn fields. On the cob version, there are possible options from the bottom of our minds:
- non-heaving soils – additional penetrations are not required, since the soil is dry; with high groundwater level, drainage and waterproofing are necessary;
- clayey soil - along the perimeter of the building and under the pavement, it is necessary to lay insulation to save geothermal heat under an unfired cabin, prepare wall drainage and treat the accessible surfaces of the concrete with hydroisolating materials to turn off swelling;
At the early stages, the technology for creating a monolithic belt with your own hands involves the following operation:
- marking - cast-offs are extended beyond the perimeter by 1.5 - 2 m, for the skin wall, 2 cords are stretched along the inner/outer edge of the foundation;
- earthlings - the birth ball is removed in the middle of the axial lines all around, so that it is impossible to prepare a screed on the ground;
- the underlying ball is a foundation cushion made of crushed stone or sand, summing up the AGS material 0.2 - 0.4 m, the perimeter is larger than the size of the foundation by 0.2 m on the skin side;
- drainage - a closed circuit made of perforated pipes, which lies on the level of the sole with a bend of one side of 4 degrees;
- insulation - only on clay soil, the perimeter is lined with extruded polystyrene foam, the pavement is insulated at a depth of 0.4 m;
- formwork - plywood or board panels are mounted vertically, the sides are 5 cm beyond the design mark, to prevent splashing of the concrete during vibration;
- reinforcement – frames made of late struts 6 – 10 mm, tied with straight clamps made of smooth reinforcement 6 – 8 mm;
- pouring - placing the mixture on a stake with one-hour reinforcements (plastering with a rod or clay vibrator).

Monolithic stitch belt for state-owned blocks with pavements
Keeping an eye on the concrete will allow the cracks to disappear due to the periodically poured mixture. As an option, you can cover the concrete surfaces with plaster, reducing the vaporization of moisture.
After demoulding, all accessible edges of monolithic beams are waterproofed with bituminous mastic, coating or plaster materials, or rolled material (for example, TechnoNIKOL) is fused on the surface.
The foundation on the ground is a screed that is suspended from the foundation with a damper stitch. Paving is necessary to drain thawed and rainwater from the walls of the barn.
Thus, for the shed you can build a budget foundation based on the options considered. The main criteria are the characteristics of the soil and the level of water supply, the relief and water supply, the type of substructure/surface and the assignment to the state block.
The carnage of non-living creatures was on the farm, without a doubt, it is necessary, before them you can bring a barn, which we are building today with powerful forces, vikorist with which there are foam blocks.
Why a foam block
Of course, there is a great sense of pride in simply ignoring this moment, even if we just have a stable, and in essence it is not our fault to worry about what we are talking about. This is a space in which a warehouse for food products, tools, and equipment can be stored.
So, we can still present the songs that are relevant to the internal atmosphere.
Well, the existence of a shed made of foam blocks allows us to talk about the following features of the material:
- Thermal insulation, how important it is for the stable to lie down for its purpose.
- Simplicity in robots. Let us look at this point below especially carefully.
- Very low varity.

Why start
Of course, there is no talk about any kind of language project here; we still need to work on the actions and developments.
If we don’t have any foundations standing on the ground, we need a simple foundation - pour it in, cover some of the material. Discover the place of everyday life.
- Select the parameters of the foam block. Let it be a standard size 200x300x600 mm.
- The perimeter of the barn is important. We have 4x3, that is 14 meters.
- The area of the walls is, with a height of 2.5 meters, 35 square meters.
- The standard quantity of material per square is approximately 5.6 blocks, which means we need 196 blocks.
- Next, we see the area of the doors, finally, as it is, and we can now determine a completely accurate version of the number of legumes.

Important! This instruction allows us to create a design without stitching, which, however, will be minimal, as we will use special glue.
From the point of view of the masonry, we are practically ready, but we also need reinforcement for laying in the wall and a set of simple tools:
- Roulette is a little bit.
- A pair of trowels and a hammer.
- A skewer for guides and a weight for vertical sheathing.
- Hacksaw on wood.
Foundation
For whom:
- We dig trenches 30 cm wide and 30-40 cm deep.
- According to the technology, sand is poured to the bottom and compacted firmly.
- We install fittings, which can be made of metal with 8 mm girder.
- We install the formwork, 15-20 centimeters higher than the ground, a shed made of foam blocks with our own hands must rise slightly above the ground, since foam concrete easily absorbs moisture.
Concrete is mixed in standard proportions, one portion of cement to every portion of sand and gravel. Our filler is equal to 1.8 cubic meters of concrete, but it can be poured on its own. Let's not talk about the mixer.

It’s not a large volume to allow us to pour everything in at once, but it’s better to add value to the whole base.
After a few days we will remove the formwork and carry out waterproofing. It is obov'yazkova's opinion that the foam blocks are not to be steadily built up in the foundation. For waterproofing we use simple mastic, which is used to prime the base into a ball of balls and cover the top with roofing material.
Important! In principle, laying can be carried out within 3-5 days. The concrete has already been hardened up to this point, and additional pressure, such as the masonry of the walls, will no longer be able to strengthen the foundation.
Masonry

The principle of laying a foam block block differs little from the whole one, despite its versatility, especially:
- Seam size. This is the first thing that immediately comes to mind. We can achieve such insignificant seams because we have glue, and it allows us to work the masonry with a 3 mm joint.
- Next to us, like in a hut in a hut, there are tightly bound metal gates. The barn is guilty of some kind of misfortune to the mother's pain.
- We lead the robot with equals and directly, trying not to get tired.
The simplicity of masonry and the manual parameters of the material allow one person to build a shed in one day, and the walls can be accurately built.
The food, how to make a shed from a cinder block, can be practically closed: prote, we can still at least refer.
First of all, make a break over the door opening. It is possible to create a coma in a number of ways, but if we have concrete, you can simply pour it with reinforcement. If you don't have enough concrete, you can put a bridge next to two steel piles or buy a long-lasting concrete stopper.

The covering was lost. Let's make it all very simple here:
- The top row of masonry is waterproofed and installed on a new beam, with a 100 mm girder.
- The other parallel wall is one row higher and we also place the throws.
- Now the grating is carefully installed, perpendicular to the beam with a crossbar of 50 mm, with a meter of edge.
- We cover everything with simple plywood.
- We cover the plywood with roofing felt.
- We install slate sheets as the simplest inexpensive option, the price itself is minimal.
Please! The sides can be laid with foam blocks, cutting them under the required cut, since the smell can be cut with a simple wood knife.
Visnovok

If you are interested and are ready to start, then in the presented video in this article you will find additional information on this topic.
The first time I wake up, I arrive at a new summer cottage - it is, of course, a barn, great and small. The first hour, until the bare territory of the dacha is “overgrown” with full-time government housing, a hut, a summer kitchen and a garage, a simple barn with a one-story house will long be deprived of having a single lintel for inventory, materials and a dacha lane.
Which option should I choose for a barn for a summer residence?
Regardless of the plans for the future forgotten dacha plot, the obviousness of time and pennies, the problem of sovereign placement in the dacha plot can be solved in a number of ways:
- Hire a team and build a permanent barn from a purpose or a foam block, with a one-story building and a basement;
- Pour a concrete foundation for the next spore with your own hands, buy a five-ton container and install it in your dacha instead of the barn;
- From the timber and boards there will be a barn with a one-shoe barn, 3x6 in size, as in the photo.

Of course, experienced summer residents with experience will give their votes to the remaining option, but the most important thing is to think about the decision.
Please! There will soon be a shed with foam blocks on a “clean” lot, not exactly correctly from the point of view of planning, often rulers of this type have to demolish or move it to a rustic dacha or garage.
In addition, the construction of stone, prefabricated, panel sheds, as well as the purchase of a container, requires an order of magnitude larger capital investment than is necessary for a wooden structure with a single-story building and a simple foundation. Golovnya, with great losses of remarkable strength, do not go out in front of a one-story wooden shed measuring 3x6.
Optimal design for a 3x6 wooden shed
The most foldable element of a self-made shed is yogo dah. Choose a one-skinned one for your shed, don’t have mercy. As it turns out, the masters will put one-year-old cars on barns, they are not as beautiful, but they are simpler to use and more reliable to use. In fact, you can easily work on a one-year-old barn with your own hands with minimal evidence of everyday life.
Using a single system, the correct orientation of the one-year-old houses and all the parts of the barn is ensured by the three winds, in order to change the risk of board water flowing under the upper gable of the house:
- The structure of the barn, with dimensions of 3x6 m, with a one-story house, is placed on armchairs;
- The spores are erected on a simple concrete foundation with 12 supports. As a material for the feet, a standard cinder block is used, or rather, the supports are made of concrete in the formwork;
- The basis of a one-shed shed is made up of a frame made of planks and beams, measuring 3x6 meters, with a height of 2 m and the highest point of the roof 2.7 m;
- The one-skinned house is framed according to the classical pattern, on the hanging beds with stuffed boards, laths and a flat roof. As a roofing coating, you can use corrugated sheeting, ondulin, or make a double-ball version from rolled material, for example, roofing felt.
It will be very simple and easy, as long as the foundation is assembled correctly, a wooden frame box with a single shaft can easily withstand winds of 18-25 m/s. Since in the area where you plan to install the shed, there are no strong winds, then when the walls are open, you can be surrounded by vertical drains from the boards and beams, like on a chair. For open space, it is recommended to reinforce the vertical support that is being carried with beam struts, as in the photo.

They themselves are worried about the design of the one-skinned dahu. For quiet construction, it is possible to have single-shell buildings without the need for the beams to cross the frame, but in this case the upper frame of the walls and the roof slab will need to be supported by additional vertical supports made of timber. For the windy locality of single-branched trees, it is necessary to reinforce the ceiling with beams and supports in the middle part of the blood.
We will build a barn with a one-shoe farm with our own hands
- For the frame, the material is girder 50x150mm - 14 pcs., 25x100 - 23 pcs., 50x100 - 19 pcs.;
- For a board with a size of 25x100 mm – 27 pcs.;
- For lathing and supports of the dahu you need 43 boards with 25x100 mm girder.
All joints and connections are finished with black carpentry screws 50 mm, 70 mm and 110 mm. To make your daily life cheaper, you can use primary flowers and everyday flowers, otherwise such savings will never be realized.
Robimo foundation for shed 3x6
After choosing a place for the shed, you need to plan and remove the soil on a platform no less than 3x6 m in size. It makes no sense to create a fire of a larger size. So that the growth does not become too late, the clearing of the space can be filled with salt and sand.

After marking the place for moving the supports, we dig 12 holes at the installation points of the pillars, 15 cm deep and the size of a standard cinder block. A 5 cm ball of crushed stone and sand is added to the bottom of the pits, after which a cinder block is placed to support the masonry with the addition of PVA.
Before laying, it is necessary to tighten the horizontal cords, which can be used to control the height of the skin support, so that the entire supporting surface of the feet is in the same horizontal plane.
Through the door you can install a strapping beam. All cut joints and T-like cuts are made by sawing the ends “half-tree”, the skin is joined by self-tapping screws screwed into the beam under the different cuts.

Assembling the frame and one-skinned dah
At the next stage, it is necessary to install non-supporting vertical posts, as seen in orange on the chairs. Next, we sew up the lining and lay out the blood in one-sheet dakha.
The central racks to be carried are made from 50x100 boards; for the rear wall you need to make three 220 mm racks, for the front wall - even 250 mm racks. The skin support is fixed in front to the lower ligament with one screw, and further behind the other level it is placed in a more precisely horizontal position and additionally securely with small half-meter struts, as in the photo.

After all the racks are installed, we add them with additional time-bearing struts and tie the upper tier of the frame under the next single-branch structure. In order to give the entire structure of the shed additional rigidity, it is necessary to cover the core with a tongue-and-groove plank up to the beginning of the collection of elements of a single-sheathed structure.
Further, all installed elements, boards for the lining, roofing, lathing, beam racks, bottom and top lining must be treated with an antiseptic and preservative. For an hour, while the folded blood and coverings are completed, the procedure must be repeated twice.

For the top hanging of single-sheath roofs, installation of roofs and gratings, it is necessary to secure an additional horizontal beam of the mauerlat, as in the diagram.

The sawing of the landing place on the bloody balt is drawn following the markings or the prepared template. After installing and aligning the position of the skin beam, it is recommended to fill the space between the beams with short boards, fix the blood from horizontal displacement and immediately strengthen the base of the monoschyloid dahu.
Cleaning and cleaning robots
At the final stage of the krokvi, the one-shell dakha is sewn up with a batten board. If your shed will use bituminous materials - tiles and roofing felt, you will need to put additional OSB sheets on the boards or fill the grating with wooden clapboard.
The easiest way is to cover it with one layer of corrugated sheeting. The metal surface is susceptible to any cataclysms that people may experience at home, and laying and securing the roofing material is much simpler and simpler, such as slate or roofing material. As waterproofing, polyethylene sheeting is laid, the edges of which will be pulled out from under the canopies and nailed to the top edge of the wooden walls of the shed.
The laying of the cover on the one-sheet starts from the bottom left sheet, as in the diagram. Stick the leather element with the front one in the row in two layers, apply a 15-20 cm overlap to the bottom sheet. Over-dry the place, punch the bottom and top edges with silicone paints. with a new puck.
Wind strips are nailed to the sides of the roofing pie to protect the single-layer roof from water ingress and wind blowing. A similar rail for flushing the water gutter is nailed under the bottom hanger. The upper layer of the single-shell cover is protected by a screen made of two wooden slats.
The frame of a shed, as a rule, is not insulated for the winter, so the material for lining the walls can be lining the lining, the original cut board or OSB sheet panels. To install the cladding, it is necessary to install additional vertical slats and struts on the walls. Sticks and crevices between OSB boards and shaped boards must be blown out with mounting foam, excess polyurethane foam must be trimmed and sealed with weatherproof farbe.

Visnovok
The choice of a shed with a one-story house, 3x6 m in size, the building can last up to 15 years without repair, for the mind of a competent choice of dry varnish materials. This design has one obvious advantage - a shed made of timber with a single-shell roof can easily be dismantled and moved to a new place, after a summer house or a new shed made of foam blocks is created.