How to remove an SD card. How to use an SD card on Android device
![]()
We will analyze the two ways to safely extract memory cards (microSD and the like), in the commoner called "flash drives". Nothing difficult, information for very newbies.
The first way to safely extract microSD flash drives from the tablet is through system settings. To do this, go in the settings to the "Memory" section.
Schedules with information about the free and busy space in the internal memory of the tablet and on the flash drive will open. Sheets at the bottom, and choose the "Extract SD card" item.
After clicking, you will receive a notice that some applications can stop working. This is due to the fact that often applications some of their data are loaded to the memory card so that it is less to occupy free space in the device's memory. Considerate the warning by clicking OK.
It will take several seconds before the card is unmounted. The tablet will disable running applications that take files for their work from a flash drive, and then notify you that the USB flash drive can be removed. 
The second way.There are cases that for some reason there is no point in the tablet that is responsible for the safe extraction of the flash drive. It is not scary because you can simply turn off the tablet using the power button, after which the flash drive can be safely removed. By the way, sometimes there are cases when the flash drive can not be unmounted for a long time. No need to psych and remove the flash drive - there are sad cases of loss of data. So it is better in this case or wait, or turn off the tablet if you are tired of expecting, and then then remove the USB flash drive.
Do you want to use MicroSD card as a real memory expansion and install applications on it? To do this, you need to format it as internal memory. On most phones, it is simple enough, but, unfortunately, some manufacturers, such as Sony, LG or Samsung, do not have such a default function. But if your smartphone is equipped with Android Marshmallow or newer, then you can use the command line. True, after that, avoid Android updates. How to combine memory competently, we will tell in this article.
Go:
Easy way
If you are lucky, your smartphone will allow you to do it, without connecting it to the PC. This method is likely to be the only hope if you use a newer version of Android (7.0 Nougat or 8.0 Oreo). Here's how to check:
- Install an SD card to Android phone and wait for it to recognize it.
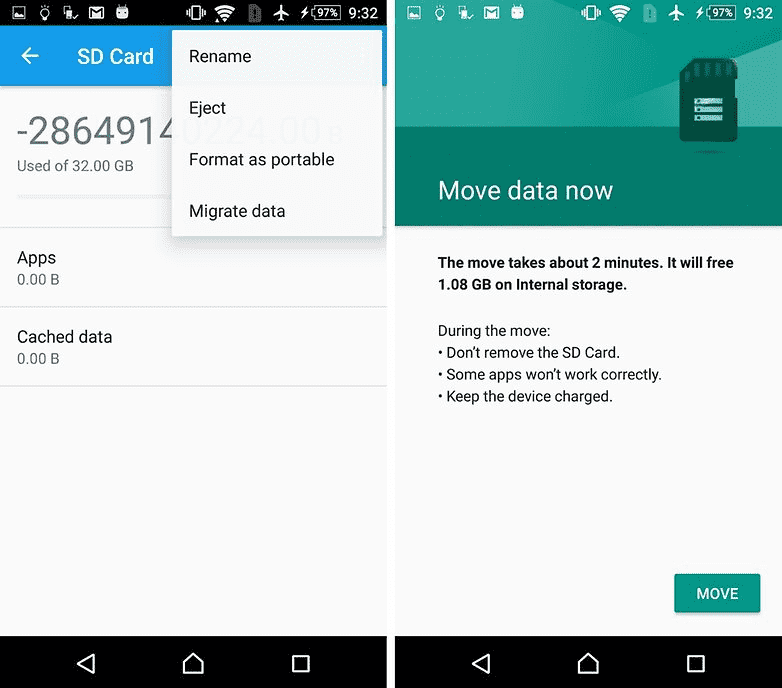
- Open Settings\u003e Storage
- Touch your SD card name.
- Touch the three vertical points in the upper right corner of the screen.
- Click "Settings" .
- Choose Format as internal memory.
- Click "Clear and format"
- Then Android will offer to transfer data
If your smartphone does not allow you to do this, the process becomes more complex. We will go to it below.
What if your phone does not allow you to format microSD as internal memory
Some smartphone manufacturers disable the usual Android feature for formatting microSD as internal memory, hiding the ability to do it from your phone. But you can still activate this process using a PC, without requiring any ROOT privileges.
The exact steps vary depending on the version of the Android version of your phone. This method has worked well with Android 6.0 Marshmallow and Android 8.0 Oreo, however, we faced the difficulties on Android Nougat.
For phones using Android 6.0 Marshmallow
When the MicroSD card is formatted as internal memory, applications can be completely saved on it. This means that if you download the application with a total size of 2 GB, then there should be 2 GB of space on the SD card. If, however, the MICROSD card is formatted only as a backup - memory is not enough, as writes Platypus_diarrhea. in reddit.
Just because the menu parameter is invisible, it does not mean that it does not work. A few days after the publication in Reddit, it became known that in the command prompt, you can also format the MicroSD card as internal memory in Galaxy S7. We successfully tested instructions with Samsung Galaxy S7 Sony Xperia. Z5 and LG G4, working running Android 6.0 Marshmallow.
All three smartphones work from the factory or after upgrading from Android 6.0 Marshmallow and have a microSD card slot. In addition, there is no menu option for formatting the microSD card as internal memory. The function is only available in HTC One A9 and in Motorola on all MOTO smartphones.
Why samsung, lg and sony hid this item? I connected each of the three smartphones to the computer, and each of them had one microSD card.
Then I entered the commands described in your blog. As soon as you open the command prompt window and connect the smartphone, you can enter the first command:
- aDB Shell.
Now the command line is ready for the launch of system commands on your smartphone. In this case, we want to format the SD card or part of it as internal memory. Even if Sony, Samsung and LG will refuse us in such an opportunity in the graphical user interface, we can still perform this command through the console. First, however, we need an SD card identifier. You can find out by the next team:
- sM List-disks
In my case, the disk is called 179.64 . Perhaps you have it another. Pay attention to the exact identifier. In the next team, we will format and break the MicroSD card. Your content will be deleted. If there are important files on the map, copy them to another disk or to the computer. If you want to keep the MicroSD card in a smartphone, you can now break all your memory. To do this, enter:
- sM Partition Disk: 179,64 Private
The operation takes a few seconds or minutes, depending on the capacity capacitance of the memory card. If you want to use only a certain percentage so that other devices can read it, you must exclude it from a personal partition. 50:50 split command looks like this:
- sM Partition Disk: 179,64 Mixed 50
This is the end of the O'Brien floor guide, but not the end of work. If you now want to use the redeemed memory, you must also transfer applications and data. This can be done through the "Storage" section in the Android settings menu. Select MicroSD Map, then go to the top right of the menu and click "Move Data" . You can not choose this menu item before splitting.
Now all downloaded applications are completely recorded on the microSD card. Only system applications and updates use internal memory. This means that you will never receive an error message due to a lack of space.
Smartphones with Android Oreo
Recent updates for Android have slightly changed the rules, but you can still use this method with ADB. Just start working with ADB according to the method above, but after entering shell ADB. You will be asked to set certain values.
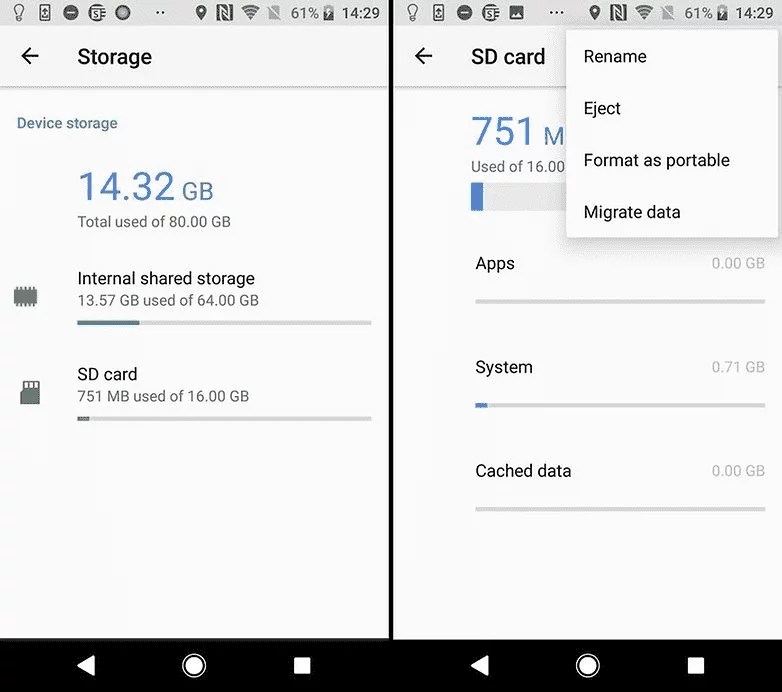
Enter the following lines to unlock the possibility of formatting MicroSD cards as an internal storage on your phone:
G8141: / $ SM Set-Force-Adoptable True
G8141: / $ SM List-disks
- Disk: 179.0
G8141: / $ SM Partition Disk: 179.0 Private
G8141: / $ SM Set-Force-Adoptable False
G8141: / $ EXIT
We checked this method on the Sony Xperia XZ Premium running Android 8.0 Oreo, and it worked. In the screenshots below you can see a 16-gigabyte microSD card installed as internal memory:
Problems with system updates and nougat
Some readers reported difficulties when installing the system updates in Android 6.0 after using the methods described above. The update for Android 7.0 Nougat is not possible after installing MicroSD as internal memory. Our test devices with Android 7.0 Nougat, do not even respond to console commands shown above.
Due to the lack of documentation on the network, we can only recommend to perform a number of operations, before updating the system. Make backup Photos or music on your computer or cloud and free so much memory on the SD card and smartphone, as you can.
Delete unnecessary applications and return the data into the internal memory. Then format the microSD card as a removable media. Only then can you safely install an update for Android.
What's the catch?
MicroSD cards work not as fast as the integrated memory of the smartphone. Therefore, do not waste money for cheaper, but instead, buy a memory card with reasonable reading bandwidth. Extreme Pro. And MicroSD from SanDisk turned out to be, in our opinion, the best price for price / quality ratio. When recording bandwidth 74 MB / s you should not test delays. Such cards are best suited for installation as internal memory.
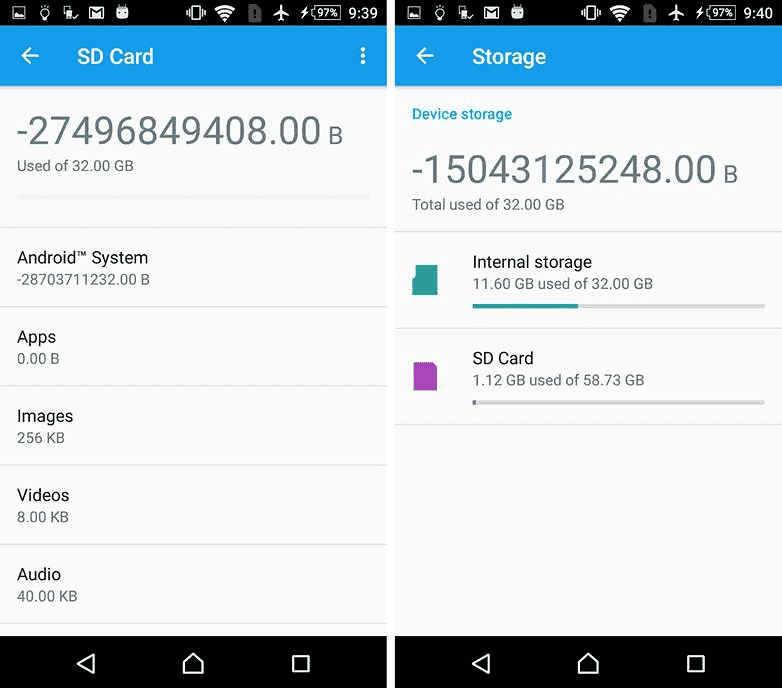
Interestingly, only LG G4 was able to correctly read the enhanced memory. Samsung showed unnatural a large number of Busy memory, and Sony's memory was even negative. However, we did not have any complications, and even when we were connected to a computer, we were able to access all our data properly, although we could only see the general, and not a specific part of the memory. Difficulties occur only if the system is updated (see above).
Increased memory: full success
We have undergone all the smartphones described above a single endurance test. We installed Final Fantasy IX on all devices. The size of the game is 1.8 GB. After installation, it is easy to see which of two types of memory, internal or SD card - used. In all cases, after installation on an SD card, 1.8 GB is less space. The success of such a degree cannot be achieved with SD cards formatted as external memory, since complete data migration is impossible.
Compare the values \u200b\u200bof the internal memory and the SD card memory in the screenshot to confirm.

What happens if you remove the microSD card?
Of course, the question is what is happening if the MicroSD card disappears from the system. In fact, it creates a serious problem for your applications. In the end, they can no longer access their data. Since sections with your operating system And information for factory reset is still stored in internal memory, a remote or broken SD card cannot be harmful. When we deleted the MICROSD card, the application icons simply disappeared, and when re-installed, returned back.
If you lose an SD card or break it, your data will be lost. Because they are encrypted as internal memory, you may not hope for data recovery. Instead, use regular backup. So feel free to enjoy the cheapest memory expansion of your Marshmallow smartphone.
Safe deletion of the inner broken SD card
To safely remove the SD card from the smartphone, you must cancel the process described above. Since your storage room in internal memory is probably not enough, you first need to transfer photos and other data to another storage, such as your PC hard drive.
Then go back to the settings "Storage and USB drives" and press "Move the data into the internal memory" on the menu. Then format the SD card as an external memory. Make both actions (backup and formatting) so that your data cannot be lost, and you can use an SD card with other devices.
Improper removal of the memory card can harm the files recorded on it. There is a certain sequence of actions that allow you to properly disable the flash drive from the computer.
You will need
- Computer, flash card.
Instruction
Instruction
There are problems on the phone android or any other with a memory card? You can not read the data from it or the phone / tablet android does not detect it?
You can restore a damaged micro SD card if it is damaged using a computer, check it for errors or fully reformat.
In general, the fact that the SD card is not read is not unusual. If you have a lot of data stored on it, and you are actively using them on your phone, there is always a possibility that you may have a problem with reading content.
Only this does not mean that the card should be thrown immediately. There is always a chance to restore the work of the CD card.
- If you cannot correct the memory card, you can restore files on a damaged memory card.
Sometimes the solution may be verifying the file system for errors in saved files, restoring damaged sectors, formatting a map or a complete deletion of the partition (map structure) and its re-creation. Below will look at all these solutions.
How can I restore the performance of the external CD card
To correct the damaged SD card you will need:
- computer or laptop running Windows;
- any way to connect an SD card directly to a computer.
You can connect it to your computer using the adapter - if not you can buy a USB card reader.
The first way is to restore the damaged CHKDSK file system
If your device writes an SD card is damaged This is what you can do. The first and easiest way is to use the windows tool to restore the system disk, that is, CHDSK.
This tool from Microsoft and is available only on Windows computers. Chkdsk does it without deleting any files, so you do not lose card data.
First, connect the SD card directly to the computer or laptop and run "My Computer" or "This Computer" (Windows 8 and later versions).
In the list of disks, find the supplied SD card and remember what the drive letter it was assigned. For the purposes of this manual, assume that the card was assigned the letter "D".

Press the Windows + R keys combination to invoke Windows Startup. In the Startup window, enter the following command to turn on the command line: CMD.
A new command line window will appear. Now you have to enter the appropriate command that will scan the memory card and correct errors on it. The team looks like this:
CHKDSK D: / F

Of course, instead of "D:", write your drive letter (not forgetting the colon). Press the "ENTER" button to start scanning.
After scanning you can check your memory storage and see if everything works.
Method Second - Formatting Damaged CD card
The second way is to fix the damaged SD card, it is formatted by deleting it all data. This parameter can help if CHKDSK could not check and still have problems (for example, read errors of individual files).
Of course, you will lose all the data, but there is a possibility that formatting will fix the card.
To do this, connect the drive to the computer, and then call "My Computer" or "This Computer". In the list of disks, locate the connected SD card and right-click it.

Select "Format" in the context menu. A new formatting window will appear for the specified disk (in this case, the SD card).
Click the default distribution button and make sure that FAT32 is selected as a file system.
You can format with the selected option "Quick Format", only for more accurate results I recommend that you make this check box - formatting will be much longer, but it is more careful, which can help solve the problems with the card.
After formatting, insert the card to your smartphone, the tablet, the digital camera or another device you use, and make sure the card works correctly.
The third way - complete remove all sections and re-creation
The SD card does not differ from the usual disk - it can have one or more sections. By default, only one partition is always.
You can format the map in this way to completely delete the section and leave it unallocated.
This is called low-level formatting. Please note that it will also forever delete all data on the memory card.
After formatting, you can create a new section. This often helps when the memory card appears as "RAW" after connection and does not display sections to which you can access.
For this formatting, you can use the program called "HDD Low Level Format Tool". Downloadable below.
Connect the drive to the computer, and then run the tool for determining the level of the low level of the hard disk.
See a list of all your disks on your computer, including a connected external drive. Find your SD card in the list and select it.
Make sure you have chosen correctly. After the selection, click "Continue" and go to the format this device tab.

The card will be completely formatted and all sections will be deleted. Now it will be a clean, retained surface.

This is not all - the card is in such a state that it will be useless. Now go to the "Start" menu and locate the Windows Administration Folder, and select Computer Management.
A new window will appear. In it, select "Disk Management". A new window appears that displays all the discs - both internal and external connected via USB.
Find your drive, the surface of which is displayed in black. Click on the black retained area with the right mouse button and select "New Simple Tom".
See a wizard that will help you step by step in the process of creating a section. You do not need to change anything, just click "Next". Pay attention to the "File System" field and make sure that the FAT32 is selected instead of NTFS.
Confirm the creation of a new partition. Your micro SD memory card will now appear in the My Computer window with an automatically assigned drive letter. You can disconnect it from the computer and connect to the phone or tablet. Successes.
Developer:
http://hddguru.com/
Operations:
Window
Interface:
English
At the moment, there are already many different models - both telephones and cameras supported by SD cards. And these Most Memory Cards are the main data warehouse and video recording tools and document photos. Almost any device, including MicroSD not insured from all kinds of failures and errors. Therefore, most manufacturers recommend to extract the memory card only when the device is turned off, insertioning just.
Still, many users ignore this rule and get to the punishment, or damaged memory cards, or in general burned. But problems with the memory card arise not only for this reason. Sometimes, damage can occur during the full discharge of the phone, while the record of some files was recorded on the memory card, or the failures arise at all due to unprecedented causes. Thus, a bunch of incomprehensible and unreadable files can be on a damaged memory card, which, if judged by the title of the article, can be restored.
What is needed to recover data from a memory card?
(We will restore photos and video)
In order to restore all the files, or at least partially, we will use simple and fast way. On the Internet you can find many different instructions about the recovery of files, but in this article, we will analyze the method that is suitable for beginners.
We use we use an interesting program called Zar X Systems Recovery Software. Full version This program is paid, but the free version is also suitable for us, that is, a tool for data recovery is in the demo version and they can use completely free.
To begin with, of course, download the program by reference above. Then install. Now you should make sure that you have a sufficiently free hard disk space. It is necessary, just for data recovery. If you have a memory card on 8 GB, then on your hard disk you should have free 8 GB. Also, you need to have with you card reader (memory card reader) so that we can connect it to the computer. The laptop usually already has a special built-in slot.
Recovery process
By the way, everything that is on the memory card is better not to touch and do not rename that the recovery has passed more successfully.
Now, connect the memory card to the computer, open ZAR X and choose the recovery of images " Image Recovery.».
A list of disks appears in which you select a damaged memory card, then click the button Next.
Now we need to simply wait until the program scans the USB flash drive and start recovering.
After the memory card is scanned, you can choose how to restore it is full or partially.
To fully restore all the files, you need to mention the items - Raw and Fat, now click Next.
Now you specify the destination folder and click Start Copying.. The recovery process begins.Most likely, not all files will be restored, although the percentage of recovery is quite high 80-90%.
Now you can format the memory card and use it again, transferred to the recovered files.


