Do not flash the phone through the recovery. Android Samsung firmware behind Odin
Kozhen, hto rob the first crocs from the firmware procedure for Android devices, I respect the most common way of getting through the process - firmware through the recovery. Android Recovery is the middle of the update, access to what is needed є is practical for all Android add-ons, independently of the type and models of the rest. To that, the method of firmware through the recovery, you can see it, as the simplest way to update, change, update, or to change the program to secure the device.
Practically, skin pricing, which works for the management of Android OS, is equipped with a special middleware for updating, which is necessary in the world, including the extraordinary ones, the ability to manage the processes of day-to-day
Slide means that there is a change in operations that can be carried out through the "native" recovery, as it will be installed in the device as a virobnik, a velma of the encirclement. There are firmwares available, only official firmwares and / or updates are available.

In some cases, through the factory recovery, you can install a modified middle of the update (custom recovery), in order to expand the capabilities of the robot with firmware.
At the same time, the main activities for carrying out the renewal of the software protection and the update of the software can be carried out through the factory recovery at all. To install the official firmware or update it, which will be available in format * .zip, Viconuєmo of the coming crooks.


Yak stitch through the modified recovery
More wide functional robots with Android add-ons may be modified (custom) middlings. One of the first appeared, and on the current day we will expand our solutions, є recovery from the ClockworkMod command -.
Installing CWM Recovery
Oscillations of the CWM recovery, є unofficial solutions, before the victorious ones, it is necessary to install a custom middleware update in the attachments.


- For annexes of Samsung in a large number of vipadkiv vikoristovuyutsya dodatok.
- For outbuildings, prompted on the MTK hardware platform, there is a supplement available.
- Naybіlsh unіversalny way, albeit at the same time it is not safe and folding, - firmware recovery through. In detail, they should be carried out to install the recovery in the manner described for the sake of your permission:
Firmware via CWM
For the additional modified middleware update, it is possible to flash not only the official update, but the custom firmware, as well as the developed components of the system, represented by Russifiers, additional updates, polices, kernels, radios, etc.
This is because of the appearance of the great number of versions of CWM Recovery, since the entrance on the new outbuildings can be used to display the interface, - the background, decorated, can be present with sensor controls, etc. In addition, you can see the menu items on the menu.

At the butts, the lower vikoristovuyutsya itself the standard version of the modified CWM recovery.
At the same time, in the last modifications of the middle, with the firmware, vibrate, you can name it in the lower part of the instruction, so that you can see that it was issued innocently as a result of fighting a fight.
For registration, it is possible to manage the CWM projects in the outbuildings. In most devices, the following scheme is used:

- aparatna clavisha "Guchnost +"- relocation by one point up the hill;
- aparatna clavisha "Volume-"- moving one point down;
- aparatna clavisha "Zhivennya" i / abo "Home"- approved selection.
Otzhe, firmware.


Firmware via TWRP Recovery
Besides the solution from the ClockworkMod vendors, there are also changes in the middle of the update. One of the most functional solutions of this kind is є. About those who will attach TWRP behind the additional help, it is stated in the article:
In this rank, firmware of Android devices is carried out through the middle of the update. It is necessary to go to the choice of recovery and the method of installation, as well as to stitch into the device only those packages that are removed from the new ones. At the same time, the process is going to run against any problems and problems.
Alle the axis yak їх stand specifically on your smartphone model, or the tablet, there is not enough information, or it is spread across the Internet.
The article is given to deprive the installation of custom firmwares for additional ZIP update, and not be in any other way.
Briefly about the smut ...
The operating system is Android, won і African іy і get lost, whether you have Samsung, LG, HTC, Sony, Motorola or the one of the most popular ... Firmware similar with attachments. The axis of the ci simple crocs:
- wikachuєmo firmware
- Wikachuєmo Google service (optional)
- Robimo Backup (optional)
- Rozblokuєmo Bootloader (once, per brand)
- Install Recovery (one time)
- Installable firmware and Google services
- Skidannya Danikh
- Ochіkuvannya first zavantazhennyam
All at once 8 crocs (2 neobovyazkovyh, 2 vikonuyutsya once). With them in the fake one you will repeat only 3 - 5 as a rapt, you want to change the firmware.
Ready the solution!
site Android +1 prepared instructions for installing custom firmwares for brandy and virobniks:
- Installing custom firmware on the Nexus
- Installing custom firmware on Samsung
- Installing custom firmware on HTC
Do you know the custom firmware on your Android?
rozblokuєmo Bootloader
Vy happy volodar Sony, HTC, Huawei, Nexus, so you have to follow the procedure for installing custom firmware - unlocking Bootloader.
- rozblokuvati Bootloader Sony
- rozblokuvati Bootloader Htc
- rozblokuvati Bootloader Huawei
- rozblokuvati Bootloader Nexus
The procedure is given once, and you can skip it.
We know and customize Recovery (or the Kernel from Recovery)
Vie by seven-league crocs collapse before installing your first custom firmware! Prodovzhuєmo ... You also need to add custom Recovery, for what do you power the vi?
Є many reasons:
- In the case of deyakie attachments, it is banal (Recovery), but you need to install custom firmware and GAPPS from it
- Install the custom firmware from the original Recovery (which is є) custom firmware will not go to the link, but there is no Wirobnik signature, but the custom Recovery includes the signature and allows the installation of additional ZIP updates, including firmware.
In some cases, Recovery is embedded in the Android kernel (Sony, Samsung) so you need to shuffle the kernel with CWM or TWRP Recovery to replace that shukati just Recovery.
For quiet hto, after reading to the end ... Would you like to see the video look around the installation of custom firmware? Write a message in the comments!
For a skin smartphone or a tablet, there are both official and custom firmwares. Їx installation works in different ways: OTA will be updated every time, firmware in ZIP archives will be installed manually via CWM, TWRP Recovery or additional ROM Manager, vikoristovuchi computer, you can flash Android for additional utility Fastboot and SP Flash Tool.
For the Android firmware, all data from the internal memory are checked, so that you can save contacts, settings and add-ons, a collection.
Android firmware via Recovery
Unofficial firmware in ZIP format, such as CyanogenMod, can be installed through custom Recoveries: CWM or TWRP, as well as functions that can be found in Recovery, for example, ROM Manager. Kernels and patches are flashed in the same way. To add the official "Update.zip" options to the standard update mode, report in the statistics for the available updates.
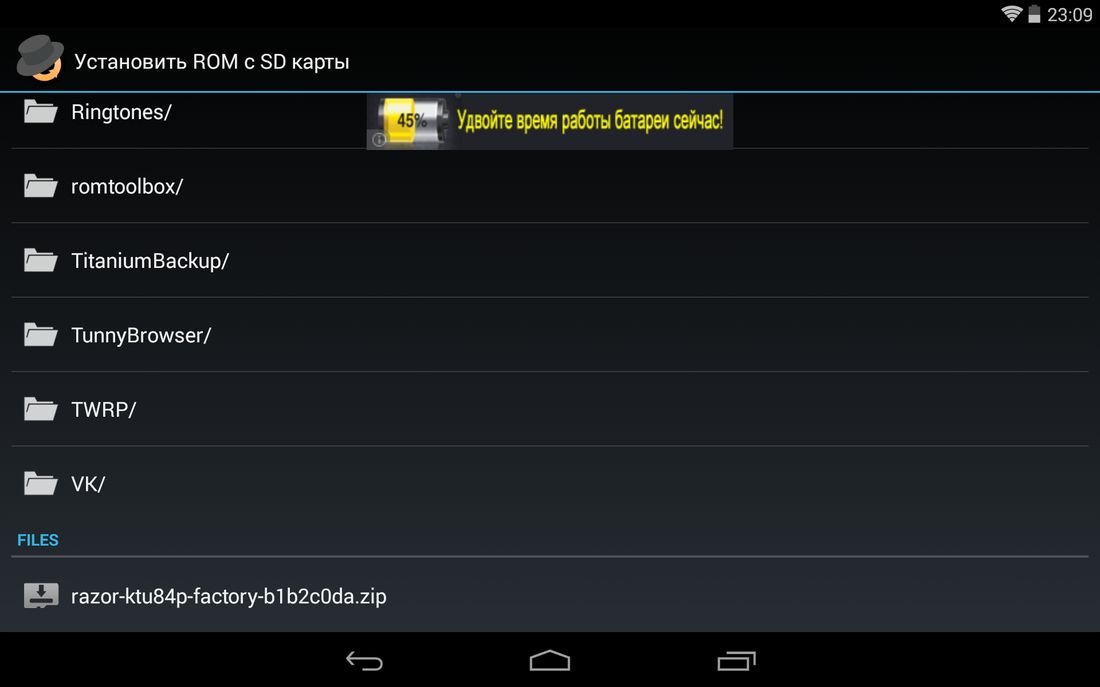
Insert ZIP file into CWM
On all outbuildings "out of the box" there is a choice of the Rekaveri from the virobnik, instead of a new one you need to install the CWM by. Then you know and download the ZIP archives with the firmware. Fuck, the firmware of the other formats via CWM will not be installed.
1. Now we are going to Rekaveri. For a wide range of devices and onslaught, there are no more buttons. Here is the list of all available options (the new version says how to enter Recovery on specific models):
- Guchnost in the mountain + on button
- Gucnity down + on button
- Guchnost up / down + on button + "Dodomu"
- Gucci uphill + Gucci down + on button
Apparently, we got it in Recovery. Rukh zd_ysnyuєtsya for the help of buttons, and support the selection with a button.
2. Before installing the firmware, you need to check the wipe data / factory reset item.


4. Even better! Turn to the main menu and select "install zip".

5. Write "Choose zip from / sdcard".

6. Go to the folder, in which you saved the firmware and vibrate її.

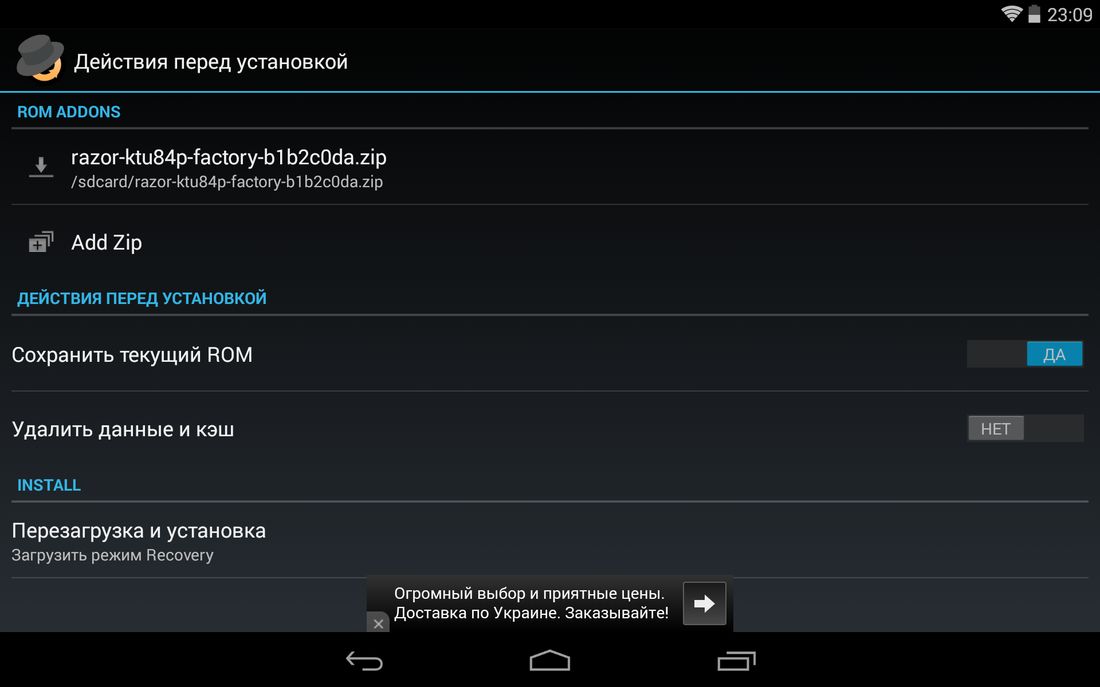
7. Sign up for a power supply. Natisnit "Yes - Install ...".

8. Go through the process of installing the firmware and in the bottom on the screen, the words "Install from sdcard complete" will appear.
Wonderful, Android please. By turning the head of the CWM Recovery menu and re-installing the system. For tsoy vibiraєmo "reboot system now".

Yak install the firmware via TWRP Recovery
It's more like not CWM, but TWRP Recovery, flashing yogo, keruyuchis. Through new, you can also install the firmware from the ZIP archive:
1. Download the firmware and place it in any handy place in the memory of your smartphone.
2. Go to TWRP. It’s like this, yak CWM.
3. Now you need to remove the system. For the whole choose "Wipe" in the main menu.

4. In order to run the skid to the factory, drag the skip to the right.

5. Upon completion of cleaning the smartphone, tablet, press the "Back" button.

6. You will turn to the main menu of TWRP Recovery. Now it is possible to pass without prior to the firmware itself. For all choose "Install".

7. Go to the memory before the firmware is saved. Attack on her.

8. Drag the tab to the right to install the firmware.

9. Honor the process. Call wine trivia 2-3 hvilini.

10. On the other hand, you will be notified about the completion of the firmware in the distance. Chat on "Reboot System" to boot up Android.

One more way to flash Android for additional ZIP upgrade is displayed. You can also speed up with a special supplement. Pro tse below.
Vikoristovuєmo ROM Manager
Supplementary ROM Manager permitsє. Before the speech, the raju will back up the internal memory before the firmware, and then the update will be done. We will be infected with the function of the program: flash the phone with the help of the ROM Manager.
For robots to utilize the required root rights - the stench to go after additional exploits: anyway.
The obov'yazkovo maє buty is installed by the custom Recovery (on the basis of the additional ROM Manager, flashing through the new one, but at the same time, we will forgive and intelligently use the add-on interface, and not the Recovery). Follow the instructions є in the foreground points.
Now, install the ROM Manager, know and download the required firmware for your attachment. View the program and follow the instructions:
1. Place the firmware archive in the memory of the Android phone or tablet.
2. In the ROM Manager menu, open the "Insert ROM from SD picture" item.

3. Know the archives and press on the new one.
4. At the menu, vibrate "Overwrite and install". Raju put a tick against "Save the current ROM", so you can update the system if necessary.
5. At the offensive wake-up call "OK", so that you can get into the Recovery mode and the firmware process will be honored.

Also in the ROM Manager є the function of the ROM for the attachment. At the main menu, select the "Firmware upgrade" program. They are available only in the premium version of the programs.

I have posted about three ways to install firmware from ZIP archives on the attachment itself. Further information about the Android firmware for an additional PC.
Yak to flash Android through a computer
Bagato mobile devices are stitched for additional special utilities for PC: below instructions for robots with Fastboot and SP Flash Tool. Through a friend program, you can use Chinese phones based on Mediatek processors.
Fastboot: instructions for firmware phone
It is necessary to install a lot of firmware from the computer for the additional Fastboot utility by rebooting the mobile device into one mode. The program to enter the Android SDK Platform Tools, as described in the. Besides, you should know the driver (all information is for your own use).
Also, on the outbuildings of deyaky virobniks, you need to unlock Bootloader:
- Yak zrobiti on HTC :,
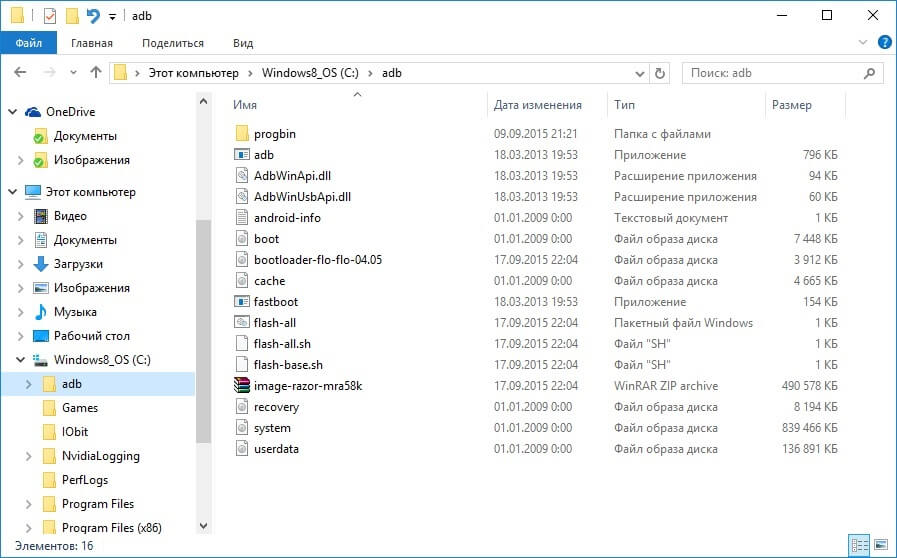
Now we will add archives with the required firmware and unzip it in the “platform-tools” folder, which contains “ADB” and “fastboot”. Maє viyti is approximately like this (for me, the components need to be found in the papacy "adb").
Then connect Android to a computer via USB and transfer a smartphone or a tablet to fastboot mode. Easy to build in this way:
- inclusive
- On the computer, go to the command line
- Lastly, the following commands are entered and given a skin pressure “Enter”:
cd go to the "adb" file
For example, it is located in "C: \ Program Files (x86) \ Android \ android-sdk \ platform-tools". Todi shlyakh will look like this:
cd Program Files (x86) \ Android \ android-sdk \ platform-tools
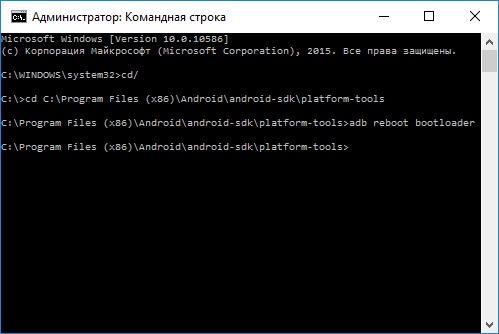
Then the Android gadget is rewired to fastboot mode.

Before the time, you need to flash the system, which will need to be updated, so that there are no problems in the robot. For tsyogo victorious commands (for the introduced skin press "Enter"):
fastboot erase boot
fastboot erase userdata
fastboot erase system
fastboot erase recovery
fastboot erase cache
It is possible to stitch the paper for cleaning the parts. Enter the commands (there may be more commands - all are stored in the explicitness of the singing files in the same firmware, below the set of the main ones):
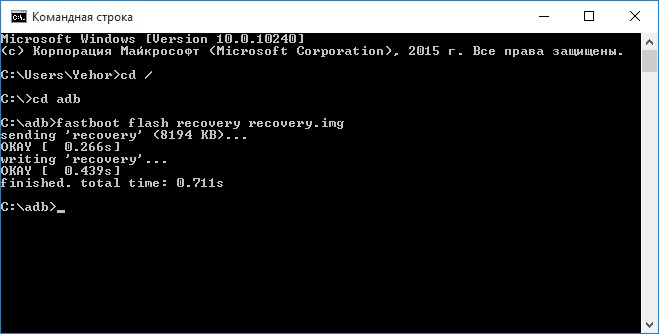
fastboot flash boot imya-fayla.img
fastboot flash userdata imya-fayla.img
fastboot flash system imya-fayla.img
fastboot flash recovery imya-fayla.img
fastboot flash cache imya-fayla.img
"Imya-fayla.img" - the name of the firmware file. For example, there are some splinters in my recovery and the image is called "recovery.img", I enter:
fastboot flash recovery recovery.img
You can install the firmware in one piece, to flash all the files at once. For all, the "flash-all.bat" is to blame for the firmware files. Yaksho vin є, just enter the command and read the firmware installation process:

You will see a message about the successful completion of the firmware in the package.

You can lock the system. For the whole, you need to go from fastboot mode on the very attachment or behind the computer's help. Another vipad needs to enter one more command:
Installing ZIP update in Fastboot
Vikoristovuchi Fastboot can install ZIP firmware. To do this, download and place the firmware in a folder called "ADB". Transfer your smartphone or tablet to fastboot mode and enter the command:
fastboot flash zip imya-fayla.zip
"Imya-fayla.zip" - the name of your firmware, replace it with yours.

Check the completion of the Android installation and rewrite the settings.
SP Flash Tool: flashing Chinese Android smartphones on MTK
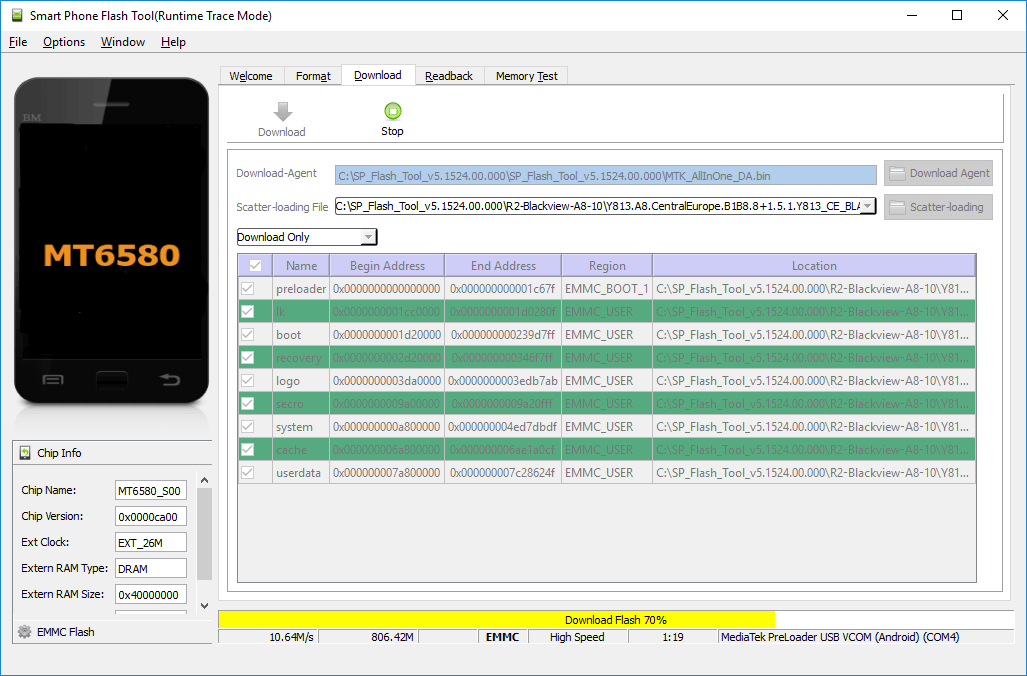
Chinese smartphones Fly, Lenovo, Xiaomi, Meizu, ZTE, Doogee, Bluboo, UMI, Elephone, Oukitel, Blackview and others, which are based on MTK processors, need to flash the SP Flash Tool. Vona in the shiti okremі razdіli, formatuvati system and collate backup copies. Models are available for MT6572, MT6577, MT6580, MT6582, MT6589, MT6592, MT6750, MT6737, Helio P10, Helio P20, Helio X10, Helio X20 and the least popular chips.
The current version of the programs is available on the site: http://spflashtool.com/. Before starting the process, install the USB driver for the MTK processor (see the FAQ in the "Fastboot" section of this manual).
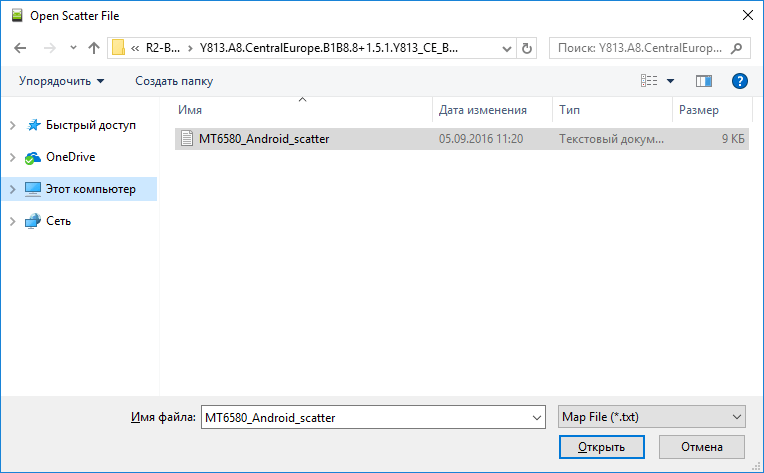
1. Unzip the SP Flash Tool folder on the "C: \" drive, instructing to "load" the firmware. Shlyakh to files is not guilty of revenge of Cyrillic symbols.
2. Papa has a file called "flash_tool". Start yogo.

3. In the "Download-agent" field, the path to "MTK_AllInOne_DA.bin" will also be indicated. You will need to download the "Scatter-loading" and vibrate the scatter file in the firmware.

4. The remix was added to "Download Only" and must be stitched for the first time (for all versions of the video).

5. Onslaught “Download”. Let's use the phone, we will take the battery for a few seconds, insert it all the way back and then bring the Android smartphone to the computer via USB.

6. Chervona smuga "Download DA 100%" will appear on the spot.

7. Then the firmware is running. The views are displayed as close to the end of the installation.
Enjoy the choice of firmware and instructions for installing on Android via the recovery menu.
Navigation
The Android operating system is famous for its stable robot for the whole year; Your pristіy startє galmuvati, close automatically add-ons, see the critical pardons of system services just. As a rule, it is tied with a firmware installed on the mobile attachment.
There are two types of firmware: standard and custom. I, persh nіzh to stitch my attitudes, for the ear it is necessary to think carefully, to honor all the "Pros" and "Pros" of the skin from the firmware and vibrate that, as you would like the best
Android firmware
Basic pluses and minuses of stock firmware
- And so, the firmware is stable - the official program is secured, released by the vendors and the most kindly optimized for a large number of mobile attachments
- As a rule, tablets and mobile telephones are sold with an optimal version of the operating system (firmware) for them and replace it at a much earlier time, for the reason that it is not recommended, but in some cases, such is necessary. For example, if V missed the update to the new version, having removed root rights
plus
- The official firmware gives a guarantee of the quality and stability of the robotic system
- Bezbezpechu nad_yny zhist from evil zzovny
- Є the possibility of automatic updating in the form of a new version of the operating system
- The presence of any serious bugs, glitches and conflicts with third-party software add-ons
- In case of a breakdown of the annex due to the standard firmware, it can be returned to the repair service or it can be exchanged under the guarantee
minusi
- In the official firmware, there is a lot of software security, it’s hard to see. If you have a weak mobile phone or a tablet, you can use a galmuvati system
- Daily access to control annexes
- There is no way to get up the program.

Custom Android firmware
Basic pluses and minuses of custom firmware
- Custom firmware - modernized by the official version of the operating system. So, as Android can display the code, be it possible to use the operating system as much as you want
- Custom firmware іsnu bezlіch і all stinks have their pluses and minus. One praise is like a year on all outbuildings, some only on singing models, and a third one is on the side. To lay down all kinds of people, such as
plus
- Most custom firmwares are available with a high-quality firmware
- Visibility of unnecessary standard software security
- The presence of additional third-party software security
- Fixed many bugs, such as bullets present on the stock firmware version
- Root rights detection
minusi
- There is a sufficient number of firmwares, as it is even more severely galvanizing the system
- Nemaє guarantee of safety and protection of donations on the annex
- Do not run custom firmware on all annexes
- Mayuchi pristіy zі installed custom firmware, a guarantee for a new zgoraє and build yo for repairs in the service center is not visible
Relatively call all "For" and "Proti" and be sure that you will go more for the insured person

Recovery menu on Android
Yak pritrіy through the recovery menu?
- Regardless of the fact that you want to install the firmware you want to install on your own, stock or custom, you need to get a root-right. When you reject it, you need to set one of the versions on your attachment custom recovery menu... Naynadіynіshіmi and popular seasons є TWRPі ClockworkMod recovery
IMPORTANT: Remember, rejecting root rights will nullify the guarantee for your setup and, in case of breakdowns, do not go to the service center.
- Set menu TWRP Goo manager
- To set the menu ClockworkMod, It is necessary to add the program to the Play Market Rom Managerі in the main menu, browse the item “ Setup recovery»

Android firmware via recovery_3 menu
IMPORTANT: Before starting the procedure, make a new backup of all important data to the SD card, so that during the firmware process I will add all the additional data and contacts, and the settings will be dropped to the factory settings.
- Download and place the firmware file on the SD-card in the format “ zip". Remember, you need to install only that firmware, which is designated for your attachment! In the case of an insane firmware, you can spend it as an attachment.
- In order for the menu to be installed, and the file with firmware changes to the SD card, you need to lock the phone to recovery mode
- To fight with the path of one hour embossed several buttons on your attachment in the imprinted station. On all models, a combination of buttons for growth, prote, is most often jammed button "+"і button to eat
- So you yourself can get into the menu through one of the downloaded earlier dodatkiv. On the main contribution, select the launch of the add-on in recovery modesі dozhayte zavantazhennya attachment to this mode.
- Yak tilki Vee are locked up in the recovery menu, you can start without a second before installing the firmware

Android firmware via recovery_2 menu
- ClockworkMod, For the additional buttons for the sound "voice more / more quietly", change the menu and show in the strict order of the advance:
Wipe data / factory reset, yes Yes - Wipe all user data;
Wipe cache partition, yes yes - Wipe cache;
Advanced, dal wipe dalvik cache, dal Yes - wipe dalvik cache;
Install zip, choose zip from sdcard (here you will need to download the file with firmware) - After all these steps, the installation process starts, which can take an unimportant hour. Expect the installation to vary from 15 to 40 chilins. When finished, the process needs to turn in the main menu and select the item "reboot system now"

Android firmware via recovery_1 menu
- Yaksho V was put on the attachment menu TWRP That is, it is sensory and for navigation you can use your finger, pushing on the necessary points. Viconize in strict order of advancement:
Wipe, given Swipe to factory reset; (For what to turn around in the head of the menu)
Install, give add by downloading the file for installation, Yakiy Vee zazdalegіd transferred to the SD-card;
Pishov installation process. Check out your completion by turning in the head of the menu and natisnit "Reboot system"
- If the firmware will be re-installed and the phone will be locked into normal mode
IMPORTANT: If you are nasty, you need to know what you are and if you need everything, it is recommended to use the handwritten firmware and if you need help with the help of professionals, if you want to go without an attachment
IMPORTANT: Vdauchis to self-proclaimed attachment, see your fear and risik. Administration of the site and the author of the statty does not imply an opinion for the possibility of diagnosing problems on your outbuildings before the hour of installation
VIDEO: Android firmware without a computer
In which case is the Android firmware required? It is necessary, as long as you want to expand the functionality, get familiar with the gadget in the new "obgorttsi", give the robot a phone, if you do not go through the screen.
Installing the firmware on "Android" behind the computer's help
You need to add some money. Bazhano viconati zavantazhennya from the official site of the mobile extension store. It is necessary to respect that the program is safe for the singing model of the device. In general, there may be a problem with the installation. If on the official site every day is necessary for the program to be secured for any reason or not, you can know it as a custom on the Internet.
Is it necessary for the nobility?
First, proceed to the firmware of the mobile annex, after remembering and after getting started with a few rules:
The battery charge is not less than 80%;
you need to install the driver on the computer for the Vlasny attachment
neatly, if the Android firmware is broken through the power connection (it is recommended to use a laptop);
for the enclosure of an outbuilding from an unclear operating system, it is necessary to open a backup copy of the explicit software and data;
it is not recommended to install a USB 3.0 port during the flashing process;
it is necessary to familiarize yourself with the firmware before jumping, unique for new sites;
bazhano vikoristovuvati original USB-cable, which is included in the set with attachments.
After flashing, press the power on button of the device for about 15-20 seconds.
Fastboot
With the help of Fastboot, you can download the firmware of the Android tablet via a computer. For this, it will be necessary to add the Fastboot utility to the root of the system disk. As a result, go to the folder with a path to it C: \ Android. Besides, there are two objects: Tools and Drivers. The first one is to take revenge on the necessary programs, the other is the driver. You need to open the Drivers folder and install the drivers. When writing to the Tools folder, you need to transfer the locked firmware to a zip archive.
How long does it take to connect the device to the computer with a USB connection. Then the command line (or cmd) is displayed and entered without the paws "cd C: \ Android \ Tools". After switching to the directories of the central folder, enter fastboot devices. I will write the code for the attachment. As soon as it is not, it means that it is necessary to unblock the Bootloader, so that the OS is given about the memory card memory, operational memory, and the kernel. In addition, he is responsible for the process of securing the operating system. In such a rank.
Yaksho bootloader is not rozblokovuvati, reflash prist_y not vyde. It is necessary to realize that in the first release of the device there will be a guarantee. True, it is possible to visonati blockade anew, if such a need appears. Slid to brutal respect and to those who unlocked erasing the whole instead of the apparatus and pictures of memory. It is also recommended that you make a backup copy of your internal memory and SD-picture before you create a backup copy.
rozblokuvannya bootloader
To unlock the bootloader, you need to do the following:
1. Turn on the mobile attachment.
2. Connect it to the computer and press the on button one hour, as well as offend the keys.
3. On the computer, the command row (or cmd) is displayed, in the yak it is necessary to enter "cd C: \ Android \ Tools" without paws.
4. Enter the fastboot oem unlock command.
5. Change again with the fastboot devices command.
If you replace the code with a Manual waiting for device, then change the driver and replace the USB cable. As a knowledge device, you need to enter the command: fastboot update I will name the zip file. If the firmware is going to be a Viconan, try to reload it.
Flashtool
First, install the firmware on Android for an additional computer with Flashtool programs, if you need to install the operating system in ftf format. Then you can restore the utility. The downloads of the file, the indications for flashing, must be placed in the Firmwares folder, distributed in the directories of the programs. Start the utility to start playing. Then it is necessary to press the button with the blinking icon, as it is located at the upper left codend, to override the point on Flashmode.
Then the file of the operating system is known from the transcript for the attachment. On the right, there are signs on Wipe User Data and Wipe Cache. For a small ochіkuvannya, it appears as a window, de-take instructions for connecting the phone. Having brought it to the computer, it is necessary to press the power button down immediately. If the program has access to it, the process of automatically flashing the phone will be repaired from the computer's windows. "Android" will get up to finish the shvidko, literally clean up the decilkoh chilin. After completing the process, turn on the gadget and go through the initial setup. The Danish version of the installation of software security is installed in one set.
Vikoristannya special programs
A large number of mobile devices developed special service programs. One of these is the software update for Fly smartphones. Vono allow me to streamline the operating system and firmware "Android" Fly-smartphone behind the help of a computer. Some of them need to be added and installed. Then the program will propose to bring the device to the computer.
It is imperative that the USB service is active. In the first place, it’s quick to help you utilize it, as the visconate can allow it. Then it is necessary to natisnut "Install the driver", connect the smartphone, start the program. If you want to, you will need to click on the "Revision update" and vibrate from the presented model. On the screen, you will see a window with information about the security program, if you need to read "Post a security" and follow the recommendations. Check out and іnshі utilities, scho allow you to install the firmware on "Android" through a computer.
Recovery mode
In this vipad, you can also reflash a Vlast device. For tsyogo vikoristovatsya mode Recovery. You need to link the operating system and transport it to the SD card. The firmware is given to work without a computer. To install a new operating system on the phone, you need to go to the engineering menu or the Recovery mode. A little bit of it is necessary to vimknuti, then press down the button of liveness and soundness down at once.
I'll look at the version of "Rekoveri", such as:
- in the standard version it is necessary to apply update from external storage;
- for the TWRP version, click on install ZIP;
- for version CWM - apply update from sdcard.
If the firmware of the Viconan is successful, you need to be able to re-install the smartphone and go through the initial setup. I tried all possible options, but I could not enter the "Rekoveri" mode, which means that the function in the device is turned on anyway.
On the other hand, there are a few important moments, so you can save your nerves when installing the Android firmware. Persh nіzh viconati is given by the operation from the computer, it is necessary to connect the backup copy of the data. For the whole, you can choose special programs from the official or unofficial retail store. In such a rank, the system can be updated at times, if the flashing did not work. To carry out all the steps, you need to press the on button for about 15-20 seconds. If the prism does not turn on, you can wipe out the battery, and then insert it again. Then you need to turn on the device again. As a rule, a flash card will require a format. It is necessary to change it to the computer before carrying out the firmware procedure.


