Crafts from colored paper without glue. Colored paper crafts
Such a flower is able to quickly transform the room, decorate a banquet table. You can twist a few roses and make an artificial garden of them.
Show the child how to make roses with your own hands using one of the easiest ways. For such a craft, you will need only 4 things:
- colored paper;
- pencil;
- scissors;
- stationery glue.

Here is such a wonderful rose from paper, with your own hands or palms of the baby made, it turns out.

Soft thin paper is also wonderful wonderful artificial plants. That's how to make corrugated roses.
Before starting to create, prepare:
- corrugated green and red paper;
- isolate or glue;
- wire;
- wooden wand.
To facilitate the work on the manufacture of petals, fold the paper several times a pile. Then you immediately make several items, and you will not cut one petal.
Draw on the top sheet of a stack of heart, cut the petals on this contour. They need to give the volume, for this it is necessary to put the thumbs of both hands with the right and left side of the petal, press. Now every workpiece needs to wrap the left and right edge. To do this, bring the item to the stick, tighten with this simple device one and the second top edge of the petal back.
Enroll the stalk with a strip of green corrugated paper, at the same time lining it. Cut the paired blanks for leaves from the same paper. Put 1 sheet on the table front side down, lubricate the withdrawal with glue, place the wire here, and on top - another workpiece of the sheet face up.
This is how to make a rose from corrugated paper. Next. Take the stem, lubricate it with glue, wound the first petal on its top. Low part of this petal Lubricate a small amount of glue, wrap the second petal. Thus, make the whole flower, lining the petals.
From the green corrugated paper cut the strip, with the help of scissors, make one longer side of the zigzag. Screw this element on the bottom of the flower, having it to the cloves to the bud.
Mastery fan do it yourself
It can also be made of paper. Such a device will be useful when it is hot and make such a useful thing can be literally in 10 minutes.
If the child is small, then show him a simple manufacturer. For this, he will be needed:
- colored paper;
- curly holes;
- satin ribbon;
- glue.

Here's how to make a fan of paper baby. Older child can use a more complex option. Here are what materials needed for needlework:
- a4 paper sheet;
- scotch;
- wooden sticks;
- beads;
- rubber.
To make a handle of a fan, for which it will be held, screw the tape for a width of 2.5 cm. Also with this adhesive tape attach wooden sticks to the right side. So that the fan can be folded, cut off the strip of the desired length from the gum, slide beads on it, tie two knots. Put the gum on the bottom of two wooden sticks.

This is how to make a Japanese-style fan.

How to make a turntable?
It also manufactures from a very affordable material. If you show the baby, how to do the turntable, he will gladly deal with an interesting needlework.
Look at how much different options Such windows can be.

The child will like to play with the turntables, and you can accommodate them in the country, decorating the country area.
For the manufacture is taken:
- a leaf of double-sided paper or two one-sided, 14x14 cm in size;
- bamboo sketch;
- beads;
- awl;
- wire;
- ruler and pencil;
- pipes for cocktails.

If you have two sheets of one-sided colored paper, glue them with the irons with each other. It is better to understand the principle of creating a product to help you.

Let the child, with the help of the line and pencil, will draw a square sheet of paper diagonally. Then, not reaching the center of 6 cm, will cut through these lines.

Next stage of work Take on yourself. Take a sequel hole in the center, as well as upstairs, through the corner. The diagram is drawn, which areas need to be treated in this way.

Now the child can take up for work, which you explain how to make the turntable further. Let the wire wand on the wand, hesitates a bead that is used as a limiter.

After that, the wire must be returned to the central hole of the paper square, on the other hand, fasten with the help of beads.

It remains in turns to wear on the tip of the wire edge of a paper square and fix these blades beads. Watch that they do not drag the main element, and he rotated well.

If the child easily mastered this technique and wants to know how to make an eight-blade turntable, tell me that it is manufactured using two four-oddable, but the grooves are made in a slightly different way.

Focusing on the diagrams, cut two such blanks from two square sheets and insert one to another.

The diagram shows where to make holes in the center and at what upper edges. Do openings, secure the turntable with a wire with a wire, focusing on the previous description.

The purple of the paper in the form of a flower is also beautiful and fulfilling its functions. It is also cut out of a square leaf with sides of 14 centimeters, only the edges are made by semicircular.

Looking at the scheme, it will be easy to make internal slits, beaten these elements as shown in the photo.

If you want to return to the flower theme, find out how is the Sakura branch made from paper, read it right now. Stopping it necessary, you quickly create this elegant home decoration.
Sakura branch with her own hands
She will resemble Japan in the spring and never starts.

So that blooming Sakura settled in your home for a long time, this is what is needed for the manufacture of exposure:
- corrugated or papyrus paper dark and light pink color;
- glue pistol;
- dry branches;
- scissors.

Now take a darker flower, put a light pink on it, shifting it so that the lower contrasting petals can be visible. Drip to the center of a little glue, hands in thin rubber gloves click on this place. Slightly doubts so that the Sakura flower looks like a real.

Now take a dry branch, revive it by sticking the workpiece.

You can make a small deepening with a knife, glue the flowers there or climb them with a floral ribbon or tape tone.
Here is such a beautiful blooming Sakura with you from paper. You can make not only one or more branches, but also a whole tree. If there is little place in the house, make it small. Such an ornament will perfectly fit into the room and will remind you in the spring even in winter.

Sakura branch may look different. For such flowers are made somewhat in any way. At first, 6 large petals are cut out of the bright pink paper, from the light pink as much, but smaller. For such a craft, you need another yellow paper, stamens are made of it. Cut the circles from it, put it with a fringe. Stick them upstairs into the center of the flower.

Sakura branch can be decorating a large space. For this, the flowers are glued onto the wall.

If you like the desktop option more, then think about what you put an artificial branch.
Paper vase
In such a beautiful container, the composition will look great. It can be used in direct purpose - to fill with water and put live flowers.

For this useful work you will need:
- corrugated or ordinary color paper;
- glass jar;
- scissors;
- pVA glue.

Secondly and each subsequent glit slightly above. As a result, you will have a beautiful paper vase.
Such can make it possible to make a child of kindergarten. He will be interested to know and how to make a vase with his own hands, so that it turns out this original.

In it, Sakura branch will stand and look perfect. For work, use the list of the following materials:
- cardboard pipe;
- unnecessary newspapers and magazines;
- pVA glue;
- transparent lacquer fixer;
- cardboard;
- golden tint;
- paint.
For the base of the vase, the cardboard tube of medium diameter is taken. It can be bought in a construction store or make independent of 2-3 sheets of cardboard, twisting and gluing them.

- Depending on how the height is a vase from paper, you caulate a cardboard tube in such a height. Put her bottom on a sheet of cardboard, circle a bottom and cut it out. Attach this item to the bottom of the pipe with super-glue.
- From the old newspapers and magazines, cut the strips, turn each in half, twist in tight rolls, lubricating parts by glue, so that they do not spin.
- Plue the outer surface of the cardboard pipe, including its top.
- The gaps between the details fill in beads, beads, buttons or beans.

When the glue dries, start decoring the paper tool. To do this, first cover her scarlet paint, let it dry. Then apply black and immediately after that, without giving dry, erase excess with a sponge. It is only needed for toning.

That's how to make a vase with your own hands on. When the paint is completely dry, cover the product with translucent golden paint. When it snacks, apply to the surface in 2-3 layers of a lacquer fixer and leave dry. After that, you can put in a vase Sakura branch, dried flowers or decorative grass.
That's how much useful can be made from cardboard and ordinary paper. At the end of the article, as always, you are waiting for interesting videos on this topic.

Probably all schoolchildren love to make crafts at school and at home. It is worth saying that a wide variety of materials can be used for crafts. But quite often schoolchildren crawl crafts from cardboard and colored paper. Why does this happen? Yes, then that's the most best MaterialWith which it is convenient to work. Today, our article will tell you about what crafts from paper exist for schoolchildren. You will definitely like these crafts and you probably want to do them for some holiday or just for a good mood.
Simple crafts from paper for schoolchildren
Appliques.
First-graders and students primary classesOf course, you will not be able to make sophisticated crafts. And the teacher must offer them to make lighter crafts. For example, you can make pretty applications that the guys will be able to give their moms or grandmothers. Appliques can be a lot. You should simply include your fantasy and try to do something unusual and at the same time pretty. Appliques are very easy to do. Just see what beauty can be created with your own hands.


Colored paper figures.
If you wish to see, all crafts are paper for junior schoolchildren, then this article will help you to do. In addition to appliques from paper, you can make cute little animals. However, in this case, for decoration it is worth using additional details that will mimic eyes and other parts of the animal face.


And if your child is not a first grader, but only going to school and it is difficult for him to cut all parts smoothly, then print a pattern for it.

From stripes of colored paper you can make caterpillars. To do this, use a bright colored paper And create such interesting crafts.

See what funny chickens you can work out of bright colored paper.

Colored paper flowers.
And to make such a wonderful craft you need to work hard. However, you will definitely like the result. And if you like this idea, then we will tell you how to make such a cradle.

Progress:
- First you should prepare several sheets of colored paper.
- After that, in templates it is worth cutting large and small flowers.
- As soon as you picked up for each large flower a couple, all the details are planted on a flexible and solid rod. On the reverse side, the flower on the stem should be consolidated so that in the future he does not fly away.
- And so that your paper flower has become more prettier, it should be sprayed with spirits.
Paper - Popular material for children's creativity. It is easily amenable to the most incredible reincarnations, thanks to which even the most inexperienced children can make crafts from colored paper with their own hands.
The main thing is to choose the task for them.
So, for children for 3-4 years, crafts that do not require jewelry possessing scissors are available, the skills are especially gentically handled with glue and a big perfection.
You can make a fish from cardboard and revitalize it with rings of dry breakfast and bulk eyes.

Here is such a fish with scales we got out!

You can decorate paper fish with pieces of colored paper and foil.

Owl of paper
From the ready-made kids templates can glue the owl.

It will only be left to decorate her tummy prints with bright paint, for which you can use any remedy.

Applique "Owl" - ready!

Cow from paper plate
As working with ready-made templates, the exercise is well suitable - from a disposable plate. Cut the cardboard details in advance: the muzzle, ears, stains, cook eyes.

Billets for crafts "Cow"
It remains only to show the child how to glue all these elements to the base.

Pieces of paper in the nest
Interesting to children hand drawn in the nest. We make a nest of paper molds for cupcake and decorative chips.

It remains to glue the keyboard and eyes to the body template of the bird and settle it in the nest.

Crafts "Birds in the nest"
Applique "Bird"
You can make a bird applique and without a nest. I cut it in advance to her body, paws, keyboy, eyes, wings and decorations for breast.

The child remains to glue these fragments.


Applique "Bird"
If you use such an option to craft from colored paper for children 4-5 years, then kids are proposed to cut all the details on their own. At this age, they can already cope with such a task, as well as make many other interesting products.
Paper and yarn spids
For example, a funny spider of black paper. You only need to cut two fusion parts of the head and abdomen, glue the legs from yarn between them.

We supplement the spider with big eyes.

Mouse from paper hearts
Or mouse from hearts. A large heartfelt, folded in half, becomes her body, two hearts of different colors, glued together in another - ears.


It remains to stick the fluffy nose from small stripes.

Printe the ears and factory eye mouse. Our mouse is ready!

Paper chicken and cockerel
According to the same principle, a suit for theatrical production is made - for example, a rockey rush. The wings and cunning church are becoming circled into cardboard and carved contours of the baby's palm,

taurus make in the form of a silhouette of a matryoshki.

Head and body "Ryaby"
It remains only to glue the beak, eyes and paws from paper harmonica.

From colored paper you can make a very cute rooting with harmonic paws.

Penguin of paper
The contours of the palms are convenient to use to create a "Penguin" appliqué - they become the legs of this cute bird.

Supplement toy eyes and bright scarf, carved from felt or drape.

Volumetery paper "Girl under the umbrella"
Paper, folded by the accordion, can be used to create a craft "Girl under the umbrella".

We form a fan from it and glue it to a postcard above the girl's image.


When the postcard opens, the girl turns out under the umbrella. Autumn handicraft handicraft!

From paper harmonica, not only an umbrella can be made, but also a beautiful bunch:
Rainbow from colored stripes
The first option of their manufacture is the use of paper strips.

For example, strips of different shades are easily turned into a bulk rainbow.


The sun and tuchka will close the tape and give the rainbow a festive look.

Red Paper Apple and Cardboard Roll
From the red stripes and the cardboard roll will be an appetizing apple. Cut the brightly aluminum paper on the strips of 1.5-2 cm wide. We glue their tape to the inside of the cardboard roll in the upper and lower part.

First we glue four stripes opposite each other.

Then we stick between the strips another one. Glit to the apple stalks and a leaf. Apple - ready! An even more spectacular handicraft looks, if you pre-paint the cardboard roll in red.

Apple Tabs of paper and cardboard roll
From colored paper and a cardboard roll can be made a wonderful tree. Cover green paper with red spots.

Make cuts on a cardboard roll and spread them.

Famming green paper with red spots and gently glue it to a cardboard roll. We will have an apple tree with picturesque apples.

Craft paper "Apple Tabs"
From colored paper and cardboard you can make a very expressive handicraft - "Autumn tree".

And from yellow strips, glued in a circle to a paper filter or disposable plate, it turns out a bright sun.


We decorate the sun with a mumps of a crumpled colored paper, fixing them with plow glue.

In the center - mint paper
You can bind to the sun thread and hang it.

Paper balloon
Bright and cheerful handicrafts from paper - "balloon". For its manufacture, we will need five blanks with a carved balloon.

We need to glue the folded halves of the workpiece with each other around the rope is a future balloon. Now make a basket. For her, we need to fold the bar of the cardboard around the bar and glue small ropes to its edges.


Decorate with a basket with colored circles.

Frogs from a cardboard cell and paper
No less attractive frog will result in two cells from packaging from the eggs. Collect them and tighten your scotch, we glue the tongue and eyes.

Decorating the frog with a butterfly tie and crown - and it turns out a real prince!

Paper crafts glued rolling
It is interesting to look for crafts made of colored paper glued in the form of cylinders. Connecting these cylinders with each other, you can get different characters - we will rush, ducklings, chicks.


A touching yellow chicken is obtained from glued rolls.

Paper rolls can be folded a small bird.

From paper strips, you can make a very spectacular pendant pendant.

From paper you can make a very beautiful ross. To do this, it will be necessary to cut a circle from red paper. In the circle draw a pencil spiral. Cut the circle on the helix.

Then you begin to twist the spiral from the edge, forming a bud.

Volumetric multi-layered paper hearts
From a red thin paper, a charming heart suspension can be made. Cut from fine paper at least nine hearts.

We fold the hearts together and flash them on the typewriter.

We are crawling. Colored paper hearts - ready!

Paper Crafts on February 23
A very beautiful craft of colored paper can be made on May 9 or the Day of Defender of the Fatherland. Cut red paper stripes and fold it twice. In place of bend we make cuts. Roll off the workpiece into the roll - we get beautiful flower. The bottom of the flower is rewinding with green paper. We make three such flower.

We fold the star from the red paper.

On the round base, we glue the flower, stalks, a St. George ribbon and an asterisk. Our craft is ready!


From ordinary colored paper it turns out a very beautiful caretaker for the day of the protection of children.

Here are so different, in their own interesting paper crafts for children can be of different ages. Improving its color handling skills, the child will get the opportunity to create more and more complex characters, thanks to which this material for a long time does not lose its relevance.
See more wonderful ideas of paper crafts:
Good and a bright day! That's very soon in a month, the first flowers will appear, I suggest that it is not waiting for and to make alone flowers from paper. After all, it is possible and without reason to give such lovely gifts of nature, well, if you need a reason, do not forget to congratulate your moms, grandmothers from March 8 or with the Mother's Day, because these days are always given such crafts.
Let them be paper, but they can be so cool and super present that they will look even better than living, and even more so it can be on the table or on the shelf one year. And this certainly pleases. Take a look at this picture, like? If so, then I showed stages as you can do.
In my opinion, today's topic will always be popular, because it is the most beautiful and gentle souvenir, which you can give to any holiday. So I suggest you freeze for a long time))).
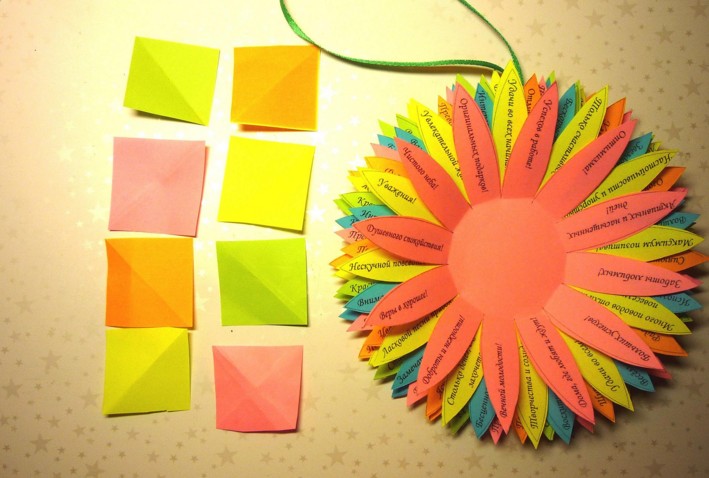
Unreally beautiful and original souvenirs that carry something unusual in themselves. I suggest starting with the most seemingly simple option, but whom, who you just look. This is a chamomile, but not simple and not fabulous, but with wishes, how nicely such will give, you do not find?
Moreover, you can download ready-made templates directly from this site and print on the printer. This is a very cool souvenir that hooked anyone. You can give it to any holiday, for example, for a birthday or on the day of the teacher.
We need:
- office sheets of different colors - 5 pcs.
- glue stick
- double sided tape
- rhinestones
- templates
- satin ribbon
- scissors
Stages of work:
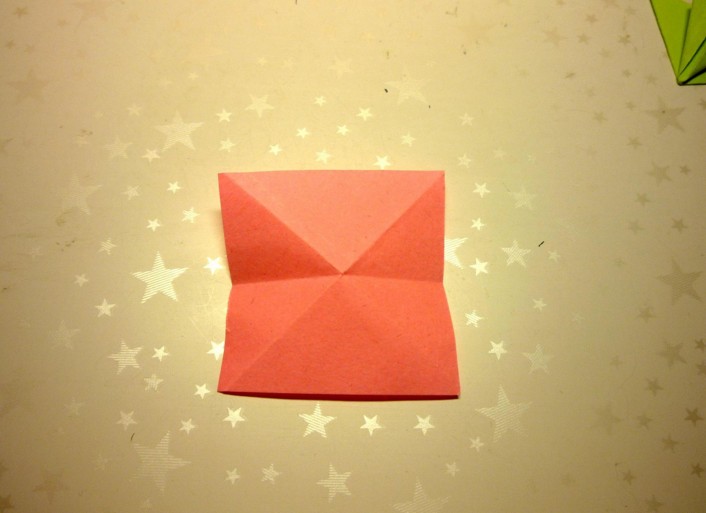
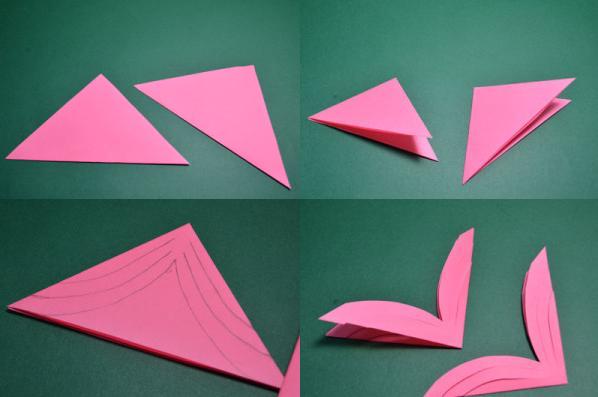
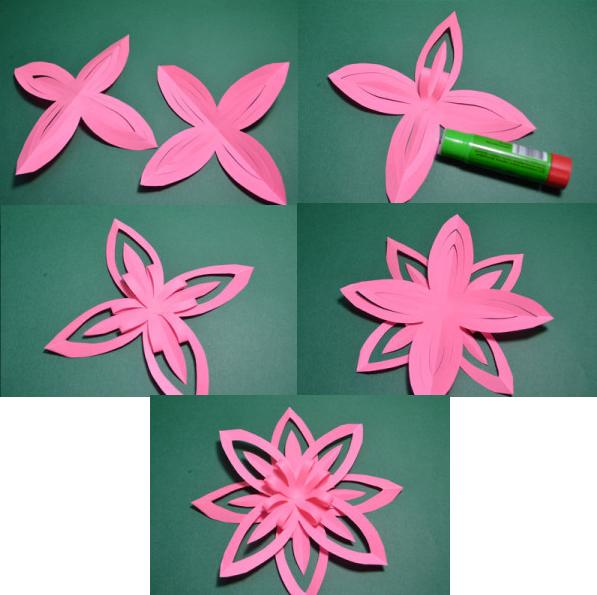
1. Start work with what you need to decide on the flower shape. I suggest to take such a seven-family flowers. Print on the printer of the workpiece. The first pattern will be the same as in this picture, everyone else I send you to your mail, just write down your comment below (there are 10 of all 10), or you yourself can come up with your words or messages.

2. Here they are handsome, now take the scissors, or you can use the stationery knife and cut down the contour.

3. These are cute and cheerful blanks will turn out.

4. Cut the circle from the cardboard with a diameter of 5 cm and put the first flower and a ribbon from the atlas and in the middle of the glue or lubricate if you use a pencil. So gradually stick everything.
5. Now it remains beautiful to make a sir. To do this, take the square, approximately 3.5x3.5 cm. Bend it like this.
6. Then make a triangle, as if you make a frog.

7. Generate ends forward.

8. These butterfly will turn out.
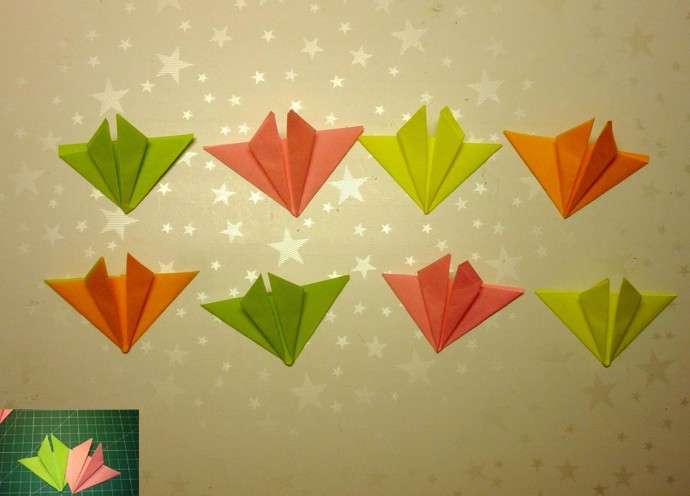
9. Which will only be connected, glue with each other, and make a middle to put something interesting, such as a bead or rhinestones. Very original and unique craftsman turned out, she will definitely enjoy the one for whom you did it.

The most common and easy especially for children is the flower of eights using holes and butt.

Undoubtedly, the king of all colors are roses, how to do them, if a honestly great many options. I somehow write about this in more detail. And now take a masterpiece as a basis.

Or such a sample, you need to draw 5 colors from more to the smallest, and then arrange this case in a vause.

Many of you I know will look for roses, because it is these flowers to be given in most cases. Well, here's the first briefing. Take corrugated paper and make petals out of it. First cut the strip, then fold it with the harmonica and round the edges. After that, you should turn on the stem, which can be a wand or something like that.

The wand also reaplates the green corrugation.
You can make such a wonderful creation from ordinary paper, but it is better to use a fixed paper or corrugation. Draw the spiral yourself in a circle, rush with a knife, and then screw the pencil or knitting hook.

Or use this usual scheme, this can be done in 5 minutes.


Their stages of work are absolutely simple. Remember how in childhood they did bookmarks, the system is approximately the same))).

Flowers themselves can also be spinning so that it looks more interesting, as if dismissed at the present.

In general, some of the paper are quite a lot of models, you can compose and do, the main thing depends on what the petal will be in form.

Notice these features themselves, and you can make dahrits, chrysanthemums, dahlias, and even cloves, take a look at the following pictures. You see patterns of petals for cutting.


Or do you prefer lily with peonies?

And what is this flower? Guess?

In the form of brook, you can make such a charming).

The first to know the snowdrops with us are well known. Moreover, you can make the flowers themselves from pumpkin seeds.

And of course, I could not pass by Foamyran, use this material too.

Followed by them dandelions. Make them from ordinary napkins using a stapler.

This is such a bright option, will also be an excellent solution to surprise everyone.

I resemble asters.
This species conquered me at all, I fell in love with him at first glance. Really look like a lively or real dahlia.

You can make a primer. You will need squares from which you need to make figures similar to triangles.

On the other hand, also turn out to be a triangle and petal for future bud. After glue them with each other. Make stem and leaves.

Great looks like the following option, as if real.

We make crafts from sheet A4
Not so often, but still you have to make such products from ordinary large sheets. Of course, such luxury crafts can be used anywhere, especially well they look if you are decorated with walls or hall, i.e. are used in the interior of the premises.
Each sheet is a large petal that you have to color in the desired color.

Large colors can be made in the form of roses. Initially, you will need to use the template.

And then gradually perform all the steps.
Video about how to make paper flowers easily and fast
You will not believe, but you can simply just twist a chic bouquet in minutes, see this video and you also learn this interesting lesson:
Master Class for Folding Paper Tulips
We all ever in childhood folded different figures and used origami. I remember in the lessons of labor I really liked this lesson. Tulip is usually performed using this technique. It turns out volumetric and similar to the original.

You can also make an open bouton.

Or take as a basis another idea of \u200b\u200bcorrugated paper, hide the candy in the bud. No one will give up such a gift, it's certain!

And now such a magnificent idea with disposable spoons. Such a gift can also be presented for the birthday and even for the wedding.

Stages of work:
1. Prepare everything you need to work, all components are depicted in this picture.

2. From corrugated paper, cut the scarlet rectangles and then wrap the spoon to turn this material, as if driving a slightly scrubbing.

3. What does it seem? Of course on the petals.

4. Missing the chopper with green paper, while putting together a spoon to each other (4 pcs.) So that it turns out the stem and bud. Then cut down a certain shape of the leaves.

5. Subscribe to a pot or a cup. You can tie a bow or some other pattern.

Step-by-step instructions for beginners how to make a flower for mom
Now let's learn how to make the easiest option, because for someone the previous ones will seem very difficult to help then this gift will come.

We need:
- square paper paper - 2 sheets

Stages of work:
1. Take a sheet and fold it in the pressure to get a triangle. Then again.
After drew such semicircular lines, as you see on this illustration. Sample cut and follow further instructions.
2. Expand, open the workpiece and glue a couple of strips to the middle.
This Varaint is suitable for the smallest, for example for preschoolers.
But with schoolchildren can be done more difficult. The meaning is the same, only the petals bend and glue differently.

You can also make a red poppy or take another color, but there will be more wire for this work.

I am very in love with Astra, and you love them?

Want to know how such you can do?
We need:
- journal Old
- scissors
- sticks for kebabs

1. Disassemble the log on the pages, turn each page in half, then again and once again.

2. Take the scissors and cut the grass. To get a fringe.

3. After this charm, screw the wand.

4. After that, wait the product. Wand laid green paper.

Something similar can be done by a teacher or such as a toet or native grandmother.
1. We also need napkins and corrugated paper, plus it will take another cup of disposable or a jar from under sour cream.

2. Since the flowers will be large, you can do and smaller, take the napkin and fold it in half, then still in half, and again. The middle will be built with a thread or stapler.

Cut the petals with scissors, give them the form.
3. Now prepare a glass, plunder it in the corrugation, inside the crumpled newspaper or unnecessary paper, cover the corrugation and release as if the grass.

4. The blanks should be 10-12 pieces, it all depends on your abilities.

5. With the help of glue, please add the resulting flowers to the base. Quite modestly, but at the same time bright and stylishly, such a present will make any, especially women or girls.

Learning to make bulk flowers
Of which they do not make such crafts in our time. Even adapted for this work molds from under eggs. For me, this is a shock, like when to whom it could come, but it came, and conquered everyone. First, it looks unspoertering, and then it turns out awesome masterpieces.

Color paint paint, dresses on a wire or wand.

A wonderful souvenir, as they say from the girlfriend and won as beautiful and happening.

Such volumetric colors, you can agree quite easily and quickly decorate any interior of the room or hall, make it irresistible and unforgettable.
You can still use such a chic floral garland.

After that, every workpiece is dressed on the line or on the thread.

From paper kules, you can also make an unforgettable creation.

Using the Origami equipment can be folded, and then glue parts.
And the coolest volumetric view that I really liked and I advise him to do everything, so this is like this:
Love Calla? Then take this master class for yourself.
You can even make a masterpiece from ordinary newspapers.

By the way you can even make pansies together with children.

An interesting idea of \u200b\u200ba rose gift with candy
Once I showed you how you can make roses and hide candy in them, remember? Now look what a chic bouquet turned out, and we presented it for Valentine's Day, if you forgot, I remind you.

I also give you to help this scheme.

You can easily go through and use step-by-step instructions.
Or take advantage of this video, without roses it is not to do without ...
I have everything on this, I wish you inspiration and excellent work. Come to visit me more often, join me in a group in contact, write your feedback and comments. Good luck to new meetings! Until!
Sincerely, Catherine Manzurova
One of the most common materials for children's creativity is paper. Crafts from paper for children are one of the entertaining classes for both children and parents. Joint creativity unites and develops creative abilities.
Work with paper:
- develops in children a small motorcy;
- contributes to the concentration of attention;
- develops imagination;
- forms artistic taste;
- develops the eye meter;
- stimulates the development of memory;
- activates mental processes;
- develops patience;
- promotes the creation of game situations.
There are all sorts of techniques for paperwork:
- Applique. It can be punch or cut, flat or volumetric, paper or napkins.
- Quilling is one of the types of appliqués. Figure is applied to the base of thick paper. The image is filled with elements from the narrow paper strips twisted.
- Mosaic (from French: folded of pieces) - Applique made of geometric figures.
- Papercoplasty - art modeling from paper.
More articles with instructions for creating all sorts of crafts do you find in your own hands on the site - myhobby.guru
Crafts from paper for preschool children
From an early age, children like to do lungs dIY DIY Especially out of paper.
Butterfly
Butterfly 1.

With such a craft to cope and two-year-old baby. Of course, without your help can not do. Paper sheet fold in half and draw a butterfly half. The shape and size of the wings can be chosen any. It is desirable to do a big butterfly.
Then the butterfly is needed cut and deploy. Give your baby paint paint for drawing with your fingers and let him cubs one side of the butterfly. While the paint did not dry, fold the butterfly so that the unpainted part lay down on the painted. Press and expand the butterfly, let it dry.
Such a paper masterpiece can decorate your baby's room.
Butterfly 2.
 You can make a butterfly from fingerprints of children's handles. This craft can be done with a child of 3-6 years. For this, you will need the following materials:
- sheets of colored paper;
- white cardboard sheet;
- scissors;
- glue;
- marker, felt-tippers, blasting, stickers and other elements for decorating butterflies.
On a colored sheet of paper, a simple pencil circle the contours of the right, and then the left palm of the baby. Cut the resulting templates twice. It turns out four wings palms of different colors.
Shift on white list Cardboard Carved Wings. On the colored paper, drew oval for the bowl of the butterfly. Let the child neatly cut it off with scissors and glues the connection of the wings. Butterfly eyes can be made in a different way: Draw a felt-tip pen or stick two small white mug, in the center of which marker put points. You can also stick ready-made eyes. Draw a mustache and mouth.
Offer a child to decorate the wings of the butterfly. Let the baby shy fantasy. For decoration, you can use glitter, stickers, or just drop felt-sauers.
Mom will definitely keep this paper butterfly with her loved baby's palms.
Butterfly 3.
To make it your hands this beautiful, paper, air butterfly The following materials:
- paper (thin or napkins, ordinary color or for origami, can leaves from a glossy magazine);
- wire or thread;
- scissors;
- brilliats or other materials for decoration.
 Draw on paper two squares 10x10 cm and 8x8 cm. In the future, the size of the squares can do any. So that the butterfly looked beautiful, the square for the upper wings do 2-3 cm more than the square for lower wings.
Suggest the child to cut these squares.
One square you fold on the diagonal "accordion", and with the second let it make a child. The width of the folds can choose any than the folds, the magnificent it turns out the butterfly.
The obtained wings blanks press the hairs to each other and secure, tapping them thread or wire.
The abdomen, head and mustache can be made of paper, wire or beads. With the help of scissors, the wings can round. The resulting butterfly is an elegant handicraft that can decorate the kid's room. Even more effectively, she will look if you decorate it with glitter or other decorative materials. The calet is suitable for any competition in kindergarten.
Mosaic Applique
 This type of craft will be interesting for children of any age, although a three-year-old child will cope with this work. The following materials will be needed to create an applique in the form of a mosaic:
- rectangular white cardboard sheet;
- colored paper;
- scissors;
- simple pencil;
On a white sheet of cardboard, draw a simple pencil of the contours of the fish, a mushroom, a sun or another simple object that would have inside enough space for gluing mosaic elements.
From the colored paper, cut the strips of about 2 cm wide. Then from these bands, offer the child to cut small squares, triangles or other geometric shapes. With the elements of the mosaic, let the child put the inner space of the drawn figure. In this case, glue the elements of paper mosaic is needed close to each other. This craft can become original gift Mom or grandmother.
Volume Applique of Lady Cow
 This crawler will be able to make a child 4-5 years old. The main thing is to correctly tell the baby a sequence of actions. It is even better if you will do this crawler with him, showing how to properly perform each action.
First, prepare the circle patterns with diameters of 10 cm, 5 cm and 1 cm, colored paper, white sheet of cardboard and glue.
Let a child with a template draw two large circles on a red sheet. On a black sheet of paper will circle one big circle, one smaller and 6 small circles.
With your own hands with the help of scissors, let him cut all drawn circles.
Now in the middle of white cardboard passes a large black circle - torso. The circle that is smaller, you need to stick so that it goes a little on big. It will be head.
Now let them decorate the wings with black little circles, gluing them with glue.
Having learned to make such a crawler, the child can diversify his work, settled by God's cow on a leaf or flower.
Paper crafts for young school children
Noseged bookmarks

This exercise is done very easily. A preschooler will cope with her, but it will be especially nice to the first-grader to make such a bookmark for its first textbooks.
For this, the following materials will be required:
- color cardboard;
- scissors;
- line;
- silenutic (fluffy) wire;
- glue;
- eyes.
From the sheet of color cardboard cut the rectangle 6x12 cm.
Return from the sides of the one and a half centimeters and spend two parallel segments of 8 cm long. For the outlined lines, make scissors.
The middle strip will serve as a nose. At the bottom of it with a simple pencil, draw the rounding and cut down with scissors.
Now glue the eyes (if not ready, you can draw them).
At the top of the head hole make one or two holes. Skip the cinema wire through them and give it the shape of the roe or mustaches.
Showing the fantasy, the child will be able to make bookmarks of different shapes and sizes, as well as decorate them at their discretion. The main thing should remain unchanged - this is a long nose at the bookmark.

Special delight of younger students cause volumetric toys from paper. Make them easy. You need to print templates, cut them and glue. Children like it very much. And then they gladly play the toys that did them with their own hands.
Here are some schemes of the heroes of favorite cartoons in the style of Pencraft.
PopperKraft Schemes


Paper crafts for middle school children

For children average school age It will be interesting to make a puppet toy with your own hands. For the manufacture of one toys need:
- a roll of toilet paper;
- rope or twine;
- two covers from plastic bottle;
- awl;
- scissors;
- glue;
- wand (control bar);
- acrylic paint;
- leske.
To make this craft you need:
- Orange paint paint the lids and a roll of toilet paper.
- For hands and legs, make a selection of four holes on the sides of the roller.
- In the center of each lid make a shill hole.
Cut two small ropes of the same length. At the end of each of them, tie up the nodule. From the inside of the roller, to turn into a hole for hand free ends of the ropes and tie a nodule at the ends. Pens ready.
Similarly make legs. Only ropes need to be cut off the chains and ends into the hole of the covers, fixing them with the nodule.
On a sheet of paper you need to draw the head and tail of the fox. If you do not know how to draw, you can use the template, decorate their paints and cut. After that, glue them to the handbound.
Now it remains to tie to the legs and head (rolling) on \u200b\u200bthe fishing line and consolidate them on the control bar.
Origami Lotos.
 This simple I. original craftMade with your own hands, children can give mom or grandmother. You can simply make it both at home and at school.
For the manufacture of lotus, paper for the origami of green, white and yellow colors will be required. Scissors and durable threads or wire.
Cut 5 rectangles 7.5x15 cm of green color and 10 of the same rectangles white color, as well as 3 rectangles of 4x10 cm yellow color.
We will analyze how to gradually collect the lotus flower - this wonderful craft of paper.
Fold a green rectangle along the long side in half. Take the paper and start the triangles to the center from the same side.
Alternately, both long sides bend to the center.
Make 5 green blanks.
Now the white rectangle fold along the long side in half. Turn up the bend up and lower the triangles as it was fed in a green rectangle.
Long sides bend to the center, then bend in half. Must get a boat.
All actions repeat with the remaining white leaves.
A yellow rectangle fold along in half along and once again.
Scissors cut into narrow strips, but not to the end, so that it turns out the fringe. These will be stamens. There will be three such blanks.
In the video, step by step is shown how these fakes are made.
Now you can collect a flower. Green blank folds in half and alternately put on it two white blanks. Top of fastening yellow tuchinka. These actions repeat two more times. As a result, you will receive three sets, each of which consists of green, two white blanks and stamens.
Collect the two remaining set by the same scheme, but without the stamen. Now collect the workpiece. First take a set with stamens, then without yellow stamens, again with stamens. Put the resulting sets on each other, alternating sets with stamens and without them. First take a set with yellow stamens. All these billets in the middle associate whether the wires are latch. Now billets break to the sides.
Collect flower Start from the stamens. In those petals where there are stamens, bend them so that the "tails" watched up. Now get the upstairs and straighten the white petals through one. It turns out the first row of petals. Collect the second row. The remaining petals also get up through one. The number of the number is performed similarly to the first and second.
Love up the last row of petals. And in conclusion, straighten green leaves. Here is the ready your original lotus.


